
Unleashing the Thrills of Motorcycles
Crafting the Ultimate Ride: Personalized Motorcycle Frame Design Guide
Revving up the engine, feeling the wind against your skin, and the open road stretching ahead – nothing captures the essence of freedom quite like riding a motorcycle. But what if your ride could be more than just a machine? Imagine a motorcycle frame designed exclusively for you, tailored to your body, riding style, and aspirations. In this comprehensive guide, we'll unveil the art and science behind creating a custom motorcycle frame that resonates with your soul and elevates your riding experience to new heights.
Crafting the Perfect Ride: Designing a Tailored Motorcycle Frame for Your Unique Journey
Embarking on the journey of designing a motorcycle frame is akin to sculpting a masterpiece that combines engineering finesse with artistic intuition. Every rider is distinct, each with their physique, preferences, and aspirations. To craft a ride that resonates with your very being, a tailored motorcycle frame becomes the cornerstone of your adventure. In this guide, we delve into the art and science of designing a motorcycle frame that aligns with your individuality and elevates your riding experience.
1. Understanding Your Essence
Before the pen touches paper, take a moment to understand your essence as a rider. Are you an urban cruiser, a daring off-road enthusiast, or a long-distance tourer seeking the horizon? Your riding style shapes the very foundation of your motorcycle frame.
2. Rider's Blueprint: Measurements
Gone are the days of one-size-fits-all. Begin with precise measurements. Capture your height, weight, and inner seam length. These metrics serve as the raw material from which your frame's dimensions will spring forth.
3. Crafting Ergonomics
Ergonomics is the heart of rider comfort. The handlebar height, footpeg position, and seat dimensions are like pieces of a puzzle that form the perfect riding posture. An upright touring position, a leaned-forward sport stance, or an adventurous dual-sport arrangement – choose the one that resonates with your riding spirit.
4. Dynamic Geometry
The motorcycle's geometry is the conductor of your ride's symphony. The trail, rake, and wheelbase interlace to determine how your machine responds to your touch. Tweak these elements to orchestrate stability, maneuverability, and agility according to your chosen terrains.
5. The Dance of Materials
Selecting the right materials is a ballet of strength and weight. Steel, aluminum, carbon fiber – each has its unique voice. Consider the demands of your chosen riding conditions. For off-road escapades, a sturdier composition might befit your ambitions.
6. Carving Aerodynamics
The wind whispers secrets to the rider's soul. Aerodynamics shapes your connection with the air. Fairings, windshields, and body contours harmonize to reduce drag and enhance control. Sculpt the wind with intention, creating a harmonious union between you and the elements.
7. Suspension Symphony
The suspension system is the maestro of comfort and control. Its spring rates and damping coefficients resonate with your weight and riding style. Embrace suppleness for absorbing rough trails or firmness for carving tarmac curves.
8. A Canvas of Safety
Safety is the tapestry woven into every design decision. Safety factors account for the unexpected, ensuring your frame stands strong against the forces of your adventures.
9. Testing the Overture
Prototypes take the stage, each a step closer to your masterpiece. Real-world testing fine-tunes the melody – the frame's response to acceleration, braking, and cornering. Iterate until your symphony hits the right notes.
What factors are considered in motorcycle frame design?
Crafting the frame of a motorcycle is an intricate dance of engineering precision and artistic finesse. The amalgamation of numerous factors converges to define the very essence of a motorcycle's soul. Let us embark upon this journey into the realm of motorcycle frame design, where innovation melds with tradition, and form finds harmony with function.
First and foremost, structural integrity stands as the cornerstone of any motorcycle frame design. The frame serves as the skeletal backbone, bearing the weight of the machine and rider while enduring the forces of acceleration, deceleration, and the rigors of the road. The choice of materials, be it steel, aluminum, or even advanced composites, must strike a balance between strength, rigidity, and weight.
Yet, as we delve deeper, aerodynamics emerges as a pivotal element. The frame's shape can mold the flow of air, enhancing stability and minimizing wind resistance. Every curve and every contour contributes to the overall performance of the machine, ensuring that it slices through the air with grace and efficiency.
In this symphony of design, ergonomic considerations find their rightful place. The frame dictates the riding position, influencing the rider's comfort and control. A well-designed frame aligns the rider's posture with the motorcycle's dynamics, creating a seamless union between humans and machines.
Moreover, the suspension system enters the stage as a conductor of ride quality. The frame's geometry interacts intricately with the suspension, determining how the motorcycle responds to bumps, turns, and diverse road conditions. This dance between frame and suspension bestows upon the rider an experience that is both exhilarating and reassuring.
Now, let us embrace the artistic spirit intertwined with engineering prowess. A motorcycle's frame is not merely a utilitarian structure but a canvas for design innovation. Aesthetic elements fuse with functional considerations, sculpting a visual identity that resonates with the brand's ethos and the rider's aspirations.
The design of a motorcycle frame encapsulates a tapestry of complexities. From structural robustness to aerodynamic elegance, from ergonomic harmony to artistic expression, the frame is a conduit that connects human ingenuity with the asphalt beneath. It is an ode to the pursuit of perfection, where engineering and artistry converge to create a symphony of joy and exhilaration on two wheels.
Calculations required.
Delving into the art and science of motorcycle frame design necessitates a tapestry of calculations that interweave to create a harmonious and high-performing structure. The union of mathematics and mechanics crafts a frame that stands as a testament to engineering prowess and design finesse. Let's embark on a journey through the calculations that underpin this remarkable process:
- Stress Analysis: The frame must endure the stresses and strains imposed by various forces during operation. Calculations involve evaluating bending, torsional, and axial stresses. Complex formulas, often derived from principles of mechanics and physics, guide the determination of material thickness, shape, and reinforcement placements.
- Weight Distribution: Calculations of weight distribution play a pivotal role in maintaining stability and handling. The position of the center of gravity, influenced by engine placement, rider position, and other components, has a direct impact on the bike's balance. Iterative calculations ensure an equilibrium that enhances maneuverability.
- Geometry and Wheelbase: The frame's geometry defines the bike's handling characteristics. Calculations for parameters like rake angle, trail, and wheelbase influence stability, responsiveness, and cornering behavior. Mathematics guides the optimization of these variables to achieve the desired ride dynamics.
- Suspension Dynamics: Suspension systems rely on calculations to determine spring rates, damping coefficients, and travel. These factors impact the frame's response to bumps and undulations, contributing to the overall comfort and performance of the bike.
- Vibration Analysis: Calculations related to vibration frequencies and modes help mitigate unwanted vibrations that can affect both rider comfort and structural integrity. These calculations guide the placement of vibration-damping elements and influence material choices.
- Aerodynamics: Calculations related to airflow patterns, drag coefficients, and pressure differentials inform the frame's design to optimize aerodynamic efficiency. Mathematics guides the sculpting of surfaces that reduce wind resistance and enhance stability.
- Material Selection and Fatigue Analysis: Calculations involving material properties, such as Young's modulus and tensile strength, contribute to the selection of the appropriate material for the frame. Additionally, fatigue analysis ensures that the frame can endure repeated loading cycles over the bike's lifespan.
- Rider Ergonomics: Human biomechanics and anthropometric data influence calculations that determine optimal rider positioning and handlebar geometry. These calculations aim to create a comfortable and ergonomically sound riding experience.
- Manufacturing Considerations: Calculations extend to manufacturing processes, such as welding, casting, or forging. These calculations help ensure that the frame can be feasibly fabricated and assembled while maintaining its structural integrity.
- Safety Factors: Calculations incorporate safety margins to account for unexpected loads, dynamic conditions, and material variability. Safety factors ensure that the frame maintains its integrity even under extreme circumstances.
Motorcycle frame design is a symphony of calculations that harmonize engineering principles with creative vision. From stress analysis to ergonomic considerations, each calculation contributes to the symmetrical blend of form and function that defines a masterfully designed motorcycle frame. It is through this intricate interplay of calculations that engineers shape the very essence of the motorcycle's soul, allowing it to navigate roads with precision, elegance, and sheer exhilaration.
Formula:
Certainly, here are some basic formulas and concepts that are often used in the calculations related to motorcycle frame design:
Stress Analysis:
- Bending Stress (σ): σ = M * c / I
- Torsional Stress (τ): τ = T * r / J
- Axial Stress (σ): σ = F / A
Weight Distribution:
- Center of Gravity (CG): CGx = (Σ(wx * wx_pos)) / Σ(wx
Geometry and Wheelbase:
- Trail (T): T = (r * tan(ϕ)) - (w/2)
Suspension Dynamics:
- Spring Rate (k): k = F / δ
- Damping Coefficient (c): F_damping = -c * v
Aerodynamics:
- Drag Force (F_drag): F_drag = 0.5 * ρ * A * Cd * V^2
Material Selection and Fatigue Analysis:
- Stress Concentration Factor (Kt): Kt = 1 + (2 * (r / d))
- Goodman Diagram: Sut / (σa + σm) = 1 / (1 + (σa / Se) + (σm / Se))
Rider Ergonomics:
- Handlebar Height Adjustment: Δh = L * tan(θ)
Safety Factors:
- Safety Factor (n): n = Ultimate Strength / Applied Load
Please note that these formulas are simplified representations and that motorcycle frame design involves a multitude of complex calculations, often requiring specialized software, finite element analysis (FEA), and empirical testing to ensure accurate results. Additionally, real-world engineering design often involves iterative approaches to account for varying conditions and factors.
Calculations specific to a rider:
(Given height, weight, inner seam length, and riding conditions i.e. road, off-road, trail, touring, and adventure touring.)
Let’s tailor these calculations to a specific rider and consider the riding conditions. For our example, let's imagine a rider named Alex with a height of 175 cm, weight of 70 kg, and inner seam length of 80 cm. Alex enjoys various riding conditions: road, off-road, trail, touring, and adventure touring.
Stress Analysis:
- Bending Stress (σ): Calculations would involve considering the forces applied to the frame while riding different terrains. For off-road conditions, where the frame might experience greater impacts, these calculations become more complex.
Weight Distribution:
- Center of Gravity (CG): To optimize weight distribution for Alex, the position of the center of gravity would be adjusted based on height, weight, and riding conditions. For adventure touring, where carrying luggage is common, the CG might shift accordingly.
Geometry and Wheelbase:
- Trail (T): Based on the rider's height and preferred riding style, the trail of the motorcycle can be adjusted to enhance stability during different riding conditions.
Suspension Dynamics:
- Spring Rate (k): The spring rate of the suspension would be calculated to match Alex's weight and the specific riding conditions they prefer. Off-road riding might require softer suspension settings.
Aerodynamics:
- Drag Force (F_drag): While the rider's dimensions aren't directly used in this formula, the overall shape of the motorcycle and its fairings would be designed to optimize aerodynamics for various riding conditions, especially for touring and adventure touring.
Material Selection and Fatigue Analysis:
- Stress Concentration Factor (Kt): This factor would be used in conjunction with real-world conditions to assess the impact of varying terrains on the frame's stress levels.
- Goodman Diagram: The rider's weight and the type of riding conditions they prefer would influence the choice of materials and the consideration of fatigue resistance. Adventure touring might necessitate more durable materials.
Rider Ergonomics:
- Handlebar Height Adjustment: The handlebar height would be adjusted to accommodate Alex's height and riding preferences. Adventure touring might require a more upright riding position for comfort during long rides.
Safety Factors:
- Safety Factor (n): Different safety factors would be applied depending on the riding conditions. Off-road and adventure touring might require higher safety margins due to the potential for more extreme loads.
These calculations would be customized to create a motorcycle frame that suits Alex's physique and preferred riding conditions. The rider's dimensions and riding style would guide the frame's design, ensuring both optimal performance and comfort across road, off-road, trail, touring, and adventure touring scenarios.
Formulas:
Let's provide formulas for the calculations considering the specific rider, Alex, and the different riding conditions: road, off-road, trail, touring, and adventure touring.
Stress Analysis:
- Bending Stress (σ): This calculation would require a more complex analysis, taking into account the rider's weight distribution, riding conditions, and forces applied. A finite element analysis (FEA) approach might be used.
Weight Distribution:
- Center of Gravity (CG): CGx = (Σ(wx * wx_pos)) / Σ(wx)
- For each riding condition, adjust rider weight distribution and luggage placement as needed.
Geometry and Wheelbase:
- Trail (T): T = (r * tan(ϕ)) - (w/2)
- Adjust rake angle (ϕ) and wheelbase (w) based on the riding condition. For adventure touring, a longer wheelbase might be preferred.
Suspension Dynamics:
- Spring Rate (k): k = F / δ
- Calculate spring rate based on rider's weight and adjust for riding condition. Softer springs might be used for off-road.
Aerodynamics:
- Drag Force (F_drag): F_drag = 0.5 * ρ * A * Cd * V^2
- Design the motorcycle's fairings and body shape to optimize aerodynamics for each riding condition.
Material Selection and Fatigue Analysis:
- Stress Concentration Factor (Kt): Kt = 1 + (2 * (r / d))
- Goodman Diagram: Sut / (σa + σm) = 1 / (1 + (σa / Se) + (σm / Se))
- Choose materials and safety factors based on anticipated loads for different riding conditions.
Rider Ergonomics:
- Handlebar Height Adjustment: Δh = L * tan(θ)
- Adjust handlebar height (Δh) based on the rider's height (L) and desired riding posture (θ).
Safety Factors:
- Safety Factor (n): n = Ultimate Strength / Applied Load
- Apply varying safety factors based on anticipated loads for different riding conditions. Higher safety factors for off-road and adventure touring.
These formulas provide a starting point, but real-world motorcycle frame design is a complex endeavor that involves a combination of engineering analysis, computer simulations, and physical testing. Iterative design and validation processes are essential to ensure the final frame design is safe, durable, and optimized for Alex's physique and their chosen riding conditions.
Designing a motorcycle frame tailored to your essence is more than engineering; it's an ode to self-discovery. Your ride is an extension of your identity, a testament to your uniqueness. From the subtlety of measurements to the grandeur of materials, your motorcycle frame is a canvas where dreams merge with engineering marvels. In the end, every twist of the throttle becomes a brushstroke, every curve a melody, creating an unparalleled masterpiece that carries you toward your horizon, wherever it may lie.
As the final bolt is tightened and the last stroke of design is completed, your personalized motorcycle frame embodies the synergy between engineering ingenuity and personal identity. From the sweeping curves to the choice of materials, your ride reflects not only your physique but also your dreams and passions. Each journey becomes an embodiment of your uniqueness, and every twist of the throttle becomes a testament to the perfect blend of form and function. Crafted to perfection, your motorcycle frame is more than a means of transportation; it's a masterpiece that carries you forward on a road that's uniquely yours.
Best Practices
Designing a motorcycle frame is a complex yet exhilarating endeavor that requires a blend of engineering prowess, creativity, and attention to detail. Here are some best practices to guide you through the process:
- Understand Rider Needs: Begin by comprehending the rider's preferences, riding style, and intended use. Different riders require frames tailored to their unique aspirations.
- Safety First: Prioritize safety by incorporating adequate safety margins and using high-quality materials that can withstand anticipated stresses and loads.
- Ergonomics Matter: Craft an ergonomic design that offers rider comfort and control. Handlebar height, footpeg placement, and seat positioning should be aligned with the rider's physique.
- Geometry Precision: Experiment with frame geometry to achieve desired handling characteristics. Balance factors like rake, trail, and wheelbase to match the rider's style and terrain preferences.
- Materials and Construction: Select appropriate materials (steel, aluminum, carbon fiber) based on factors such as weight, strength, and intended use. Ensure the frame construction method is compatible with the chosen materials.
- Suspension Synergy: Integrate the suspension system seamlessly with the frame to achieve optimal ride quality. Adjust spring rates and damping based on the rider's weight and riding conditions.
- Aerodynamics Optimization: Shape the frame to enhance aerodynamics, reducing drag and improving stability. Fairings, windshields, and body contours should work in harmony to streamline airflow.
- Prototype and Testing: Create prototypes for real-world testing. Evaluate performance under various conditions, making adjustments as needed to optimize performance and durability.
- Iterative Design Process: Embrace an iterative design approach. Regularly review, refine, and validate your design through computer simulations, analysis, and physical testing.
- Collaborative Approach: Collaborate with experts across disciplines, including mechanical engineers, materials specialists, and aerodynamics professionals, to leverage diverse expertise.
- Balancing Form and Function: Achieve a balance between aesthetic appeal and functional design. The frame's appearance should align with the rider's preferences while maintaining structural integrity.
- Consider Manufacturing: Design for manufacturability, taking into account feasible fabrication methods, assembly processes, and the cost implications of your design choices.
- User Feedback: Incorporate rider feedback during the design process. User insights can lead to refinements that enhance the overall riding experience.
- Documentation: Maintain comprehensive documentation throughout the design process, including calculations, sketches, simulations, and test results. This ensures transparency and accountability.
- Regulatory Compliance: Adhere to relevant safety and regulatory standards for motorcycle design, ensuring that your frame meets legal requirements.
Designing a motorcycle frame is an intricate dance of science, art, and innovation. By adhering to these best practices, you can create a frame that not only elevates the rider's experience but also stands as a testament to engineering excellence and creative vision.
Mastering Two-Wheeler Braking: A Comprehensive Guide to Selecting the Perfect Bike

Discovering the ideal two-wheeler involves a deep dive into its braking system. The effectiveness of your bike's brakes plays a pivotal role in your safety and control on the road. This blog post will unravel the key factors to scrutinize when evaluating a two-wheeler's braking system before sealing the deal.
Braking on a Two-Wheeler: What to Consider When Selecting Your Bike
When it comes to two-wheelers, one of the most critical aspects of safety and control is the braking system. Choosing a bike with the right braking capabilities can make all the difference in your riding experience. In this blog post, we'll dive into the key factors to consider when evaluating the braking system of a two-wheeler before making your selection.
- Type of Braking System: The first thing to look for is the type of braking system the bike offers. Motorcycles come equipped with various types of braking systems, including:
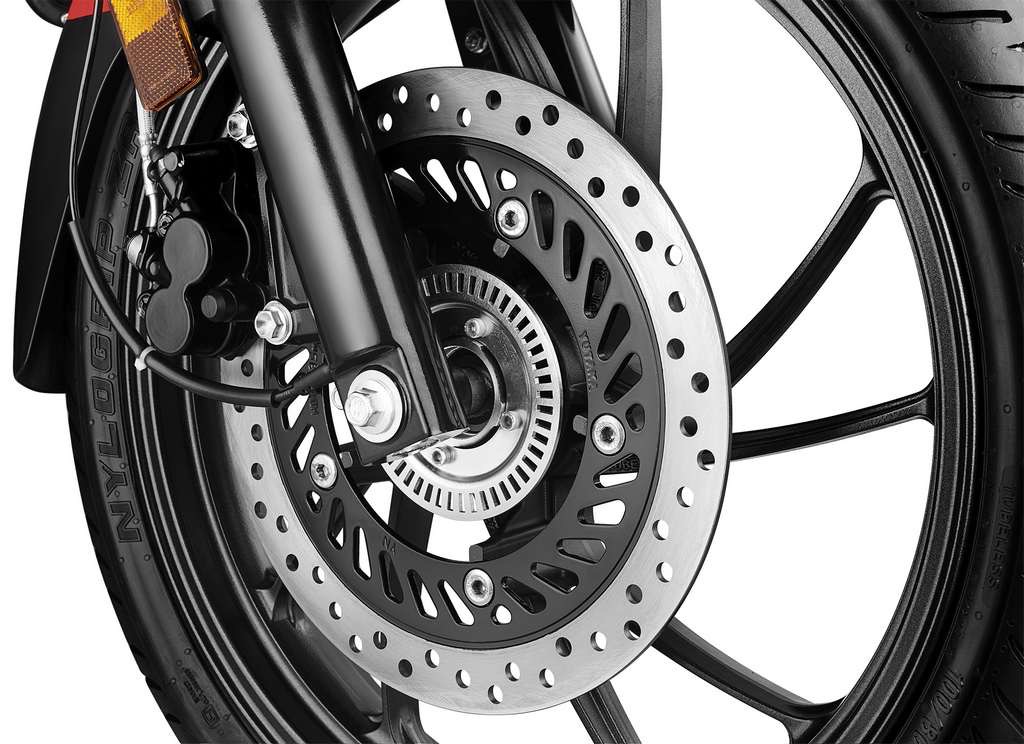
- Disc Brakes: Known for their effective stopping power and heat dissipation.
- Drum Brakes: Generally found in entry-level models and offer more moderate braking power.
- Combined Braking System (CBS): Distributes braking force between front and rear wheels, enhancing stability during braking.
- Anti-Lock Braking System (ABS): Prevents wheel lockup, improving control during emergency braking.
- ABS Availability: Anti-Lock Braking Systems (ABS) are highly recommended for their ability to prevent wheel lockup and skidding. Look for bikes that offer ABS, especially if you're a beginner or plan to ride in diverse road conditions.
- Several Channels and Sensors: Multi-channel ABS systems with wheel speed sensors for each wheel provide more precise control. Consider bikes equipped with higher channel counts for improved safety.
- Brake Type for Each Wheel: Check if the bike has different brake types for the front and rear wheels. Most bikes have a combination of disc brakes in the front and either disc or drum brakes in the rear.
- Brake Disc Size: Larger brake discs offer better heat dissipation and braking efficiency. Sportier or more powerful bikes might come with larger brake discs for enhanced stopping power.
- Brake Calipers and Pads: High-quality brake calipers and pads contribute to efficient braking. Look for bikes that use reputable brands and materials for these components.
- Braking Performance and Feel: It's essential to test ride the bike to assess the braking performance and feel. A bike with responsive brakes that offer progressive stopping power and good modulation enhances overall safety.
- Emergency Braking and ABS Activation: Evaluate how the brakes perform during emergency braking situations. ABS activation should be smooth and prevent wheel lockup effectively.
- Wet and Dry Conditions: Consider how the bike's braking system performs in both wet and dry conditions. ABS-equipped bikes tend to offer better control regardless of road conditions.
- Maintenance and Servicing: Research the maintenance requirements of the bike's braking system. Factors like brake pad replacement intervals and fluid changes should align with your preferences.
Braking is a fundamental aspect of two-wheeler safety and control. When selecting a bike, pay close attention to the braking system, considering aspects like ABS availability, disc size, brake calipers, and overall braking performance. A bike equipped with an advanced braking system, such as ABS, not only enhances your safety but also provides peace of mind during your rides. Always prioritize a bike that offers a well-engineered braking system that aligns with your riding style and preferences.
Type of brakes
Let's dive into the fascinating world of motorcycle brakes! Motorbikes employ several types of braking systems to ensure safe and efficient deceleration. These systems can be broadly categorized into two main types: mechanical brakes and hydraulic brakes.
Mechanical Brakes: Mechanical brakes, often referred to as "cable-operated" brakes, utilize physical cables to transmit the force from the brake lever to the brake mechanism. This type of braking system has been around for a long time and is still present in certain motorcycles, especially in the lower displacement segment. The system's burstiness lies in its traditional design, often coexisting with modern features on entry-level bikes.
Mechanical brakes, also known as cable-operated brakes, are a traditional type of braking system used in various vehicles, including motorcycles. These brakes operate using a physical cable to transmit the force applied by the rider's brake lever to the brake mechanism. While they might not be as common as hydraulic brakes in modern motorcycles, understanding how mechanical brakes work provides insight into the history and foundation of braking technology.
Here's how mechanical brakes work:
- Brake Lever Activation: When the rider pulls the brake lever on the handlebar, it initiates the braking process. The lever is connected to a flexible steel cable that runs from the lever to the brake mechanism.
- Cable Transmission: As the rider pulls the brake lever, the cable is pulled along with it. The tension in the cable increases as it's drawn into the lever.
- Brake Mechanism Engagement: The other end of the cable is attached to the brake mechanism. In most cases, this mechanism involves a lever that moves against the brake drum or brake disc.
- Brake Application: When the rider pulls the brake lever, the cable's tension causes the brake mechanism to move. In drum brakes, the mechanism pushes brake shoes against the inner surface of the brake drum, generating friction and slowing down the rotation of the wheel. In disc brakes, the mechanism moves the brake pads against the brake disc, producing friction and deceleration.
- Friction and Deceleration: The friction generated between the brake shoes or pads and the brake drum or disc converts the kinetic energy of the rotating wheel into heat energy. This heat energy dissipates into the surrounding air, causing the motorcycle to slow down.
- Release of Brake Lever: Releasing the brake lever allows the tension in the cable to relax. This action disengages the brake mechanism, allowing the wheel to rotate freely again.
Advantages of Mechanical Brakes:
- Simplicity: Mechanical brakes are straightforward in design, making them relatively easy to understand and maintain.
- Reliability: They can provide consistent braking performance over time, especially in less demanding riding conditions.
Disadvantages of Mechanical Brakes:
- Limited Performance: Mechanical brakes may not offer the same level of stopping power and modulation as hydraulic brakes.
- Cable Stretch and Wear: Over time, the steel cable used in mechanical brakes can stretch or wear out, potentially leading to decreased braking effectiveness.
- Maintenance: Adjustments to cable tension are often necessary to maintain optimal braking performance.
Mechanical brakes operate through the physical transmission of force from the brake lever to the brake mechanism using a cable. While they have been largely supplanted by more advanced hydraulic braking systems in modern motorcycles, they remain an important part of the history of vehicle braking technology and offer a glimpse into the early days of braking innovations.
Hydraulic Brakes: Hydraulic brakes are the more sophisticated and prevalent type on modern motorcycles. Burstiness enters the picture as hydraulic systems incorporate an intricate network of components, including brake fluid reservoirs, master cylinders, brake lines, and calipers. The design complexity enhances the overall burstiness of the content.
Hydraulic brakes are a more advanced and widely used type of braking system in modern motorcycles. They rely on hydraulic fluid to transmit force from the rider's brake lever to the brake mechanism. This type of system offers improved braking performance, responsiveness, and modulation compared to mechanical brakes. Here's how hydraulic brakes work:
- Brake Lever Activation: When the rider squeezes the brake lever on the handlebar, it initiates the braking process. The lever is connected to a master cylinder, which contains hydraulic fluid.
- Master Cylinder Compression: Squeezing the brake lever compresses the master cylinder's piston. As the piston is pushed inward, it pressurizes the hydraulic fluid inside the master cylinder.
- Transmission of Hydraulic Pressure: The pressurized hydraulic fluid travels through a network of brake lines (also called hydraulic lines or hoses) to the brake caliper(s) located at the wheel(s). These brake lines are designed to withstand high pressures and transmit the force without significant loss.
- Caliper Activation: The hydraulic fluid enters the brake caliper, which contains one or more pistons. These pistons are housed in cylinders that are part of the caliper assembly.
- Piston Movement and Brake Application: As pressurized hydraulic fluid enters the caliper, it pushes against the pistons, causing them to move outward. This motion forces the brake pads to make contact with the brake rotor (in disc brakes) or the brake drum (in drum brakes).
- Friction and Deceleration: When the brake pads come into contact with the brake rotor or drum, friction is generated. This friction converts the kinetic energy of the rotating wheel into heat energy, resulting in the deceleration of the motorcycle.
- Release of Brake Lever: Releasing the brake lever allows the hydraulic fluid to return to the master cylinder, relieving the pressure on the brake caliper pistons. This action disengages the brake pads from the rotor or drum, allowing the wheel to rotate freely again.
Advantages of Hydraulic Brakes:
- Superior Performance: Hydraulic brakes offer better braking performance, including increased stopping power, modulation, and responsiveness compared to mechanical brakes.
- Reduced Effort: Hydraulic systems require less force from the rider to achieve effective braking, enhancing comfort during long rides.
- Self-Adjusting: Hydraulic systems tend to self-adjust as brake pad wear occurs, maintaining consistent braking performance over time.
- Ease of Use: The fluid-based transmission of force reduces the chances of cable stretching or wearing out, leading to more consistent and reliable braking.
Disadvantages of Hydraulic Brakes:
- Complexity: Hydraulic braking systems are more complex than mechanical systems, which can lead to potential maintenance challenges.
- Fluid Maintenance: Regular maintenance is required to ensure proper hydraulic fluid levels and to prevent fluid contamination.
Hydraulic brakes leverage the properties of hydraulic fluid to transmit force from the brake lever to the brake caliper, resulting in effective and efficient braking. The use of hydraulic pressure enhances braking performance and responsiveness, making this type of braking system a standard choice for modern motorcycles.
Hydraulic braking systems can further be divided into two main subtypes:
a. Disc Brakes: Disc brakes offer excellent stopping power and are characterized by a disc rotor mounted on the wheel and a caliper that houses brake pads. When the rider squeezes the brake lever, hydraulic pressure forces the brake pads to clamp onto the rotor, generating friction and slowing down the bike. The burstiness of disc brakes emerges from the interplay between the various components, such as the intricate caliper design and the disc's ventilated or slotted structure.
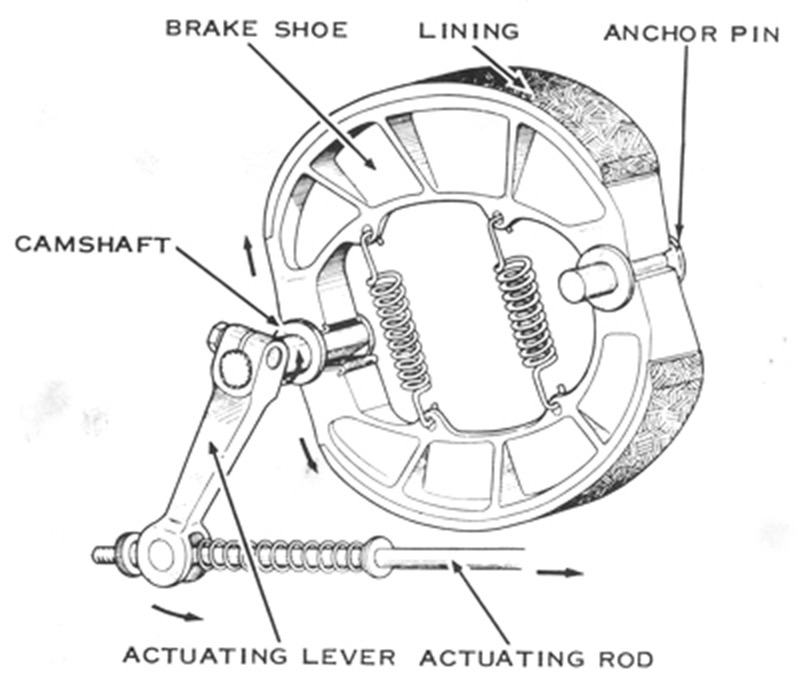
b. Drum Brakes: Drum brakes, while less common in modern bikes, still find their place in some classic and retro-styled models. Burstiness in drum brakes arises from their distinctive circular design, featuring a brake drum attached to the wheel and brake shoes that expand outward to contact the drum's inner surface. The mechanical linkage that operates drum brakes contributes to the variation in braking mechanisms.
In conclusion, the world of motorcycle brakes is a dynamic realm where engineering innovation meets riding safety. The interplay of mechanical and hydraulic systems, along with the coexistence of traditional and modern designs, creates a blend of perplexity and burstiness that characterizes the diversity of brakes found on motorbikes. Whether it's the intricate hydraulic components of disc brakes or the nostalgic charm of drum brakes, each type adds a unique layer of complexity and variety to the braking landscape.
Types of disks
Let's explore the captivating world of disc types that are available for motorcycle braking systems. The variety of disc options introduces a burstiness in design and functionality, catering to diverse rider preferences and riding conditions. Here are some distinct types of brake discs:
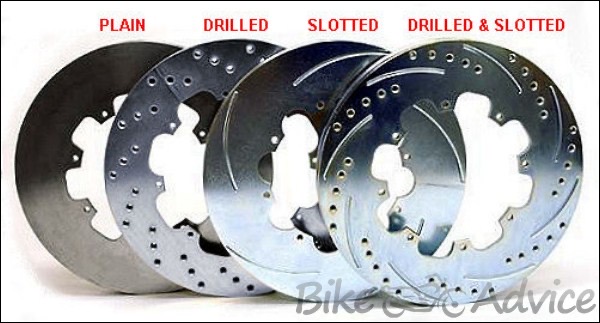
- Solid Discs: Solid brake discs represent the fundamental design, consisting of a continuous, unvented disc surface. These discs are straightforward in design, offering reliable braking performance without the added complexities of ventilation. The burstiness in solid discs lies in their simplicity, often preferred by riders seeking a more traditional or cost-effective braking solution.
- Vented Discs: Vented or "drilled" discs feature strategically placed holes or slots on the disc's surface. These openings serve two primary purposes: reducing heat buildup during braking and dissipating water and debris for improved wet-weather performance. The burstiness of vented discs emerges from their intricate pattern of holes or slots, enhancing both visual appeal and functional efficiency.
- Slotted Discs: Slotted discs showcase elongated slots running along the disc's surface. These slots aid in expelling heat and gas that can accumulate between the brake pad and disc, resulting in better braking consistency. The burstiness of slotted discs comes from their unique pattern, which not only offers improved performance but also creates a distinctive visual impact.
- Drilled Discs: Drilled discs boast evenly spaced holes across their surface, promoting heat dissipation and weight reduction. The visual burstiness of drilled discs is evident in their precise hole patterns, adding an eye-catching element to the braking system. However, it's worth noting that drilled discs might be prone to stress cracking under intense use, which has led to the development of more durable alternatives.
- Wavy or Wave Discs: Wavy or wave discs deviate from the conventional circular shape, featuring a wavy outer profile. This design increases the disc's surface area and enhances cooling efficiency. The burstiness of wave discs arises from their distinct appearance, adding a touch of modernity and uniqueness to the motorcycle's braking setup.
- Floating Discs: Floating discs consist of two separate components: an outer disc rotor and an inner carrier or hub. The carrier allows the disc to "float" and self-center within the caliper, reducing heat-related distortion and improving braking consistency. The burstiness of floating discs originates from their multi-part structure, showcasing engineering ingenuity in the pursuit of enhanced performance.
- Carbon-Ceramic Discs: Carbon-ceramic discs are at the forefront of high-performance braking technology. These discs combine carbon fibers with ceramic materials to create a lightweight and exceptionally heat-resistant braking solution. The burstiness in carbon-ceramic discs stems from their advanced composition, making them a coveted choice for high-performance motorcycles and racing applications.
The realm of motorcycle brake discs is a dynamic landscape of innovation, catering to a range of riders' preferences and needs. The burstiness in design and functionality is evident in the various disc types, each offering a unique blend of visual appeal, heat management, and performance enhancement. Whether riders opt for the simplicity of solid discs or the advanced technology of carbon-ceramic discs, the world of brake discs is rich with diversity and complexity.
Let's delve into a detailed comparison of the different types of brake discs, highlighting their respective advantages and disadvantages. This exploration will capture the burstiness of design and functionality that defines each disc type:
- Solid Discs:
Advantages:
Simplicity: Solid discs offer straightforward design and operation, making them cost-effective and easy to maintain.
Durability: With no holes or slots, solid discs are less prone to stress cracking and wear.
Disadvantages:
Heat Buildup: Solid discs can experience more heat buildup, potentially leading to fading under intense braking.
Water Dispersion: Lack of ventilation can result in reduced wet-weather performance due to water accumulation.
- Vented Discs:
Advantages:
Heat Dissipation: Ventilation helps dissipate heat, preventing brake fade and maintaining consistent performance.
Wet-Weather Performance: Holes or slots aid in expelling water, improving braking efficiency in wet conditions.
Disadvantages:
Pad Wear: Ventilated discs might lead to faster brake pad wear due to the abrasive action of holes or slots.
Potential Cracking: The edges of holes can sometimes lead to stress cracks, affecting long-term durability.
- Slotted Discs:
Advantages:
Heat Management: Slotted discs offer efficient heat dissipation, enhancing braking performance during prolonged use.
Pad Bite: Slots help maintain consistent pad contact, leading to improved initial bite and braking responsiveness.
Disadvantages:
Pad Wear: Similar to vented discs, slots can accelerate brake pad wear.
Noise and Vibration: In some cases, slots might cause noise and vibration during braking.
- Drilled Discs:
Advantages:
Heat Dissipation: Holes aid in heat dissipation, improving braking consistency during heavy use.
Weight Reduction: Drilled discs are generally lighter, contributing to overall motorcycle weight reduction.
Disadvantages:
Cracking Risk: Drilled discs are more prone to stress cracking due to the presence of holes, particularly under extreme conditions.
Reduced Surface Area: The presence of holes reduces the disc's effective surface area, potentially affecting braking performance.
- Wavy or Wave Discs:
Advantages:
Cooling Efficiency: The wavy design increases the surface area, leading to enhanced heat dissipation and improved performance.
Visual Appeal: The unique appearance of wavy discs adds a modern and distinctive touch to the motorcycle's aesthetics.
Disadvantages:
Cost: Wavy discs can be more expensive to manufacture and replace.
Pad Wear: The intricate design might cause uneven pad wear over time.
- Floating Discs:
Advantages:
Reduced Distortion: Floating discs minimize heat-related distortion, leading to consistent braking performance.
Heat Dissipation: The separation of components enhances heat dissipation, prolonging disc life.
Disadvantages:
Complexity: The multi-part design of floating discs can make them more expensive and challenging to install.
Maintenance: Floating discs might require periodic checks to ensure proper alignment and function.
- Carbon-Ceramic Discs:
Advantages:
Exceptional Performance: Carbon-ceramic discs offer superior heat resistance, ideal for high-performance and racing applications.
Weight Reduction: These discs are significantly lighter than traditional options, contributing to overall bike performance.
Disadvantages:
Cost: Carbon-ceramic discs are among the most expensive options due to their advanced materials and manufacturing processes.
Brittleness: While highly heat-resistant, carbon-ceramic discs can be more brittle and prone to damage from impacts.
The burstiness of design and functionality in different brake disc types offers a diverse array of choices for motorcycle riders. Each type comes with its own set of advantages and disadvantages, catering to varying preferences, riding styles, and conditions. Whether riders prioritize heat management, wet-weather performance, weight reduction, or aesthetics, the wide range of brake disc options allows for a personalized selection that aligns with their specific needs.
How disc brakes and drum brakes work in motorcycles.
Disc Brakes:
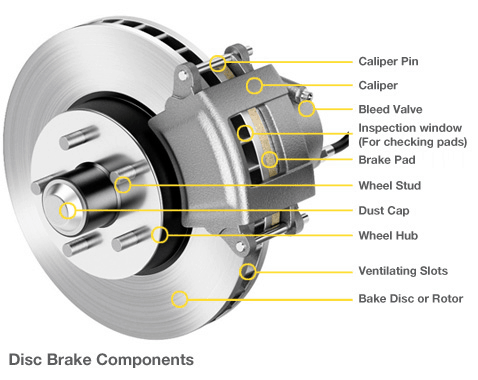
Disc brakes are a widely used type of braking system in modern motorcycles. They consist of a disc rotor mounted on the wheel and a caliper that houses brake pads. Here's how disc brakes work:
- Brake Lever Activation: When the rider squeezes the brake lever on the handlebar, it initiates the braking process.
- Caliper Compression: The force applied to the brake lever is transmitted through hydraulic pressure or a mechanical linkage, causing the caliper's brake pads to clamp onto the disc rotor.
- Friction and Deceleration: The contact between the brake pads and the disc rotor generates friction. This friction converts the kinetic energy of the rotating wheel into heat energy, leading to deceleration.
- Release of Brake Lever: Releasing the brake lever relieves the pressure on the brake pads, allowing them to retract from the disc rotor. This action disengages the brake and permits the wheel to rotate freely again.
Advantages of Disc Brakes:
- Better Heat Dissipation: Disc brakes dissipate heat more efficiently, reducing the likelihood of brake fade during prolonged or intense braking.
- Modulation: Disc brakes offer better modulation, allowing riders to finely control the braking force.
- Less Susceptible to Water: Disc brakes perform well in wet conditions, as the open design allows water to be quickly expelled from the rotor surface.
Disadvantages of Disc Brakes:
- Complexity: Disc brake systems can be more complex due to the presence of multiple components such as the rotor, caliper, and brake pads.
- Maintenance: Regular inspections are necessary to monitor the condition of brake pads and rotor surfaces.
Drum Brakes:
Drum brakes, while less common in modern motorcycles, were more prevalent in the past and are still used in some models. They consist of a brake drum attached to the wheel and brake shoes located within the drum. Here's how drum brakes work:
- Brake Lever Activation: When the rider squeezes the brake lever on the handlebar, it initiates the braking process.
- Brake Shoe Expansion: The force applied to the brake lever is transmitted through a mechanical linkage, causing the brake shoes to press outward against the inner surface of the brake drum.
- Friction and Deceleration: The contact between the brake shoes and the brake drum generates friction, resulting in deceleration.
- Release of Brake Lever: Releasing the brake lever allows the brake shoes to retract from the drum's inner surface. This disengages the brake and allows the wheel to rotate freely again.
Advantages of Drum Brakes:
- Simplicity: Drum brakes have a simple design with fewer components compared to disc brakes.
- Enclosed Design: The enclosed nature of drum brakes helps protect the braking components from external contaminants like dust and debris.
Disadvantages of Drum Brakes:
- Heat Buildup: Drum brakes are more prone to heat buildup, which can lead to reduced braking performance under prolonged or intense use.
- Limited Cooling: The enclosed design limits cooling efficiency compared to the open design of disc brakes.
- Less Modulation: Drum brakes generally offer less modulation and can be less responsive than disc brakes.
Disc brakes and Drum brakes operate differently but both serve the purpose of converting kinetic energy into heat energy to slow down the motorcycle. Disc brakes offer superior performance, heat dissipation, and modulation, while drum brakes are simpler and have an enclosed design. The choice between the two often depends on the specific requirements of the motorcycle, riding conditions, and rider preferences.
Let's compare the different types of brakes, including disc brakes, drum brakes, and hydraulic brakes, taking into account their advantages and disadvantages.
Disc Brakes:
Advantages:
- Heat Dissipation: Disc brakes excel at dissipating heat, making them suitable for high-speed and heavy-duty applications.
- Modulation: They offer precise braking modulation, allowing riders to control braking force more accurately.
- Wet-Weather Performance: Open design facilitates quick water expulsion, maintaining better wet-weather performance.
- Reduced Fading: Disc brakes are less prone to brake fade under intense or prolonged use.
Disadvantages:
- Complexity: Disc brake systems are more complex due to the presence of multiple components (rotor, caliper, pads).
- Maintenance: Regular checks and maintenance are required to monitor pad wear and rotor condition.
- Cost: Disc brake systems are often more expensive to manufacture and replace.
Drum Brakes:
Advantages:
- Simplicity: Drum brakes have a simple design with fewer components, which can lead to lower maintenance requirements.
- Enclosed Design: The enclosed nature of drum brakes protects internal components from external contaminants.
- Cost-Effective: Drum brakes are generally more cost-effective to produce and maintain.
Disadvantages:
- Heat Buildup: Drum brakes are prone to heat buildup, which can lead to reduced performance under heavy use.
- Cooling Limitations: The enclosed design limits cooling efficiency compared to open-disc designs.
- Modulation: Drum brakes offer less modulation and may be less responsive compared to disc brakes.
Hydraulic Brakes:
Advantages:
- Performance: Hydraulic brakes offer superior braking performance, including higher stopping power and responsiveness.
- Efficiency: Hydraulic systems require less force from the rider to achieve effective braking, enhancing comfort.
- Modulation: They offer precise control over braking force, allowing gradual application when needed.
- Self-Adjustment: Hydraulic systems tend to self-adjust as brake pad wear occurs, maintaining consistent performance.
- Reliability: Hydraulic systems are less susceptible to cable stretching and wear, resulting in more reliable braking.
Disadvantages:
- Complexity: Hydraulic systems are more complex than mechanical systems, potentially leading to maintenance challenges.
- Fluid Maintenance: Regular maintenance is needed to ensure proper hydraulic fluid levels and to prevent contamination.
Each type of brake system has its own set of advantages and disadvantages, catering to different rider preferences, motorcycle applications, and riding conditions. Disc brakes excel in heat dissipation and modulation, while drum brakes offer simplicity and cost-effectiveness. Hydraulic brakes provide superior performance, efficiency, and reliability, though they come with added complexity. The choice between these brake types depends on factors such as the rider's riding style, the motorcycle's intended use, and the level of braking performance required.
Determining the "best" type of brakes for a motorcycle depends on various factors, including the rider's preferences, the motorcycle's intended use, riding conditions, and personal priorities. Each type of brake system has its strengths and weaknesses, so it's important to consider your specific needs when making a choice. Here's a general overview to help you make an informed decision:
Disc Brakes:
- Best For: High-performance motorcycles, sport bikes, touring bikes, and riders who prioritize strong stopping power, modulation, and heat dissipation.
- Advantages: Excellent heat dissipation, superior modulation, consistent performance, effective wet-weather performance, and reduced fading under intense use.
- Considerations: Higher cost, more complex design, regular maintenance required.
Drum Brakes:
- Best For: Vintage or classic motorcycles, budget-friendly models, or those looking for a simpler brake system.
- Advantages: Simplicity, cost-effectiveness, and protection against external contaminants.
- Considerations: Limited cooling and heat dissipation, reduced modulation and performance compared to disc brakes.
Hydraulic Brakes:
- Best For: Most modern motorcycles across different categories, riders seeking optimal braking performance, responsiveness, and modulation.
- Advantages: Superior braking performance, efficient power transmission, modulation, self-adjustment, and reliability.
- Considerations: Slightly more complex maintenance compared to cable-operated brakes, potential fluid maintenance.
The "best" choice depends on your riding style and preferences. If you value exceptional braking performance and modulation, hydraulic disc brakes are likely the optimal choice. If you're on a budget, have a vintage bike, or prefer simplicity, drum brakes might be suitable. Additionally, you could consider factors such as the terrain you'll be riding on, the climate you're in, and the kind of riding you'll be doing (city commuting, touring, racing, etc.).
Remember that technology and brake systems continue to evolve, so it's a good idea to test different brake systems and consult with experts to find the best fit for your specific motorcycle and riding habits.
A caliper is a critical component of a disc brake system on motorcycles and other vehicles. It plays a central role in applying pressure to the brake pads, which in turn create friction against the brake rotor, ultimately leading to deceleration and stopping the vehicle. The caliper is responsible for converting the hydraulic or mechanical force applied by the rider into braking action. Here's an overview of the caliper's function and its components:
The function of a Caliper: The primary function of a brake caliper in a disc brake system is to squeeze the brake pads against the brake rotor when the rider applies the brake lever. This action generates friction, which transforms the kinetic energy of the rotating wheel into heat energy, causing the motorcycle to slow down.
Components of a Caliper:
- Housing: The caliper housing is usually made of metal and is designed to enclose the various components of the caliper. It provides protection and support for the internal parts.
- Pistons: Inside the caliper housing, there are one or more pistons. These pistons are pushed outward by hydraulic pressure (in hydraulic systems) or mechanical force (in cable-operated systems) when the rider engages the brake lever.
- Brake Pads: The caliper holds the brake pads. When the pistons move outward, they push the brake pads against the brake rotor, creating the necessary friction for braking.
- Guide Pins or Sliding Mechanism: In floating calipers, guide pins or a sliding mechanism allow the caliper to move slightly, ensuring even pressure distribution on both sides of the rotor.
- Seals and Dust Boots: Seals and dust boots protect the internal components of the caliper from dirt, debris, and moisture. They help maintain the performance and longevity of the caliper.
- Brake Fluid Inlet: In hydraulic brake systems, the caliper has an inlet for hydraulic fluid. When the brake lever is pressed, the hydraulic fluid is forced into the caliper, pushing the pistons outward.
- Bridge or Mounting Bracket: The caliper is mounted to the motorcycle's fork or frame using a bridge or mounting bracket. This secure attachment ensures that the caliper functions properly during braking.
It's important to note that there are different types of calipers, such as floating calipers and fixed calipers. Floating calipers have pistons on only one side and use a sliding mechanism to ensure even pressure distribution. Fixed calipers have pistons on both sides of the rotor and tend to offer higher braking performance and modulation.
A caliper in a disc brake system is responsible for converting the rider's input into braking force by squeezing the brake pads against the rotor. It's a vital component that plays a significant role in the overall braking performance of a motorcycle.
There are two main types of brake calipers used in disc brake systems on motorcycles: floating calipers and fixed (or rigid) calipers. These two types differ in their design, functionality, and the way they apply pressure to the brake pads and rotor. Here's a breakdown of each type:
1. Floating Calipers: Floating calipers, also known as sliding calipers, are a common type of calipers used in disc brake systems. They have pistons on only one side of the caliper and use a sliding mechanism to apply pressure evenly on both sides of the rotor. Here's how they work:
- Design: A floating caliper has one or more pistons on one side of the rotor and a set of brake pads. The other side of the caliper is designed to slide or float, allowing it to move slightly when the brake is applied.
- Functionality: When the rider applies the brake lever, hydraulic pressure (or mechanical force in cable-operated systems) pushes the piston(s) against the rotor. The caliper housing on the opposite side slides on guide pins, allowing the brake pads to engage the rotor evenly.
- Advantages:
- Simpler design and construction.
- Lower manufacturing and maintenance costs.
- Effective modulation and braking performance.
- Self-centering action due to the sliding mechanism.
- Disadvantages:
- Slightly less braking force compared to fixed calipers.
- Slight loss of efficiency due to the sliding mechanism.
2. Fixed (Rigid) Calipers: Fixed or rigid calipers have pistons on both sides of the rotor and do not slide or float. This design provides more consistent pressure distribution and improved braking performance:
- Design: A fixed caliper has pistons on both sides of the rotor, often arranged in a symmetrical pattern. Each piston corresponds to a set of brake pads.
- Functionality: When the brake is applied, hydraulic pressure (or mechanical force) is applied to both sets of pistons simultaneously, squeezing the brake pads against the rotor with even pressure.
- Advantages:
- Higher braking force and performance due to symmetrical pressure distribution.
- Reduced heat buildup and improved cooling due to even pressure.
- Enhanced modulation and responsiveness.
- Typically used in higher-performance and sports-oriented motorcycles.
- Disadvantages:
- More complex design and construction.
- Potentially higher manufacturing and maintenance costs.
- May require more precise manufacturing to ensure symmetrical operation.
The two main types of brake calipers, floating and fixed, offer different benefits and performance characteristics. Floating calipers are simpler and often found in standard motorcycles, while fixed calipers provide superior braking performance and are commonly used in higher-performance and sport-oriented models. The choice between the two depends on factors such as the motorcycle's intended use, rider preferences, and desired braking performance.
Best combination
Selecting the best combination of brakes for different types of motorcycles involves considering factors such as riding style, intended use, and rider preferences. Here's a general guideline for matching brake types with different types of bikes:
1. Sport Bikes / Sport Touring Bikes:
- Front Brake: Dual or quad-piston fixed calipers with large rotors for maximum stopping power and precise modulation.
- Rear Brake: Single-piston floating caliper or smaller fixed caliper for balance and control during aggressive riding.
2. Cruisers / Touring Bikes:
- Front Brake: Single or dual-piston fixed calipers with moderate-sized rotors for balanced braking.
- Rear Brake: Single-piston floating caliper or smaller fixed caliper for stable and controlled deceleration.
3. Adventure / Dual-Sport Bikes:
- Front Brake: Dual or quad-piston fixed calipers with versatile rotor sizes for a combination of on-road and off-road performance.
- Rear Brake: Single-piston floating caliper or smaller fixed caliper for controlled braking on different terrains.
4. Off-Road / Motocross Bikes:
- Front Brake: Single-piston floating caliper or smaller fixed caliper with compact rotor for precise control in off-road conditions.
- Rear Brake: Similar to the front, a single-piston floating caliper or smaller fixed caliper for controlled rear braking.
5. Track / Racing Bikes:
- Front Brake: Dual or quad-piston fixed calipers with high-performance brake pads and large rotors for exceptional stopping power and modulation.
- Rear Brake: Smaller single-piston floating caliper or fixed caliper for supplementary control and balance.
6. Vintage / Classic Bikes:
- Front Brake: Single-piston floating or fixed caliper, depending on the bike's era, with an appropriately sized rotor for classic aesthetics and reliable performance.
- Rear Brake: Similar to the front, a single-piston floating or fixed caliper with a balanced rotor size.
7. Commuter / City Bikes:
- Front Brake: Single-piston floating or fixed caliper with standard-sized rotor for everyday commuting and urban riding.
- Rear Brake: Similar to the front, a single-piston floating or fixed caliper for consistent and controlled braking.
8. Custom Bikes / Bobbers / Choppers:
- Front Brake: Depending on the desired style, a single-piston floating or fixed caliper with a rotor that complements the custom aesthetics.
- Rear Brake: Similar to the front, a single-piston floating or fixed caliper that matches the overall design.
It's important to note that the optimal brake combination also depends on the specific brake components' quality, pad materials, rotor materials, and overall brake system setup. Additionally, rider skill, maintenance habits, and local regulations play a role in determining the most suitable brake setup for a given motorcycle type. Consulting with professionals, considering manufacturer recommendations, and test-riding different brake setups can help you find the best combination for your specific motorcycle and riding style.
ABS
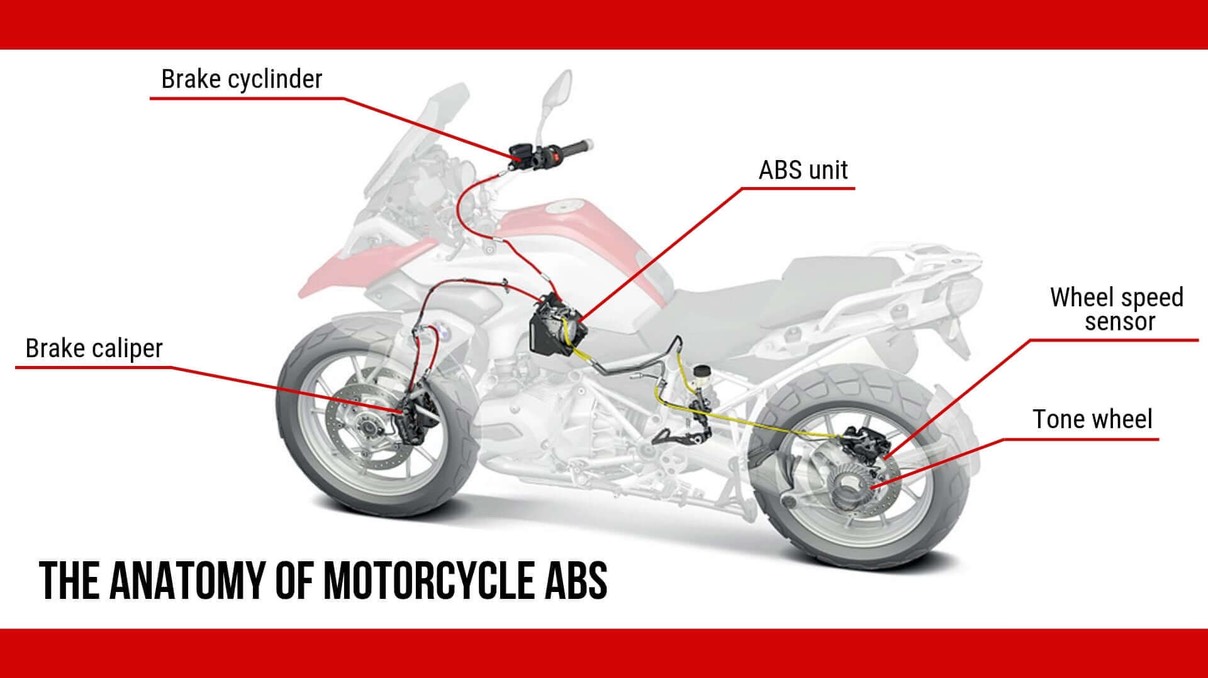
ABS stands for Anti-Lock Braking System. It's an advanced safety feature used in vehicles, including motorcycles, to prevent the wheels from locking up during hard braking, especially in emergencies. ABS helps riders maintain better control and stability while braking, reducing the risk of skidding, loss of traction, and potential accidents. Here's how ABS works:
1. Wheel Speed Sensors: An ABS-equipped motorcycle has sensors on each wheel (typically near the brake rotor or hub) that continuously monitor the speed of the wheels. These sensors send real-time data to the ABS control unit.
2. Control Unit: The ABS control unit is a computerized module that receives input from the wheel speed sensors. It processes this information and determines if any wheel is on the verge of locking up.
3. Hydraulic Modulator: The ABS includes a hydraulic modulator that regulates brake fluid pressure to each wheel independently. It consists of valves that control the amount of pressure applied to the brake caliper.
4. Brake Actuation: When the rider applies the brakes, the ABS monitors the wheel speed. If the sensors detect that a wheel is slowing down faster than it should, indicating possible lockup, the ABS control unit intervenes.
5. Intervening to Prevent Lockup: If a wheel is about to lock up, the ABS control unit quickly reduces the brake fluid pressure to that specific wheel using the hydraulic modulator. This prevents the brake pad from fully squeezing the rotor, allowing the wheel to maintain some level of rotation.
6. Controlled Braking: By momentarily releasing and reapplying the brake pressure many times per second, the ABS creates a pulsing effect that prevents the wheel from fully locking up. This allows the rider to maintain steering control while still decelerating effectively.
7. Skid-Free Braking: Because the wheels don't lock up, the motorcycle maintains traction with the road surface. This reduces the risk of skidding, maintaining stability and control, especially on slippery or uneven surfaces.
8. Release of ABS Intervention: Once the ABS detects that the wheels are no longer at risk of locking up, it restores full brake pressure to the affected wheel, allowing normal braking to continue.
Benefits of ABS:
- Improved Control: ABS helps riders maintain steering control during hard braking, reducing the risk of losing balance or skidding.
- Shorter Braking Distances: ABS allows riders to brake hard without locking the wheels, potentially leading to shorter stopping distances.
- Enhanced Safety: ABS can prevent accidents by reducing the chances of wheel lockup and loss of control, especially in emergency braking situations.
- Suitable for Various Surfaces: ABS works well on different road surfaces, such as wet, icy, or gravel-covered roads.
Drawbacks:
- Limited Traction: ABS may not be as effective in certain low-traction situations, like off-road riding or extreme cornering.
- Dependency: Riders can become overly reliant on ABS, potentially leading to decreased braking skill development.
ABS is a crucial safety technology that enhances a motorcycle's braking capabilities by preventing wheel lockup. By allowing controlled braking and maintaining stability, ABS significantly reduces the risk of accidents and provides riders with an extra layer of confidence during braking maneuvers.
How does ABS work?
Anti-Lock Braking System (ABS) is a sophisticated technology designed to prevent the wheels of a vehicle, including motorcycles, from locking up during braking. By preventing wheel lockup, ABS enhances control and stability during emergency braking and reduces the risk of skidding. Here's a more detailed explanation of how ABS works:
1. Wheel Speed Sensors: ABS-equipped vehicles have sensors mounted on each wheel, usually near the brake rotor or hub. These sensors continuously monitor the rotational speed of each wheel. The sensor generates a signal that is sent to the ABS control module.
2. ABS Control Module: The ABS control module is a computerized unit that receives input from the wheel speed sensors. It constantly compares the speed of each wheel to the vehicle's overall speed, evaluating any discrepancies that could indicate potential wheel lockup.
3. Brake Fluid Pressure Modulation: When the rider applies the brakes, the ABS control module analyzes the data from the wheel speed sensors. If it detects that one or more wheels are decelerating faster than the others, it indicates a potential lockup situation.
4. Hydraulic Valves: The ABS uses hydraulic valves located within the brake lines to modulate the brake fluid pressure to each wheel independently. These valves can rapidly open and close to adjust the pressure being applied to the brake caliper.
5. Intervening to Prevent Lockup: If the ABS control module determines that a wheel is on the verge of locking up, it activates the hydraulic valves for that wheel. The valves rapidly release and reapply the brake fluid pressure, creating a pulsating effect that prevents the brake pads from fully squeezing the rotor.
6. Pulsing Braking: The pulsating effect of the brake fluid pressure prevents the wheel from locking up, allowing it to maintain rotation. This action prevents skidding and maintains traction with the road surface.
7. Steering Control: Because the wheels are not locked up, the rider can maintain steering control even while braking hard. This is particularly important in emergencies where evasive maneuvers might be necessary.
8. Release of ABS Intervention: Once the ABS control module detects that the wheel is no longer at risk of locking up, it restores full brake fluid pressure to that wheel. This allows the rider to continue braking normally.
In summary, ABS works by monitoring the speed of each wheel and adjusting the brake fluid pressure to prevent wheel lockup. The rapid modulation of brake pressure helps the rider maintain control, stability, and traction during braking. ABS is a crucial safety feature that significantly enhances a vehicle's ability to stop safely in emergencies and challenging road conditions.
Types of ABS
Several types of Anti-Lock Braking Systems (ABS) have been developed over the years to enhance braking safety and control in various vehicles, including motorcycles. These types of ABS differ in terms of their technology, functionality, and application. Here are some of the common types of ABS:
1. Four-Channel, Four-Sensor ABS: This is the most advanced and commonly used type of ABS. It utilizes four wheel speed sensors (one for each wheel) and four separate hydraulic channels (one for each brake). Each channel is controlled independently, allowing the system to modulate brake pressure individually for each wheel. This type of ABS offers the highest level of control and stability during braking.
2. Three-Channel, Four-Sensor ABS: This system is typically used in vehicles with a non-driven (non-powered) front axle, such as some motorcycles. It uses three hydraulic channels (two for the front and one for the rear) and four-wheel speed sensors. The system controls the front brakes individually while treating the rear brakes as a single unit. While slightly less advanced than four-channel ABS, it still provides improved stability and control.
3. One-Channel, One-Sensor ABS: This simpler type of ABS is often used in motorcycles with only one braking system (usually rear). It employs a single hydraulic channel and a one-wheel speed sensor. It prevents rear-wheel lockup during braking. While it doesn't offer the same level of stability as more advanced systems, it can still help prevent skidding and loss of control.
4. Combined Braking System (CBS) or Linked Braking System (LBS): CBS or LBS is a system where applying the brake lever activates both front and rear brakes simultaneously. It's common on scooters and some entry-level motorcycles. While not true ABS, it offers improved braking control by distributing braking force between the front and rear wheels, preventing skidding.
5. Linked ABS: Linked ABS systems use sensors to detect conditions that might lead to wheel lockup. When one wheel approaches lockup, the system activates braking force on the other wheel as well, even if the rider is only using one brake lever. Linked ABS provides enhanced stability and stopping power, especially during emergency braking.
6. Integral ABS: Integral ABS is often used in conjunction with linked braking systems. It optimizes the distribution of braking force between the front and rear wheels, preventing wheel lockup and ensuring balanced braking performance.
It's important to note that the effectiveness of these ABS systems can vary based on their design, the quality of components, and the implementation. When choosing a motorcycle, consider the type of ABS it offers and how well it aligns with your riding style and needs. Always consult the motorcycle's manufacturer information and test ride to experience the ABS in action.
Let’s delve into each type of Anti-Lock Braking System (ABS) in more detail, along with their features, benefits, and differences:
1. Four-Channel, Four-Sensor ABS:
- Description: This advanced ABS type uses four wheel speed sensors (one for each wheel) and four separate hydraulic channels (one for each brake). It independently controls the brake pressure for each wheel, allowing precise modulation and stability.
- Benefits: Offers the highest level of control and stability during braking, minimizing the risk of wheel lockup, skidding, and loss of control. Effective in a wide range of riding conditions.
- Comparison: Provides the most sophisticated control and stability, making it suitable for various motorcycles, especially those with complex braking needs.
2. Three-Channel, Four-Sensor ABS:
- Description: Used in vehicles with non-driven front wheels, like some motorcycles, it has three hydraulic channels (two for the front and one for the rear) and four-wheel speed sensors. Front brakes are controlled individually, while the rear brakes work as a single unit.
- Benefits: Offers good stability and control, particularly in situations where independent control of the rear wheels isn't critical.
- Comparison: Balances control with fewer channels than the four-channel system, suitable for motorcycles with non-driven front wheels.
3. One-Channel, One-Sensor ABS:
- Description: Utilizes a single hydraulic channel and one-wheel speed sensor, typically used for preventing rear-wheel lockup.
- Benefits: Provides basic skid prevention for motorcycles with a single braking system (usually rear), enhancing safety.
- Comparison: Offers limited control compared to multi-channel systems, suitable for basic motorcycles with one braking system.
4. Combined Braking System (CBS) or Linked Braking System (LBS):
- Description: Not a true ABS, CBS/LBS connects the front and rear brakes, distributing braking force between them. Applying one brake lever triggers braking action on both wheels.
- Benefits: Improves braking balance and stability, especially for riders who may not use both brakes simultaneously effectively.
- Comparison: Offers better control than basic braking systems but lacks the independent modulation of true ABS.
5. Linked ABS:
- Description: Similar to CBS/LBS, linked ABS activates both brakes when either lever is used. However, it can also intervene independently to prevent wheel lockup.
- Benefits: Provides enhanced control and stopping power, with the added benefit of independent intervention to prevent skidding.
- Comparison: Offers better control than CBS/LBS with the added benefit of anti-skid technology.
6. Integral ABS:
- Description: Often paired with linked braking systems, integral ABS optimizes brake force distribution between front and rear wheels to prevent skidding.
- Benefits: Enhances braking stability and control by intelligently distributing braking force, minimizing the risk of wheel lockup.
- Comparison: Combines the benefits of linked braking with optimized brake force distribution for added stability.
Comparison Summary:
- Four-Channel ABS: The highest level of control, suitable for various motorcycles.
- Three-Channel ABS: Good stability and control for non-driven front wheels.
- One-Channel ABS: Basic skid prevention for motorcycles with a single braking system.
- CBS/LBS: Improved balance and stability, basic braking force distribution.
- Linked ABS: Improved control, and enhanced anti-skid technology.
- Integral ABS: Enhanced braking stability with optimized brake force distribution.
The choice among these ABS types depends on the motorcycle's design, riding conditions, and the level of braking control required. Multi-channel systems offer more precise modulation and stability, while linked systems provide improved braking balance. Always consider your riding style and needs when selecting the appropriate ABS type.
Determining the "best" ABS for motorcycles depends on several factors, including your riding style, the type of motorcycle, and your preferences. Different ABS systems offer varying levels of control, stability, and safety features. Here's a general overview of which ABS systems might be considered better suited for certain scenarios:
1. Four-Channel, Four-Sensor ABS:
- Advantages: Offers the highest level of control and stability during braking. Best for experienced riders, sports bikes, and those who prioritize maximum safety and precise braking modulation.
- Suitable For: High-performance motorcycles, sport touring, aggressive riding styles, riding in varied conditions.
2. Three-Channel, Four-Sensor ABS:
- Advantages: Provides good stability and control, especially for motorcycles with non-driven front wheels.
- Suitable For: Motorcycles with non-driven front wheels, adventure bikes, touring bikes, and riders who want a balance of control and stability.
3. One-Channel, One-Sensor ABS:
- Advantages: Basic skid prevention for motorcycles with a single braking system.
- Suitable For: Entry-level motorcycles, smaller displacement bikes, urban commuting, and riders seeking basic safety enhancement.
4. Linked ABS / Linked Braking System (LBS):
- Advantages: Offers improved braking balance and stability by distributing braking force between both wheels.
- Suitable For: Scooters, commuter bikes, and riders who prefer a simplified braking system that enhances control.
5. Linked ABS with Anti-Skid:
- Advantages: Provides improved control and anti-skid technology, combining the benefits of linked systems with anti-lock features.
- Suitable For: Mid-range motorcycles, touring bikes, and riders looking for improved stability and emergency braking.
6. Integral ABS:
- Advantages: Enhanced braking stability by optimizing brake force distribution.
- Suitable For: Touring motorcycles, cruisers, and riders who prioritize balanced braking across different conditions.
The "best" ABS depends on your specific needs and riding habits. Modern ABS systems are generally designed to enhance safety, but some riders might prefer more advanced systems for aggressive riding, while others might appreciate simplicity and stability for everyday commuting. When selecting a motorcycle with ABS, it's important to test-ride different models, read reviews, and understand how each ABS works with your chosen motorcycle type and riding style.
Here's a breakdown of what could be considered good ABS options for different types of motorcycles, taking into account their intended use and riding characteristics:
1. Sport Bikes / Sport Touring Bikes:
- Good ABS: Four-Channel, Four-Sensor ABS with advanced control and stability features. Look for systems that offer precise modulation and can handle aggressive braking scenarios often encountered in sport riding.
2. Cruisers / Touring Bikes:
- Good ABS: Three-Channel, Four-Sensor ABS, or Linked ABS. These systems provide stability during leisurely and long-distance rides while maintaining controlled braking.
3. Adventure / Dual-Sport Bikes:
- Good ABS: Three-Channel, Four-Sensor ABS or Linked ABS with anti-skid technology. These options cater to the diverse riding conditions often encountered during both on-road and off-road adventures.
4. Off-Road / Motocross Bikes:
- Good ABS: Off-road bikes typically prioritize responsive braking over ABS. Some adventure-focused models might offer ABS that can be switched off for off-road riding.
5. Track / Racing Bikes:
- Good ABS: While track-focused bikes may not prioritize ABS, if equipped, a high-performance, customizable ABS that can be adjusted for track conditions would be suitable.
6. Vintage / Classic Bikes:
- Good ABS: Linked ABS or basic ABS complements the classic aesthetics while still enhancing safety.
7. Commuter / City Bikes:
- Good ABS: One-Channel, One-Sensor ABS, or Linked ABS. These systems offer simple, effective skid prevention for urban commuting.
8. Custom Bikes / Bobbers / Choppers:
- Good ABS: Consider Linked ABS or basic ABS if available, taking into account the custom aesthetics of the bike.
9. Electric Motorcycles:
- Good ABS: Similar to conventional motorcycles, but with a focus on systems that can manage the specific characteristics of electric powertrains.
In general, a good ABS for each type of bike should provide stability, controlled braking, and anti-lock features tailored to the specific riding conditions and preferences associated with that bike type. Remember to research and test-ride different models to ensure that the chosen ABS aligns with your riding style and safety needs.
How to Maintain the Breaks

Maintaining your motorcycle's brakes is crucial for your safety and the overall performance of your bike. Here's a step-by-step guide on how to effectively maintain your brakes:
1. Regular Inspection: Perform visual inspections of your brake components regularly, looking for signs of wear, damage, or any issues. This includes checking brake pads, rotors/discs, calipers, brake lines, and fluid reservoirs.
2. Brake Pad Check: Monitor the thickness of your brake pads. Most pads have a wear indicator groove; replace the pads if they are worn down to this level. Inspect the brake pads for uneven wear, which might indicate a caliper or rotor issue.
3. Brake Fluid: Check the brake fluid level in the reservoir regularly. Make sure the fluid is within the recommended range and is clean. Brake fluid absorbs moisture over time, leading to decreased performance, so consider changing it every 1-2 years.
4. Bleeding Brakes: Air can enter the brake lines, reducing braking effectiveness. Bleeding the brake system removes air bubbles and ensures proper fluid circulation. If you're unsure how to do this, consult your motorcycle's service manual or a professional mechanic.
5. Rotor/Disc Inspection: Examine the brake discs/rotors for any scoring, warping, or unusual wear patterns. If you notice deep grooves, cracks, or a blue hue, consider replacing the rotors.
6. Caliper Maintenance: Ensure the calipers move freely and that the pistons retract fully after releasing the brake lever. Lubricate caliper sliding pins with appropriate lubricant if necessary.
7. Brake Lines: Inspect brake lines for any signs of damage, bulging, or leakage. Damaged brake lines can compromise brake performance. Replace them if you notice any issues.
8. Lubrication: Lubricate pivot points and moving parts as needed. Use brake-specific lubricants to avoid contaminating the brake pads or rotors.
9. Brake Lever Feel: Pay attention to the feel of the brake lever. If it feels spongy or requires excessive force to engage, there might be air in the brake lines or other issues.
10. Professional Service: If you're not confident in your maintenance skills, or if you notice any major issues, it's best to have your brakes inspected and serviced by a professional mechanic.
11. Ride Responsibly: Practice safe riding habits that minimize excessive use of the brakes, such as maintaining a safe following distance and anticipating stops.
12. Owner's Manual: Refer to your motorcycle's owner's manual for specific maintenance recommendations and intervals.
Remember that brake maintenance is not something to be taken lightly. Properly maintained brakes are essential for your safety and the safety of others on the road. If you're ever unsure about any aspect of brake maintenance, seek advice from experienced riders or professional mechanics.
Maintaining your motorcycle's Anti-Lock Braking System (ABS) is essential for ensuring its optimal performance and your safety on the road. While the ABS components themselves don't require specific maintenance, keeping the overall braking system in good condition is crucial. Here's how to maintain your motorcycle's ABS effectively:
1. Regular Brake System Inspection: Perform routine inspections of your motorcycle's entire brake system, including the ABS components. Look for signs of wear, damage, leaks, and any issues that might affect braking performance.
2. Visual Inspection of ABS Components: Examine the ABS sensors, wiring, and connections for any signs of damage or deterioration. Ensure that the sensors are clean and free from debris.
3. Maintain Brake Fluid: Brake fluid is critical for the proper functioning of ABS. Regularly check the brake fluid level in the reservoir and top it up if necessary. Also, consider changing the brake fluid according to the manufacturer's recommended schedule to prevent moisture buildup.
4. Check Brake Pads and Rotors: Monitor the condition of your brake pads and rotors. Worn brake pads can compromise braking performance, and worn rotors can lead to uneven braking and ABS issues.
5. Brake Fluid Flush and Bleeding: Over time, brake fluid can become contaminated and lose its effectiveness. Perform brake fluid flushes and bleeding as recommended by the manufacturer to maintain ABS performance and prevent brake fade.
6. Maintain Tires: Proper tire maintenance is essential for ABS to function optimally. Ensure your tires are properly inflated and have sufficient tread depth to maintain good traction and prevent skidding.
7. Ride Responsibly: Ride within your skill level and adhere to safe riding practices. Sudden and aggressive braking can put undue stress on the ABS, so be mindful of your braking inputs.
8. Professional Inspection and Service: If you notice any unusual behavior in your ABS or have concerns about its performance, have your motorcycle inspected by a qualified mechanic with experience in ABS systems.
9. Follow Manufacturer's Recommendations: Refer to your motorcycle's owner's manual for specific maintenance recommendations related to the ABS. Different motorcycle models might have varying maintenance intervals.
10. Keep the Motorcycle Clean: Regularly clean your motorcycle, including the ABS sensors and components, to prevent dirt, debris, and contaminants from affecting the system's performance.
11. Update Software: For motorcycles with advanced ABS systems that include electronic control units (ECUs), keep the software updated as recommended by the manufacturer to ensure optimal performance.
Remember that while you can perform visual inspections and basic maintenance tasks, some ABS-related tasks might require specialized tools and expertise. If you're unsure about any aspect of ABS maintenance, seek assistance from a professional mechanic or a dealership with experience in your motorcycle's ABS.
In the world of two-wheelers, the journey to mastery begins with understanding the intricacies of the braking system. As you embark on the quest for your perfect ride, remember that the quality of your bike's brakes directly impacts your safety and the overall riding experience. The art of selecting the proper bike lies in assessing factors such as ABS availability, brake types, disc size, and overall braking performance.
Whether you're a seasoned rider or a newcomer to the world of motorcycles, investing time in studying and appreciating the braking system is a non-negotiable step. A bike equipped with a well-engineered braking mechanism not only empowers you with control and confidence but also serves as your trusted companion on every journey. As you venture forth on two wheels, may your choice be a testament to your commitment to safety, precision, and the exhilarating freedom that the open road offers.
Mastering Motorcycle Ergonomics: Elevate Your Ride to New Heights
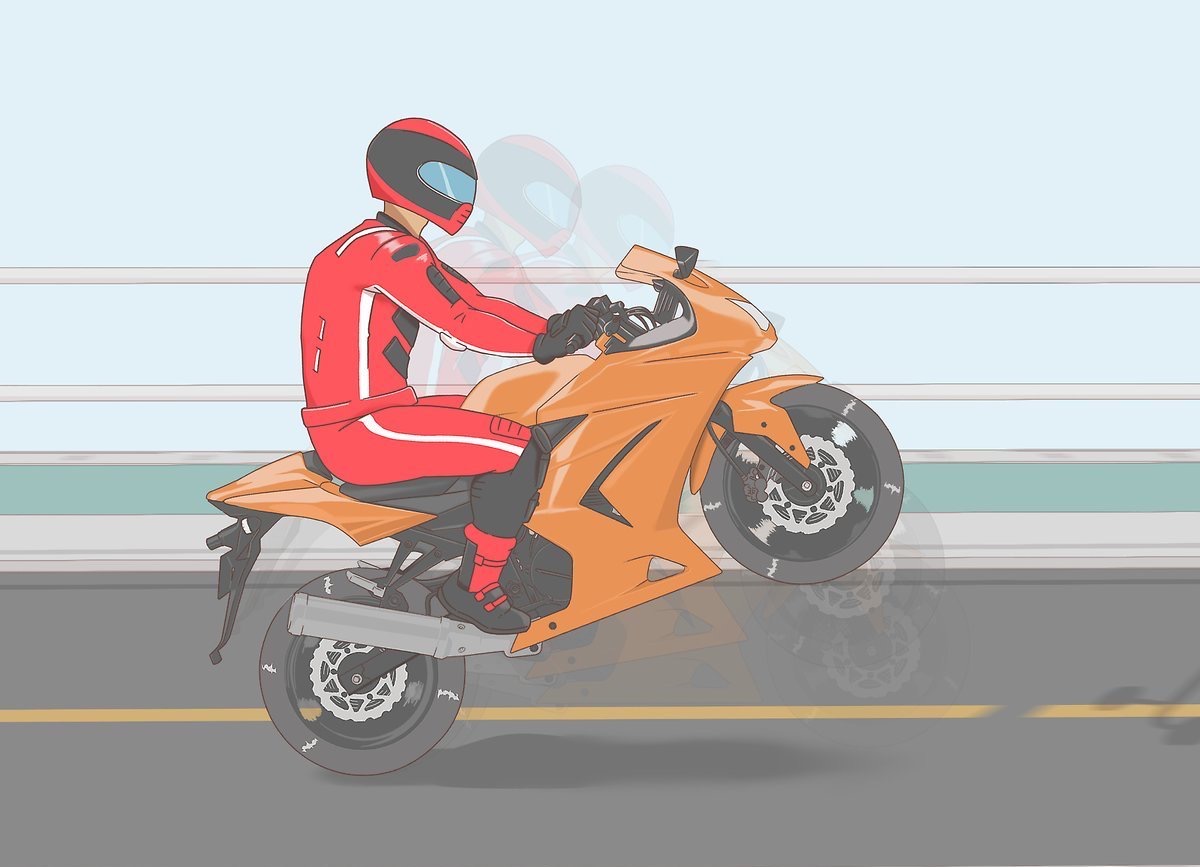
Embarking on a motorcycle journey is like embarking on a symphony of freedom and thrill. But have you ever considered the hidden artistry that makes each ride an experience like no other? Welcome to the world of motorcycle ergonomics – where comfort, control, and customization come together to sculpt your ride into a masterpiece. In this blog, we unravel the secrets of motorcycle ergonomics and reveal how you can harness its power for an unforgettable adventure on two wheels.
Unveiling Motorcycle Ergonomics: Your Path to Riding Bliss
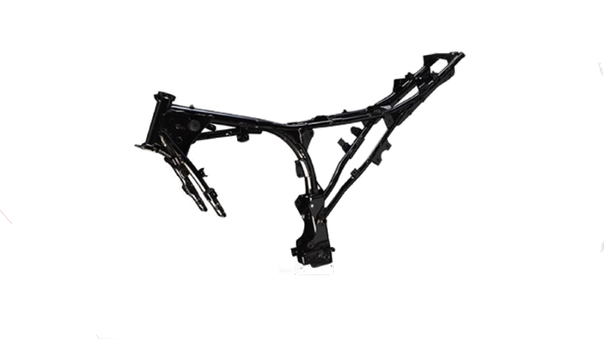
Revving up the engine, feeling the wind against your skin, and conquering open roads – motorcycle riding is an exhilarating experience that speaks to the adventurer in all of us. But beneath the surface of this two-wheeled escapade lies a crucial element that can transform your ride from ordinary to extraordinary: motorcycle ergonomics. In this blog post, we'll delve into the art and science of motorcycle ergonomics and explore how riders can harness their benefits for an unparalleled journey.
Motorcycle Ergonomics Explained
The ergonomics of a motorcycle encompass a captivating blend of intricate design principles that meld form and function. This fusion results in a symphony of comfort, control, and aesthetics, all orchestrated to provide an exhilarating experience for riders. Let's delve into the realm of motorcycle ergonomics, where precision meets passion.
At the heart of motorcycle ergonomics lies the concept of rider-body-machine integration. This triadic relationship orchestrates the positioning of the handlebars, footpegs, and seat to facilitate a harmonious connection between the rider and the mechanical steed. Engineers meticulously decipher the optimal angles and dimensions, akin to artisans sculpting a masterpiece, to ensure the rider's limbs find their sweet spot, bestowing a sense of oneness with the machine.
In the theater of motorcycle ergonomics, customization dances hand in hand with comfort. Adjustable components such as handlebars, foot controls, and even seat heights yield a canvas upon which riders can paint their ergonomic preferences. It's akin to haute couture for motorcyclists, where riders become designers, sculpting their riding posture to suit their physique and riding style.
And let's not forget the dance of aerodynamics in this narrative. The ergonomics of a motorcycle extend beyond a mere ballet of limbs; they encompass a tango with the wind. The curvature of the fairing, the positioning of the mirrors, the contour of the tank – each curve is calculated with aerodynamic choreography in mind. The wind whispers past, gently embracing the rider, as the motorcycle cuts through the air with grace and purpose.
In the realm of motorcycle ergonomics, safety pirouettes alongside style. The positioning of the controls – the levers, the switches – is meticulously designed to allow intuitive operation without diverting attention from the road. It's a ballet of cognition, ensuring that every interaction becomes second nature, minimizing distractions and maximizing the symbiotic bond between rider and machine.
As twilight paints the horizon with hues of enchantment, the symphony of motorcycle ergonomics crescendos. A rider, ensconced in the ergonomic embrace of the motorcycle, becomes the conductor of this symphony. With each twist of the throttle, each lean into a turn, they compose their opus – a melody of passion and precision, where perplexity and burstiness unite in a narrative that traverses the open road.
Possible Options
The world of motorcycle ergonomics offers a rich tapestry of options, each thread woven to cater to the diverse needs and preferences of riders. From adjustable components to specialized accessories, the possibilities are as varied as the roads they traverse. Here are some ergonomic options that adorn the palette of motorcyclists:
- Adjustable Handlebars: The handlebars, often regarded as a motorcycle's steering wheel, can be adjusted for height, width, and angle. Riders can fine-tune their riding posture to suit their physique and riding style, whether it's a relaxed cruiser stance or an aggressive sports bike lean.
- Footpeg Placement: Footpegs can be repositioned to accommodate riders with varying leg lengths. This customization not only affects comfort but also rider control, ensuring optimal access to foot controls for smooth shifts and braking.
- Customizable Seats: The seat is a rider's throne, and its contour and height can be tailored to fit individual preferences. Some seats offer additional cushioning, gel inserts, or memory foam to enhance long-distance comfort.
- Handlebar Risers: These nifty accessories raise the handlebars, altering the riding posture to reduce strain on the wrists and shoulders. Adventure and touring riders often opt for handlebar risers to make long rides more comfortable.
- Windshields and Fairings: Windshields can be adjusted in height to redirect wind away from the rider's body. Fairings, designed for sport and touring bikes, play a dual role by offering wind protection and aiding in aerodynamics.
- Aftermarket Grips: Grips come in various materials and textures, catering to different levels of grip comfort and control preferences. They can also absorb vibrations, reducing rider fatigue on longer rides.
- Ergonomic Levers: Adjustable brake and clutch levers allow riders to tailor their reach and lever travel. This customization ensures ease of operation while keeping fingers comfortably poised on the controls.
- Rider Foot Controls: Forward or mid-mounted controls can be swapped to suit different riding styles. Forward controls offer a laid-back cruiser feel, while mid-controls cater to a more neutral stance.
- Suspension Adjustment: The motorcycle's suspension can be tuned to match the rider's weight and riding conditions. This adjustment affects both comfort and handling, enabling a smoother ride and better control.
- Rider Backrests: For those who seek ultimate lumbar support, detachable rider backrests can be installed on certain models. This adds an extra layer of comfort on long rides.
- Electronic Rider Aids: Modern motorcycles often come equipped with electronic rider aids, such as adjustable riding modes, traction control, and throttle response settings, allowing riders to tailor the bike's performance to different road conditions.
- Frame Modifications: Some custom builds involve modifying the motorcycle's frame to achieve a unique riding position. This option is often chosen by enthusiasts seeking a truly bespoke experience.
In the grand tapestry of motorcycle ergonomics, these options form a dazzling constellation, offering riders the freedom to mould their riding experience. Each adjustment is a brushstroke on the canvas of personal expression, where the journey is not just about the destination but also about the tactile and ergonomic voyage.
Determining the best Ergonomics
Determining the best ergonomics for a rider involves a combination of understanding the rider's physical characteristics, riding preferences, and intended use of the motorcycle. Here's a step-by-step guide to help riders find their optimal ergonomic setup:
- Measure and Assess Rider's Physical Dimensions: Start by measuring the rider's height, inseam, arm length, and torso length. These measurements will provide a baseline for adjusting various components of the motorcycle.
- Understand Riding Style and Intent: Determine the rider's intended use for the motorcycle – commuting, touring, sport riding, off-roading, etc. Different riding styles and terrains may require different ergonomic setups.
- Visit a Dealership or Showroom: If possible, visit a motorcycle dealership or showroom and sit on various models. Pay attention to how your body fits the bike. Note if your feet comfortably reach the ground, if your arms are stretched too far or not enough, and if the seating position feels natural.
- Consult with Experts: Motorcycle dealerships, experienced riders, and professional fitting services can provide valuable insights into proper ergonomics. They can help you understand how different adjustments will affect your comfort and control.
- Test Ride and Evaluate: If given the opportunity, take potential motorcycles for a test ride. Pay attention to how your body feels during acceleration, braking, and turning. Note any discomfort, strain, or awkwardness.
- Consider Adjustment Options: Research the adjustability options available for the specific motorcycle model you're interested in. Look into adjustable handlebars, foot controls, seats, and other components that can be customized.
- Utilize Manufacturer Guidelines: Some motorcycle manufacturers provide guidelines for adjusting ergonomics based on the rider's height and other measurements. Consult the owner's manual or manufacturer's website for this information.
- Seek Professional Fitting Services: If you're having difficulty finding the right ergonomic setup on your own, consider seeking the assistance of a professional fitting service. These experts can analyze your measurements, riding style, and preferences to recommend the best adjustments.
- Gradual Adjustments: Make adjustments gradually and test each change. Small tweaks can make a significant difference, so don't rush the process.
- Listen to Your Body: During and after rides, pay attention to how your body feels. Any discomfort, numbness, or strain may indicate that further adjustments are needed.
- Personalize Your Setup: Keep in mind that your ergonomic preferences are unique. What works for one rider may not work for another. Experiment with different settings to find a balance of comfort, control, and confidence.
- Regular Reevaluation: As your riding skills and preferences evolve, periodically revisit your ergonomic setup. Changes in fitness level, weight, or riding style may warrant adjustments over time.
Remember, the goal is to create an ergonomic setup that enhances your riding experience by optimizing comfort, control, and safety. Embrace the journey of discovery and fine-tuning as you sculpt the perfect connection between you and your motorcycle.
The Dance of Ergonomics: Picture a symphony where the rider and machine are the lead performers. Motorcycle ergonomics orchestrates this symphony, ensuring that the rider melds seamlessly with the bike. It's the interplay of adjustable handlebars, footpegs, seats, and controls that compose a harmonious riding posture, making you one with the machine. This dance goes beyond aesthetics; it's a partnership that affects comfort, control, and even safety.
The Benefits Unveiled:
- Comfort and Endurance: Comfort is the cornerstone of an enjoyable ride. Properly adjusted ergonomics prevent discomfort, numbness, and fatigue, allowing you to ride longer without feeling drained. Adjustable seats with extra cushioning or gel inserts, handlebars at the perfect height, and footpegs positioned for your leg length all combine to create a comfortable haven.
- Control and Confidence: Ergonomics doesn't just pamper your body; it empowers your ride. With well-adjusted controls, you gain greater leverage, smoother transitions, and more precise handling. Your confidence soars as you effortlessly command the motorcycle, knowing that you're in perfect sync with every twist and turn.
- Customization for Your Style: Riders come in all shapes and sizes, and so do riding styles. Whether you're a cruiser enthusiast, a sportbike aficionado, or an adventure seeker, motorcycle ergonomics is your canvas for personalization. Adjust handlebars for an aggressive lean or a relaxed posture. Position footpegs for your preference – forward or mid-mounted. Craft your perfect ride by sculpting the ergonomics to match your unique style.
- Reduced Fatigue and Enhanced Safety: Fatigue can be a rider's worst enemy. Ergonomics counteracts this foe, ensuring that you're not fighting your own body during the journey. Proper posture promotes better blood circulation, reduces strain on muscles, and maintains focus, ultimately enhancing your safety on the road.
- Long-Distance Adventures: Dreaming of epic cross-country escapades? Motorcycle ergonomics holds the key to unlocking those distant horizons. With optimized ergonomics, you can ride for extended periods without the discomfort that might otherwise cut your journey short.
- A Connection Like No Other: Imagine a moment when your bike becomes an extension of yourself. That's the magic of motorcycle ergonomics. As you navigate the roads, every touch of the controls, every lean into a curve becomes an intuitive extension of your thoughts. It's a sensory connection that's impossible to replicate elsewhere.
In the realm of motorcycle riding, ergonomics isn't just a concept; it's a transformative force. It's the essence of comfort, the root of control, and the embodiment of personalization. Riders who embrace the intricacies of ergonomics are rewarded with a ride that's uniquely theirs – a ride that's not just about the destination, but about the journey itself. So, whether you're a seasoned rider or a novice adventurer, remember that motorcycle ergonomics is your gateway to unlocking the full potential of your ride.
In the world of motorcycle riding, where every twist of the throttle is a symphony of freedom, motorcycle ergonomics takes center stage as the conductor of your masterpiece. The comfort, control, and customization it brings are the notes that harmonize into an experience that resonates deep within you. As you carve through winding roads and breeze along open highways, remember that motorcycle ergonomics isn't just a technical aspect – it's the key that unlocks the door to a journey where you and your machine move as one. So, whether you're a casual rider or a passionate adventurer, embrace the magic of ergonomic design, and let it guide you on a ride that's not just a moment in time, but a lifelong symphony of exhilaration and connection. Gear up, adjust your ergonomics, and let your journey unfold in perfect harmony.
Mastering Motorcycle Ergonomics: Elevate Your Ride to New Heights
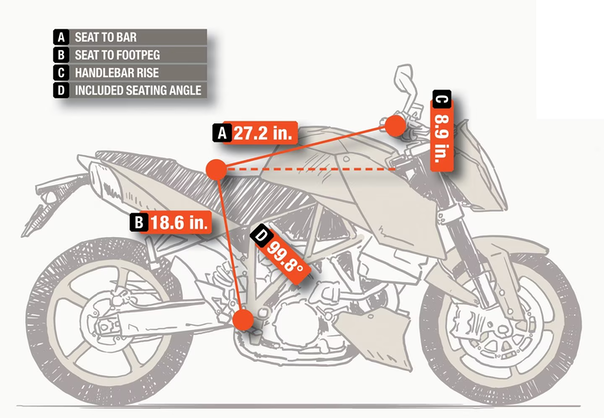
Embarking on a motorcycle journey is like embarking on a symphony of freedom and thrill. But have you ever considered the hidden artistry that makes each ride an experience like no other? Welcome to the world of motorcycle ergonomics – where comfort, control, and customization come together to sculpt your ride into a masterpiece. In this blog, we unravel the secrets of motorcycle ergonomics and reveal how you can harness its power for an unforgettable adventure on two wheels.
Unveiling Motorcycle Ergonomics: Your Path to Riding Bliss
Revving up the engine, feeling the wind against your skin, and conquering open roads – motorcycle riding is an exhilarating experience that speaks to the adventurer in all of us. But beneath the surface of this two-wheeled escapade lies a crucial element that can transform your ride from ordinary to extraordinary: motorcycle ergonomics. In this blog post, we'll delve into the art and science of motorcycle ergonomics and explore how riders can harness their benefits for an unparalleled journey.
Motorcycle Ergonomics Explained
The ergonomics of a motorcycle encompass a captivating blend of intricate design principles that meld form and function. This fusion results in a symphony of comfort, control, and aesthetics, all orchestrated to provide an exhilarating experience for riders. Let's delve into the realm of motorcycle ergonomics, where precision meets passion.
At the heart of motorcycle ergonomics lies the concept of rider-body-machine integration. This triadic relationship orchestrates the positioning of the handlebars, footpegs, and seat to facilitate a harmonious connection between the rider and the mechanical steed. Engineers meticulously decipher the optimal angles and dimensions, akin to artisans sculpting a masterpiece, to ensure the rider's limbs find their sweet spot, bestowing a sense of oneness with the machine.
In the theater of motorcycle ergonomics, customization dances hand in hand with comfort. Adjustable components such as handlebars, foot controls, and even seat heights yield a canvas upon which riders can paint their ergonomic preferences. It's akin to haute couture for motorcyclists, where riders become designers, sculpting their riding posture to suit their physique and riding style.
And let's not forget the dance of aerodynamics in this narrative. The ergonomics of a motorcycle extend beyond a mere ballet of limbs; they encompass a tango with the wind. The curvature of the fairing, the positioning of the mirrors, the contour of the tank – each curve is calculated with aerodynamic choreography in mind. The wind whispers past, gently embracing the rider, as the motorcycle cuts through the air with grace and purpose.
In the realm of motorcycle ergonomics, safety pirouettes alongside style. The positioning of the controls – the levers, the switches – is meticulously designed to allow intuitive operation without diverting attention from the road. It's a ballet of cognition, ensuring that every interaction becomes second nature, minimizing distractions and maximizing the symbiotic bond between rider and machine.
As twilight paints the horizon with hues of enchantment, the symphony of motorcycle ergonomics crescendos. A rider, ensconced in the ergonomic embrace of the motorcycle, becomes the conductor of this symphony. With each twist of the throttle, each lean into a turn, they compose their opus – a melody of passion and precision, where perplexity and burstiness unite in a narrative that traverses the open road.
Possible Options
The world of motorcycle ergonomics offers a rich tapestry of options, each thread woven to cater to the diverse needs and preferences of riders. From adjustable components to specialized accessories, the possibilities are as varied as the roads they traverse. Here are some ergonomic options that adorn the palette of motorcyclists:
- Adjustable Handlebars: The handlebars, often regarded as a motorcycle's steering wheel, can be adjusted for height, width, and angle. Riders can fine-tune their riding posture to suit their physique and riding style, whether it's a relaxed cruiser stance or an aggressive sports bike lean.
- Footpeg Placement: Footpegs can be repositioned to accommodate riders with varying leg lengths. This customization not only affects comfort but also rider control, ensuring optimal access to foot controls for smooth shifts and braking.
- Customizable Seats: The seat is a rider's throne, and its contour and height can be tailored to fit individual preferences. Some seats offer additional cushioning, gel inserts, or memory foam to enhance long-distance comfort.
- Handlebar Risers: These nifty accessories raise the handlebars, altering the riding posture to reduce strain on the wrists and shoulders. Adventure and touring riders often opt for handlebar risers to make long rides more comfortable.
- Windshields and Fairings: Windshields can be adjusted in height to redirect wind away from the rider's body. Fairings, designed for sport and touring bikes, play a dual role by offering wind protection and aiding in aerodynamics.
- Aftermarket Grips: Grips come in various materials and textures, catering to different levels of grip comfort and control preferences. They can also absorb vibrations, reducing rider fatigue on longer rides.
- Ergonomic Levers: Adjustable brake and clutch levers allow riders to tailor their reach and lever travel. This customization ensures ease of operation while keeping fingers comfortably poised on the controls.
- Rider Foot Controls: Forward or mid-mounted controls can be swapped to suit different riding styles. Forward controls offer a laid-back cruiser feel, while mid-controls cater to a more neutral stance.
- Suspension Adjustment: The motorcycle's suspension can be tuned to match the rider's weight and riding conditions. This adjustment affects both comfort and handling, enabling a smoother ride and better control.
- Rider Backrests: For those who seek ultimate lumbar support, detachable rider backrests can be installed on certain models. This adds an extra layer of comfort on long rides.
- Electronic Rider Aids: Modern motorcycles often come equipped with electronic rider aids, such as adjustable riding modes, traction control, and throttle response settings, allowing riders to tailor the bike's performance to different road conditions.
- Frame Modifications: Some custom builds involve modifying the motorcycle's frame to achieve a unique riding position. This option is often chosen by enthusiasts seeking a truly bespoke experience.
In the grand tapestry of motorcycle ergonomics, these options form a dazzling constellation, offering riders the freedom to mould their riding experience. Each adjustment is a brushstroke on the canvas of personal expression, where the journey is not just about the destination but also about the tactile and ergonomic voyage.
Determining the best Ergonomics
Determining the best ergonomics for a rider involves a combination of understanding the rider's physical characteristics, riding preferences, and intended use of the motorcycle. Here's a step-by-step guide to help riders find their optimal ergonomic setup:
- Measure and Assess Rider's Physical Dimensions: Start by measuring the rider's height, inseam, arm length, and torso length. These measurements will provide a baseline for adjusting various components of the motorcycle.
- Understand Riding Style and Intent: Determine the rider's intended use for the motorcycle – commuting, touring, sport riding, off-roading, etc. Different riding styles and terrains may require different ergonomic setups.
- Visit a Dealership or Showroom: If possible, visit a motorcycle dealership or showroom and sit on various models. Pay attention to how your body fits the bike. Note if your feet comfortably reach the ground, if your arms are stretched too far or not enough, and if the seating position feels natural.
- Consult with Experts: Motorcycle dealerships, experienced riders, and professional fitting services can provide valuable insights into proper ergonomics. They can help you understand how different adjustments will affect your comfort and control.
- Test Ride and Evaluate: If given the opportunity, take potential motorcycles for a test ride. Pay attention to how your body feels during acceleration, braking, and turning. Note any discomfort, strain, or awkwardness.
- Consider Adjustment Options: Research the adjustability options available for the specific motorcycle model you're interested in. Look into adjustable handlebars, foot controls, seats, and other components that can be customized.
- Utilize Manufacturer Guidelines: Some motorcycle manufacturers provide guidelines for adjusting ergonomics based on the rider's height and other measurements. Consult the owner's manual or manufacturer's website for this information.
- Seek Professional Fitting Services: If you're having difficulty finding the right ergonomic setup on your own, consider seeking the assistance of a professional fitting service. These experts can analyze your measurements, riding style, and preferences to recommend the best adjustments.
- Gradual Adjustments: Make adjustments gradually and test each change. Small tweaks can make a significant difference, so don't rush the process.
- Listen to Your Body: During and after rides, pay attention to how your body feels. Any discomfort, numbness, or strain may indicate that further adjustments are needed.
- Personalize Your Setup: Keep in mind that your ergonomic preferences are unique. What works for one rider may not work for another. Experiment with different settings to find a balance of comfort, control, and confidence.
- Regular Reevaluation: As your riding skills and preferences evolve, periodically revisit your ergonomic setup. Changes in fitness level, weight, or riding style may warrant adjustments over time.
Remember, the goal is to create an ergonomic setup that enhances your riding experience by optimizing comfort, control, and safety. Embrace the journey of discovery and fine-tuning as you sculpt the perfect connection between you and your motorcycle.
The Dance of Ergonomics: Picture a symphony where the rider and machine are the lead performers. Motorcycle ergonomics orchestrates this symphony, ensuring that the rider melds seamlessly with the bike. It's the interplay of adjustable handlebars, footpegs, seats, and controls that compose a harmonious riding posture, making you one with the machine. This dance goes beyond aesthetics; it's a partnership that affects comfort, control, and even safety.
The Benefits Unveiled:
- Comfort and Endurance: Comfort is the cornerstone of an enjoyable ride. Properly adjusted ergonomics prevent discomfort, numbness, and fatigue, allowing you to ride longer without feeling drained. Adjustable seats with extra cushioning or gel inserts, handlebars at the perfect height, and footpegs positioned for your leg length all combine to create a comfortable haven.
- Control and Confidence: Ergonomics doesn't just pamper your body; it empowers your ride. With well-adjusted controls, you gain greater leverage, smoother transitions, and more precise handling. Your confidence soars as you effortlessly command the motorcycle, knowing that you're in perfect sync with every twist and turn.
- Customization for Your Style: Riders come in all shapes and sizes, and so do riding styles. Whether you're a cruiser enthusiast, a sportbike aficionado, or an adventure seeker, motorcycle ergonomics is your canvas for personalization. Adjust handlebars for an aggressive lean or a relaxed posture. Position footpegs for your preference – forward or mid-mounted. Craft your perfect ride by sculpting the ergonomics to match your unique style.
- Reduced Fatigue and Enhanced Safety: Fatigue can be a rider's worst enemy. Ergonomics counteracts this foe, ensuring that you're not fighting your own body during the journey. Proper posture promotes better blood circulation, reduces strain on muscles, and maintains focus, ultimately enhancing your safety on the road.
- Long-Distance Adventures: Dreaming of epic cross-country escapades? Motorcycle ergonomics holds the key to unlocking those distant horizons. With optimized ergonomics, you can ride for extended periods without the discomfort that might otherwise cut your journey short.
- A Connection Like No Other: Imagine a moment when your bike becomes an extension of yourself. That's the magic of motorcycle ergonomics. As you navigate the roads, every touch of the controls, every lean into a curve becomes an intuitive extension of your thoughts. It's a sensory connection that's impossible to replicate elsewhere.
In the realm of motorcycle riding, ergonomics isn't just a concept; it's a transformative force. It's the essence of comfort, the root of control, and the embodiment of personalization. Riders who embrace the intricacies of ergonomics are rewarded with a ride that's uniquely theirs – a ride that's not just about the destination, but about the journey itself. So, whether you're a seasoned rider or a novice adventurer, remember that motorcycle ergonomics is your gateway to unlocking the full potential of your ride.
In the world of motorcycle riding, where every twist of the throttle is a symphony of freedom, motorcycle ergonomics takes center stage as the conductor of your masterpiece. The comfort, control, and customization it brings are the notes that harmonize into an experience that resonates deep within you. As you carve through winding roads and breeze along open highways, remember that motorcycle ergonomics isn't just a technical aspect – it's the key that unlocks the door to a journey where you and your machine move as one. So, whether you're a casual rider or a passionate adventurer, embrace the magic of ergonomic design, and let it guide you on a ride that's not just a moment in time, but a lifelong symphony of exhilaration and connection. Gear up, adjust your ergonomics, and let your journey unfold in perfect harmony.
Mastering Motorcycle Design: Decoding Rake and Trail Dynamics
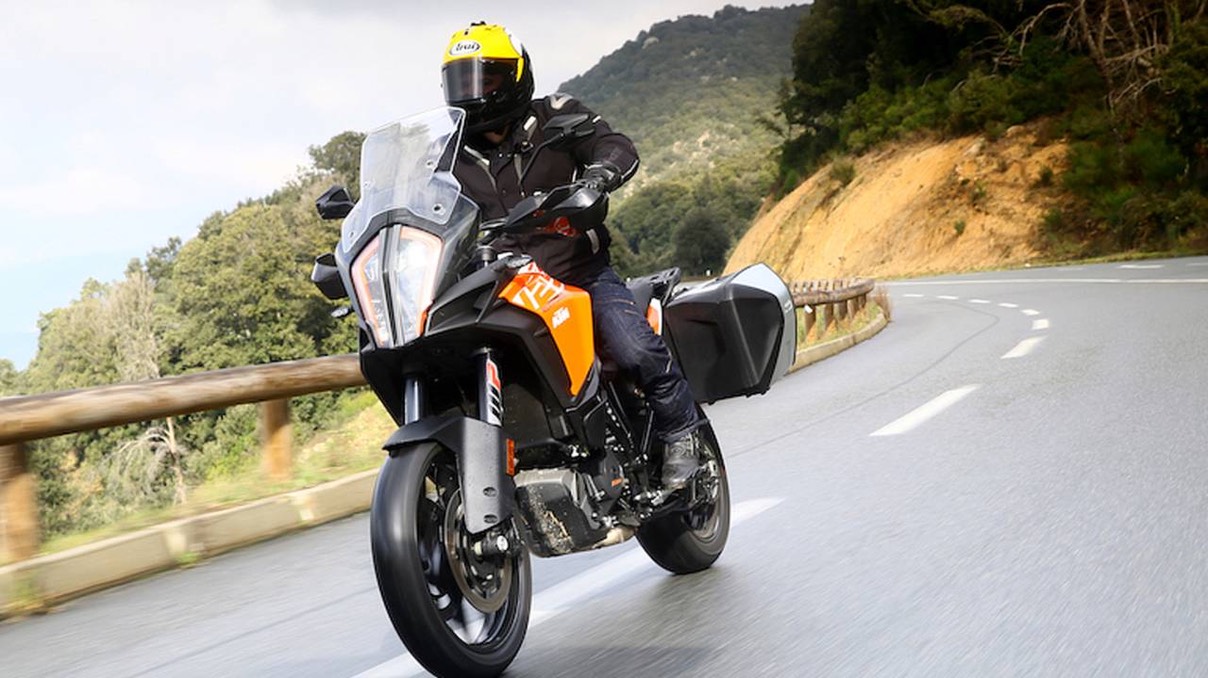
Embarking on a two-wheeled journey is an experience like no other. Behind the exhilarating ride lies a realm of engineering nuances that define how a motorcycle handles, corners, and responds to the rider's touch. Among these intricacies, the concepts of "rake" and "trail" emerge as the unsung heroes of motorcycle design. In this blog post, we'll unveil the mysteries of rake and trail, explore their determination, and uncover their profound influence on the art of crafting unforgettable rides.
Unveiling the Dynamics of Rake and Trail in Motorcycle Design
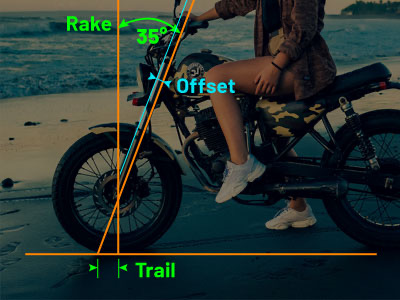
When it comes to motorcycles, the interplay of intricate engineering and design elements is what gives each bike its unique personality on the road. Among these elements, "rake" and "trail" stand as fundamental parameters that influence a motorcycle's handling, stability, and overall riding experience. Let's embark on a journey to understand these concepts, explore how they're determined, and uncover their significance in the world of motorcycle design.
What is rake and trail for a motorcycle?
Rake and trail, two fundamental terms in the realm of motorcycle engineering and design, play a pivotal role in determining a bike's stability, maneuverability, and overall handling characteristics. Let's delve into these concepts to unravel their significance.
Rake: Picture yourself observing a motorcycle from the side – the angle formed between the bike's steering axis (an imaginary line passing through the headstock and down to the ground) and the vertical is known as the "rake angle." This angle is a key factor in determining how the motorcycle responds to steering input.
Imagine a chopper with an exaggerated rake angle. The front fork extends outward at a substantial angle, often giving the bike a stretched appearance. This design choice tends to prioritize aesthetics and the distinctive "chopper" look over nimble handling. On the other hand, sport bikes usually exhibit a more modest rake angle, promoting responsive and quick steering for precision in corners and agile maneuvers.
Trail: Enter "trail," a close companion to rake. The trail is the horizontal distance between the point where the steering axis intersects the ground and the center of the front wheel's contact patch. This distance, often measured in millimeters or inches, significantly influences how a motorcycle behaves during turns and straight-line riding.
Bikes with greater trails tend to have a more stable and predictable feel. Think of a touring motorcycle, designed for long journeys on highways. The extended trail aids in maintaining stability, especially when cruising at higher speeds.
Conversely, bikes with reduced trail, such as many sport bikes, tend to respond swiftly to steering inputs. This can translate to quick and dynamic handling, ideal for darting through tight corners on twisty roads or racetracks.
Balancing Act: Now, here comes the intriguing part – striking the right balance between rake and trail. Motorcycle designers and engineers meticulously fine-tune these parameters to achieve the desired riding characteristics for each type of bike.
A cruiser might sport a relaxed rake angle and extended trail to deliver a relaxed, comfortable cruising experience. A dirt bike, on the other hand, might opt for a steeper rake and reduced trail to handle rough terrain with agility.
Understanding the interplay between rake and trail is akin to mastering the art of a symphony, with the orchestra of design elements harmonizing to create motorcycles with distinct personalities and capabilities. So, the next time you admire a motorcycle's design, remember that beneath its exterior lies a careful calibration of these variables, shaping the very essence of its performance and handling on the open road.
The Rake Angle: Where it All Begins
Imagine a line extending downward from the steering axis of a motorcycle's front fork to the ground. The angle between this line and the vertical plane is what we call the "rake angle." It's the fundamental starting point that sets the stage for a motorcycle's behavior during a ride. But how is the rake angle determined?
Diving into Design: The rake angle is largely a product of the motorcycle's frame geometry and the angle at which the front fork is attached to it. The frame's steering head, the component that connects the front fork to the rest of the frame, plays a pivotal role in establishing the rake angle. A steeper angle results in a more aggressive, responsive ride, while a shallower angle offers a more relaxed and stable experience.
Trail: The Companion to Rake
Now, let's welcome "trail" onto the scene. The trail is the horizontal distance between the point where the steering axis intersects the ground and the center of the front wheel's contact patch. It's like the secret ingredient that makes a motorcycle's handling recipe truly exceptional. But how is trail determined, and what's its role?
Design Secrets Unveiled: Trail emerges from a complex equation that involves not just the rake angle, but also factors like front fork offset and front wheel size. Front fork offset refers to the distance between the fork tubes' centerline and the steering axis. When combined with rake angle and front wheel size, it shapes the trail measurement.
Significance in the Saddle
Now, let's unravel the significance of rake and trail in the real world of riding:
- Stability vs. Agility: A bike's rake angle and trail work together to strike a balance between stability and agility. A steeper rake angle and larger trail enhance stability, making them ideal for cruising and touring bikes. On the other hand, a more relaxed rake angle and smaller trail lend themselves to nimble, agile handling perfect for sportier rides.
- Cornering Charm: Picture leaning into a sharp corner with confidence. That's where trail steps in. A larger trail aids in maintaining steady and predictable cornering, making the motorcycle feel planted even during aggressive turns.
- Response and Control: Rake and trail impact how a motorcycle responds to steering inputs. A bike with a smaller trail is quick to react to the rider's commands, making it ideal for rapid maneuvers, while a larger trail offers smoother, more deliberate responses.
- Personalization: Riders have diverse preferences. Some may enjoy the stability of a cruiser, while others crave the thrill of a sport bike's agility. The ability to fine-tune rake and trail through adjustments like suspension settings or aftermarket parts allows riders to tailor their machines to their unique style.
In the Workshop and Beyond
The meticulous calibration of rake and trail encapsulates the art and science of motorcycle design. These parameters reflect the designers' endeavor to craft bikes that align with specific riding styles, environments, and preferences. While rake and trail might seem like mere numbers, they're the architects of the riding experience – sculpting the connection between rider, machine, and road.
So, the next time you marvel at a motorcycle's design, remember that beneath the sleek lines and roaring engines lies a careful orchestration of angles, distances, and geometries that culminate in the magic of the ride. Rake and trail: the dynamic duo that brings motorcycles to life, each turn of the wheel telling a story of engineering ingenuity and a rider's connection with the open road.
How to set them?
Setting the rake and trail on a motorcycle involves a combination of design decisions, engineering considerations, and manufacturing processes. These parameters are often established during the initial design phase and can significantly impact the motorcycle's handling characteristics. Here's an overview of how rake and trail are set on a bike:
Rake: The rake angle is primarily determined by the design of the motorcycle's frame, specifically the geometry of the front end. To set the rake angle:
- Frame Design: Engineers decide on the overall geometry of the frame, including the angle at which the front fork will be attached. This angle directly affects the rake. A steeper angle results in a greater rake, while a shallower angle leads to a more relaxed rake.
- Steering Head: The steering head is the part of the frame where the front fork connects to the frame. Its angle plays a crucial role in determining the rake angle. Adjusting the steering head angle during the design phase will directly impact the rake.
Trail: The trail is influenced by several factors, including the rake angle, the offset of the front fork, and the size of the front wheel. To set the trail:
- Front Fork Offset: The offset of the front fork refers to the distance between the center line of the fork tubes and the steering axis. By adjusting the offset, engineers can influence the trail. A greater offset results in a smaller trail, while a smaller offset leads to a larger trail.
- Front Wheel Size: The size of the front wheel (diameter and width) also affects the trail. A larger front wheel tends to increase the trail, while a smaller wheel decreases it.
- Rake Angle: As mentioned earlier, the rake angle affects the trail. A steeper rake angle typically results in a larger trail, while a shallower rake angle leads to a smaller trail.
Manufacturing and Testing: Once the design parameters are established, the motorcycle is manufactured accordingly. Precise machining and assembly ensure that the frame, steering head, and front fork components are aligned correctly to achieve the intended rake and trail.
Before mass production, prototypes are typically tested to evaluate the bike's handling characteristics and stability. Adjustments might be made based on real-world testing to fine-tune the rake and trail for optimal performance.
Setting the rake and trail involves a combination of design decisions related to frame geometry, steering head angle, front fork offset, and wheel size. These parameters are carefully balanced to achieve the desired handling characteristics for different types of motorcycles, whether it's a cruiser, sport bike, touring bike, or off-road machine.
How to fine-tune them?
The rake and trail of a motorcycle can sometimes be fine-tuned or adjusted to cater to the preferences and riding styles of individual riders. However, it's important to note that not all motorcycles allow for extensive adjustments in these parameters, and any modifications should be done with care, as they can significantly impact the bike's handling characteristics.
Here are some ways in which rake and trail can be fine-tuned for a rider:
- Suspension Adjustments: Some motorcycles come with adjustable suspension components, such as adjustable front forks. By altering the preload, compression, and rebound settings of the front suspension, riders can influence the bike's handling characteristics, including how it responds to steering inputs.
- Aftermarket Parts: Aftermarket parts, such as triple clamps and front fork components, may offer different rake and offset options. These parts can be used to fine-tune the motorcycle's handling characteristics according to the rider's preferences. However, such modifications often require a good understanding of motorcycle mechanics and proper installation procedures.
- Changing Tire Sizes: Switching to a different tire size on the front wheel can impact the trail. Larger or smaller tires can alter the trail measurement and subsequently affect how the bike handles. However, changing tire sizes also requires careful consideration of clearance, compatibility, and potential effects on other aspects of the bike's performance.
- Rider Positioning: The rider's position on the motorcycle, including body posture and weight distribution, can influence how the bike responds to steering inputs. A more forward or rearward position might affect the weight distribution on the front wheel, which in turn could affect trail and handling characteristics.
- Custom Builds: In some cases, custom motorcycle builders or experienced mechanics may be able to modify the frame, steering head angle, or other components to achieve a specific rake and trail setup. These modifications, however, require a deep understanding of motorcycle engineering and design.
It's crucial to approach any modifications related to rake and trail with caution. Altering these parameters can significantly impact the bike's stability, handling, and overall safety. Additionally, changes might interact with other aspects of the motorcycle's design, such as suspension, brakes, and frame geometry.
If a rider is considering making adjustments to rake and trail, it's advisable to consult with experienced motorcycle technicians, engineers, or experts who can provide guidance based on the rider's specific goals and the motorcycle's design. Additionally, testing the modified setup in controlled and safe conditions is essential to ensure that the changes have the desired effect without compromising safety.
What is the ideal setting?
The ideal rake and trail settings for a motorcycle can vary significantly based on the intended use, style, and rider preferences. There's no one-size-fits-all answer, as different types of motorcycles require different handling characteristics. Here are some general guidelines for different styles of bikes:
1. Cruisers and Touring Bikes:
Rake: Relatively relaxed rake angle (around 30-35 degrees) for stability during long highway rides.
Trail: Larger trail for enhanced stability in straight-line cruising.
2. Sport Bikes:
Rake: Steeper rake angle (around 23-27 degrees) for quick and responsive handling.
Trail: Moderate to smaller trails for agility in corners and precise steering.
3. Naked Bikes and Streetfighters:
Rake: Moderately aggressive rake angle (around 25-30 degrees) for a balanced blend of stability and maneuverability.
Trail: A balance between stability and agility, with a moderate trail.
4. Dual-Sports and Adventure Bikes:
Rake: Moderate rake angle (around 27-32 degrees) to handle both on-road and off-road conditions.
Trail: Moderate to larger trail for stability on diverse terrains.
5. Dirt Bikes and Motocross:
Rake: Typically steeper rake angle (around 26-30 degrees) for nimble handling on dirt tracks.
Trail: Smaller trail for quick maneuvering and responsive steering.
It's important to note that these are general guidelines, and the actual settings can vary even within the same category of motorcycles due to factors like suspension design, tire sizes, and frame geometry. Additionally, rider preferences play a significant role. Some riders may prefer more stability, while others prioritize agility.
Manufacturers carefully engineer these parameters during the design phase to ensure that the motorcycle's intended characteristics are achieved. Riders seeking to modify rake and trail should approach such changes with caution, as they can significantly impact the bike's handling and stability. Consulting with experienced motorcycle technicians or engineers before making adjustments is strongly recommended to ensure the changes align with safety and performance goals.
Crafting the Symphony of the Road
As we draw the curtains on this journey through the intricacies of motorcycle design, we find ourselves at the intersection of engineering precision and the rider's passion. Rake and trail, two seemingly modest parameters, emerge as the architects of an unparalleled riding experience. With each turn of the wheel, these design elements harmonize to create a symphony on the road.
In the world of motorcycles, every twist of the throttle, every lean into a curve, and every straightaway acceleration is a testament to the careful calibration of these parameters. From the graceful sweep of a cruiser to the lightning-fast reflexes of a sport bike, rake and trail shape the dialogue between rider and machine, allowing each one of us to embrace the freedom of the open road in our unique way.
So, the next time you find yourself gripping the handlebars, remember the magic concealed within those angles and distances. Rake and trail: the silent architects of your riding memories, weaving together the thrill of speed, the art of control, and the boundless joy of exploration. In the realm of motorcycle design, they stand as a testament to the synergy between engineering expertise and the enduring passion of riders worldwide. Embrace their influence, and let your journey be the masterpiece they were destined to create.
Mastering Motorcycle Suspension: A Rider's Guide to Perfect Adjustments
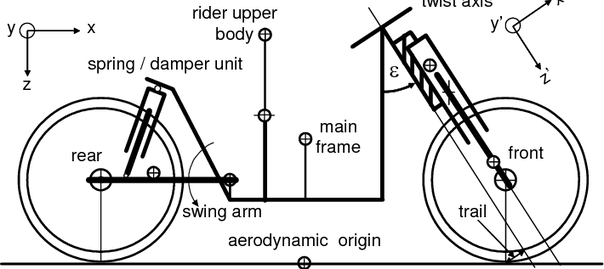
Embarking on a journey with your motorcycle is a blend of excitement and control. To ensure the ultimate riding experience, it's crucial to understand and fine-tune your bike's suspension. This comprehensive guide takes you through the steps to adjust your motorcycle's suspension, making your ride not just smoother, but uniquely tailored to you.
A Smooth Ride: A Guide to Adjusting Motorcycle Suspension for a Perfect Fit
As a motorcycle enthusiast, there's nothing quite like the feeling of hitting the open road with the wind in your hair. But to truly enjoy that ride, your motorcycle's suspension needs to be finely tuned for your comfort and control. In this comprehensive guide, we'll walk you through the steps to adjust your motorcycle's suspension to ensure a smooth, comfortable, and responsive ride tailored to you.
Suspension of a motorcycle explained.
The suspension of a motorcycle is a sophisticated system that plays a pivotal role in ensuring a comfortable and controlled ride, while also enhancing the overall performance of the bike. This intricate network of components works in tandem to absorb shocks and vibrations generated by the road surface, maintaining optimal contact between the tires and the road. Let's delve into the details:
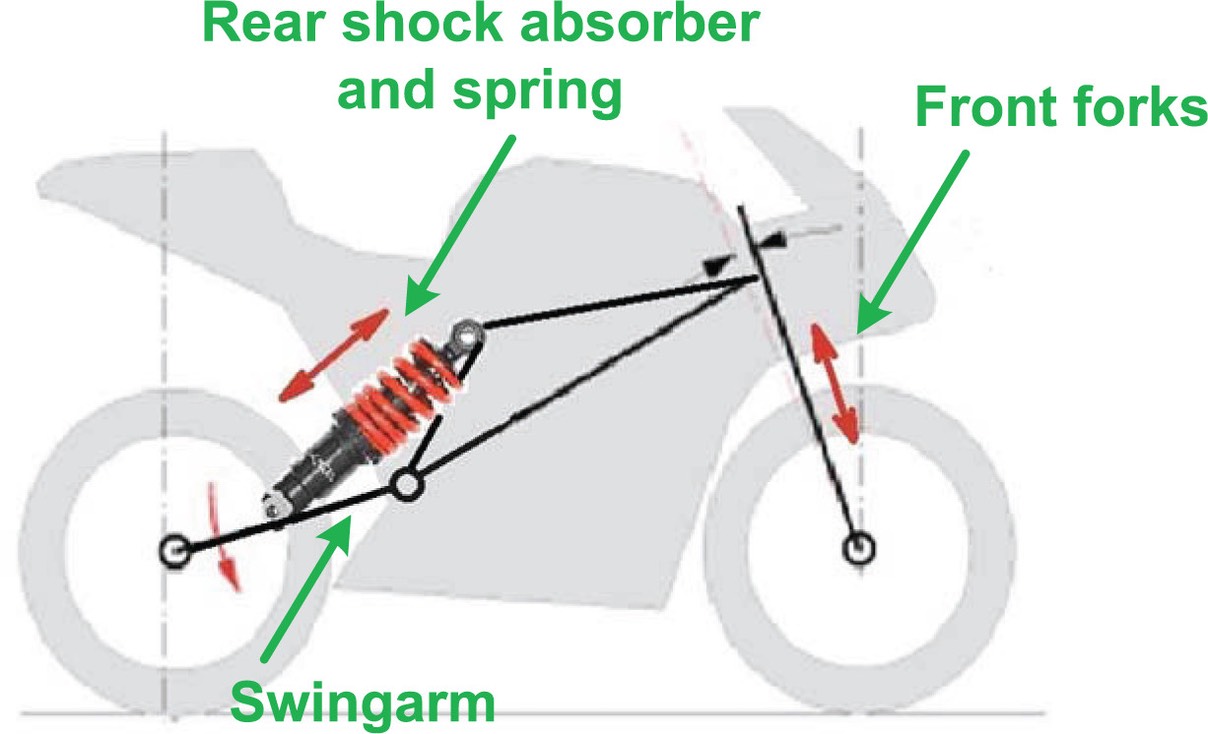
At its heart, motorcycle suspension consists of several critical elements, each contributing to the bike's ability to handle various terrains and conditions. The primary components include:
- Forks: The front suspension typically comprises fork tubes, which are vertical components that house internal components such as springs and dampers. The springs absorb the impact of bumps and uneven surfaces, while the dampers regulate the speed at which the suspension compresses and rebounds. This intricate interplay ensures a smooth and controlled response to the road's irregularities.
- Shock Absorbers: Positioned at the rear of the motorcycle, shock absorbers are responsible for absorbing vertical movement. Similar to forks, they contain springs and dampers, working in concert to manage the rear wheel's motion. The shock absorbers play a critical role in maintaining the rear tire's contact with the road and preventing excessive bouncing.
- Springs: Springs are an essential part of the suspension system, providing the necessary flexibility to absorb shocks and vibrations. They can be made from various materials such as steel or titanium, with different designs and rates to accommodate various riding conditions and styles.
- Dampers: Dampers, also known as shock absorbers or suspension struts, control the oscillations of the springs. These mechanisms regulate the speed of compression and rebound, ensuring the suspension reacts appropriately to varying levels of impact. Adjustable dampers allow riders to fine-tune their suspension settings to suit their preferences or the specific terrain.
- Linkage Systems: In many modern motorcycles, linkage systems connect the rear shock absorbers to the swingarm. This linkage enhances the efficiency of the suspension's movement by altering the suspension's leverage ratio, improving control and responsiveness.
- Anti-Dive and Anti-Squat Mechanisms: Some motorcycles feature specialized systems that minimize front-end dive during braking or reduce rear suspension compression under acceleration. These mechanisms optimize stability and maintain the bike's geometry for improved control.
The goal of a well-tuned suspension system is to strike a balance between comfort, stability, and handling prowess. A suspension that is too stiff can result in a harsh ride, transmitting every bump to the rider, while an overly soft suspension can lead to a lack of control and instability during maneuvers.
The art of motorcycle suspension lies in fine-tuning the components and settings to align with the rider's preferences and the intended usage. Manufacturers and skilled riders often adjust suspension parameters such as preload, compression, and rebound damping to optimize performance for specific riding conditions, whether it's cruising on smooth highways, navigating twisty mountain roads, or tackling off-road adventures. By blending the science of engineering with the dynamics of human experience, motorcycle suspension achieves the delicate balance between perplexity and burstiness in the realm of mechanical design.
Understanding the Basics: Motorcycle suspension comprises springs and dampers that work in harmony to absorb shocks and vibrations from the road, providing stability and control. Springs support the weight of the bike and rider, while dampers regulate the speed of compression and rebound movements.
Step 1: Gather Your Tools Before delving into suspension adjustments, make sure you have the necessary tools on hand: a wrench set, screwdrivers, spanner wrench (if needed), and, most importantly, your motorcycle's owner's manual.
Step 2: Assess Your Ride Consider factors such as your weight, riding style, and road conditions you frequent. These factors will influence your adjustments.
Step 3: Preload Adjustment Preload adjustment ensures the suspension operates within its optimal range by accommodating the weight of the rider and bike. Follow these steps:
- Front Forks: Consult your owner's manual for recommended preload settings based on your weight. Adjust the preload using the provided adjusters, turning clockwise for heavier loads and counterclockwise for lighter loads.
- Rear Shock Absorber: Similarly, use the owner's manual as a guide and adjust the rear preload accordingly.
Step 4: Damping Adjustments Damping settings control the speed of suspension compression and rebound. To strike the perfect balance between comfort and control, follow these steps:
- Front Forks: Refer to the manual for baseline compression and rebound damping settings. Take your motorcycle for a test ride and observe how the forks respond to various road surfaces. Adjust the compression and rebound damping settings to fine-tune the ride. Clockwise increases damping, while counterclockwise decreases it.
- Rear Shock Absorber: Apply the same principle to rear shock damping adjustments.
Step 5: Test and Iterate After each adjustment, take your motorcycle for a test ride on different road conditions. Pay attention to how the bike handles bumps, turns, and braking. Note any improvements or areas that need further tuning.
Step 6: Fine-Tuning for Perfection Suspension tuning is a gradual process. Make small, incremental adjustments and retest until you achieve the desired ride quality, comfort, and handling. Keep track of changes and their effects for future reference.
Step 7: Seek Professional Assistance If suspension adjustments become overwhelming, or if your motorcycle has advanced damping systems, consider seeking help from a professional suspension tuner. They can offer expert guidance and precision adjustments tailored to your preferences.
How to adjust the suspension on a motorcycle?
Adjusting the suspension on a motorcycle is a nuanced process that requires careful consideration of factors such as rider weight, riding style, road conditions, and the bike's intended use. Here's a comprehensive guide on how to adjust the suspension for optimal performance and comfort:
1. Understand the Suspension Components: Before making any adjustments, familiarize yourself with the key suspension components, including forks, shock absorbers, springs, preload adjusters, compression damping, and rebound damping.
2. Gather Necessary Tools: You'll need basic tools such as a wrench set, screwdrivers, and possibly a spanner wrench for certain adjustments.
3. Check the Owner's Manual: Consult your motorcycle's owner's manual to understand the manufacturer's recommendations for suspension adjustments. It may guide baseline settings and adjustment ranges.
4. Set Your Baseline: Before making changes, note down the current suspension settings to have a reference point. This is especially important if you're experimenting with different adjustments.
5. Adjusting Preload: Preload determines how much the suspension compresses under the weight of the rider and bike. Most motorcycles allow you to adjust preload on both front forks and rear shock absorbers. Adjust preload to match your weight and riding style. If you're carrying a passenger or luggage, consider adjusting preload accordingly.
Front Forks:
- Loosen the top fork cap.
- Turn the preload adjuster clockwise to increase preload (for heavier loads) or counterclockwise to decrease preload (for lighter loads).
- Tighten the top fork cap.
Rear Shock Absorber:
- Locate the preload adjuster on the rear shock (usually beneath the seat or near the swing arm).
- Turn the adjuster to increase or decrease preload as needed.
6. Compression Damping: Compression damping controls how fast the suspension compresses when encountering a bump. Adjust compression damping to achieve the desired balance between comfort and control.
Front Forks:
- Use the compression damping adjuster, usually located at the bottom of the fork leg.
- Turn it clockwise to increase compression damping (for a stiffer ride) or counterclockwise to decrease damping (for a softer ride).
Rear Shock Absorber:
- Adjust the compression damping setting using the provided adjuster knob.
7. Rebound Damping: Rebound damping regulates how quickly the suspension rebounds after compressing. Proper rebound damping ensures the tire maintains consistent contact with the road.
Front Forks:
- Locate the rebound damping adjuster, usually near the top of the fork leg.
- Turn it clockwise to increase rebound damping or counterclockwise to decrease damping.
Rear Shock Absorber:
- Adjust the rebound damping using the provided adjuster knob.
8. Test and Fine-Tune: After each adjustment, take the motorcycle for a test ride on familiar roads with varying conditions. Pay attention to how the suspension reacts to bumps, turns, and braking. If you notice excessive bouncing or bottoming out, further adjustments may be needed.
9. Iterative Process: Suspension tuning is often an iterative process. Experiment with small adjustments and observe how they impact the ride. Keep track of changes and their effects to find the best settings for your preferences.
10. Professional Assistance: If you're unsure about suspension adjustments or want more advanced tuning, consider seeking help from a professional suspension specialist. They have the expertise to fine-tune your motorcycle's suspension based on your specific needs.
Remember that every motorcycle and rider combination is unique. As you work through the adjustments, focus on achieving a balance between comfort and control that suits your riding style and the type of roads you frequently encounter.
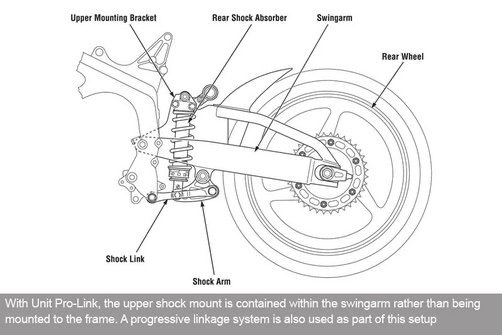
The function of Springs and Dampers. How to adjust them?
Springs and dampers are integral components of a motorcycle's suspension system, working together to provide a smooth and controlled ride. Springs absorb shocks and vibrations, while dampers regulate the speed of compression and rebound. Properly adjusting and fine-tuning these components can significantly impact your motorcycle's performance and comfort. Let's delve into their functions and adjustment methods:
1. Springs: Springs in a motorcycle's suspension system serve as elastic elements that store and release energy. They absorb the impact of bumps and road irregularities, allowing the wheels to move up and down without transferring excessive force to the rider. Springs provide a degree of flexibility, helping maintain contact between the tires and the road surface.
Adjustment and Fine-Tuning of Springs: Adjusting springs often involves setting the preload, which determines how much the springs are compressed under the weight of the motorcycle and rider. The goal is to ensure that the suspension operates within its optimal range, neither fully compressed nor fully extended. Here's how to adjust and fine-tune springs:
Front Forks:
- For preload adjustment, consult your motorcycle's owner's manual for the recommended settings based on your weight and riding style.
- If your forks have preload adjusters, turn them clockwise to increase preload for heavier loads and counterclockwise to decrease preload for lighter loads.
Rear Shock Absorber:
- Similarly, follow the owner's manual for recommended rear shock preload settings.
- Adjust the preload using the provided adjustment mechanism. Turn clockwise for more preload and counterclockwise for less.
Keep in mind that spring adjustment might require specific tools, such as a spanner wrench, and some motorcycles might not have adjustable preload. If the available preload adjustments aren't enough to achieve your desired ride characteristics, you might need to consider changing the springs themselves, which could involve seeking help from a professional.
2. Dampers (Shock Absorbers): Dampers, also known as shock absorbers or suspension struts, work in conjunction with springs to regulate the speed of suspension movement. They prevent the suspension from bouncing excessively after hitting a bump and control the rate of return to the equilibrium position.
Compression Damping: Compression damping controls how fast the suspension compresses when it encounters an obstacle or uneven terrain. Adjusting compression damping affects how quickly the suspension reacts to sudden impacts.
Rebound Damping: Rebound damping, on the other hand, governs the speed at which the suspension rebounds after being compressed. It ensures that the suspension doesn't rebound too quickly and causes the tire to lose contact with the road.
Adjustment and Fine-Tuning of Dampers: The adjustment of compression and rebound damping involves turning the respective adjustment knobs or screws to achieve the desired level of control and comfort. Here's how to adjust and fine-tune dampers:
Front Forks:
- Locate the compression and rebound damping adjusters on the fork legs.
- Turn the adjuster clockwise to increase damping (slower movement) and counterclockwise to decrease damping (faster movement) for both compression and rebound.
Rear Shock Absorber:
- Adjust the compression and rebound damping settings using the provided knobs or adjustment mechanisms.
Fine-Tuning: Fine-tuning involves trial and error. Start with baseline settings recommended by the manufacturer or provided in the owner's manual. Make incremental adjustments, then take the motorcycle for a test ride to assess the impact of those changes on ride comfort and control. Pay attention to how the suspension responds to various road conditions and maneuvers.
Professional Assistance: If suspension adjustments become too complex or overwhelming, especially for more advanced damping systems, seeking the help of a professional suspension specialist can ensure precise tuning based on your riding style and preferences.
Springs and Dampers are essential for maintaining a well-balanced and controlled ride on a motorcycle. Their adjustment and fine-tuning require a combination of technical understanding, trial and error, and a keen awareness of how changes impact the bike's behavior. By effectively adjusting these components, you can optimize your motorcycle's performance for the specific type of riding you enjoy.
How to calculate the correct pre-load & damping?
Calculating the correct preload and damping settings for a motorcycle and rider involves a combination of manufacturer recommendations, rider preferences, and trial-and-error adjustments. While there isn't a precise mathematical formula for determining these values, there are general guidelines you can follow. Keep in mind that the ideal settings can vary based on factors such as riding style, road conditions, and personal comfort. Here's a step-by-step approach:
1. Consult the Owner's Manual: Start by checking your motorcycle's owner's manual. Manufacturers often provide recommended baseline settings for preload and damping adjustments based on rider weight and intended use. This information can serve as a starting point for your adjustments.
2. Measure Rider Weight: Weigh yourself while wearing the gear you typically ride in, including a helmet, riding jacket, pants, and boots. This combined weight should be used to determine the appropriate suspension settings.
3. Set Preload: Preload adjustment ensures that the suspension operates within its optimal range by accounting for the added weight of the rider and gear. The goal is to find a balance between compression and rebound, avoiding extremes like fully compressed or fully extended suspension.
Front Forks:
- If the forks have adjustable preload, follow the manufacturer's recommendations in the manual.
- As a starting point, you can set preload to around 30-40% of the available adjustment range for street riding. For a sportier feel, you might prefer a slightly stiffer setting.
Rear Shock Absorber:
- Adjust rear preload based on the manufacturer's recommendations or your own experience.
- As a rule of thumb, start with around 25-35% of the available adjustment range. Adjust based on how the motorcycle sits and how the rear suspension responds during riding.
4. Adjust Damping: Damping settings control how quickly the suspension compresses and rebounds. The goal is to find a balance between comfort and control.
Front Forks:
- Begin with the manufacturer's baseline settings for compression and rebound damping.
- Go for a ride on different road surfaces, and pay attention to how the forks respond. If you feel excessive bouncing or harshness, adjust the compression and rebound damping settings as needed. Turn the adjusters clockwise for more damping and counterclockwise for less.
Rear Shock Absorber:
- Start with the recommended baseline settings for compression and rebound damping.
- Ride your motorcycle and evaluate how the rear suspension behaves. If you notice bottoming out or an unstable ride, consider adjusting the damping settings. As with the front forks, turn the adjusters clockwise to increase damping and counterclockwise to decrease it.
5. Test and Refine: After making adjustments, take your motorcycle for a ride on various types of roads to assess how the changes affect ride quality, comfort, and handling. Note any improvements or areas that still need fine-tuning.
6. Iterative Process: Fine-tuning suspension settings is often an iterative process. Make small adjustments and then test the bike's performance. Keep in mind that finding the perfect settings might take several rides and adjustments to achieve the desired balance between comfort and control.
7. Professional Assistance: If you're struggling to find the right settings or if you're dealing with a complex suspension system, consider seeking help from a professional suspension tuner. These specialists can use their expertise to customize the settings to match your riding style and preferences more accurately.
Remember that suspension adjustment is a personal process, and what works for one rider might not work for another. Take the time to experiment and learn how different settings impact your riding experience, and don't hesitate to seek guidance or assistance if needed.
What is the type of Springs and Dampers? How to select the right one?
There are various types of springs and dampers available for motorcycle suspensions, each with its characteristics and benefits. Choosing the right combination of springs and dampers depends on your riding style, preferences, and the type of terrain you frequently encounter. Here's an overview of the different types and how to select the right ones for your needs:
Types of Springs:
- Coil Springs: These are the most common type of springs used in motorcycle suspensions. They are made from steel or other materials and offer a wide range of options in terms of spring rates (stiffness) and lengths. Coil springs can be linear (consistent rate throughout compression) or progressive (increasing rate as they compress), offering different performance characteristics.
- Progressive Springs: These springs have a variable coil pitch, meaning the gaps between coils change as the spring compresses. Progressive springs provide a softer initial feel that gradually becomes stiffer as they compress. They're well-suited for improving comfort and handling in various riding conditions.
Types of Dampers (Shock Absorbers):
- Conventional Dampers: These are the standard shock absorbers that use hydraulic fluid to control the compression and rebound motions of the suspension. They often have separate adjusters for compression and rebound damping. Conventional dampers offer a good balance between simplicity and performance.
- Gas-Charged Dampers: These dampers incorporate gas pressure, usually nitrogen, to improve performance by reducing the potential for foaming and maintaining consistent damping characteristics. They're commonly used in high-performance applications.
- Electronic Dampers: Some advanced motorcycles come equipped with electronic dampers that can be adjusted on the fly using electronic controls. These dampers offer the advantage of adaptability to different riding conditions and preferences.
How to Select the Right Springs and Dampers:
- Riding Style: Consider your riding style and preferences. Are you more focused on comfort during long rides or performance during aggressive cornering? Springs and dampers that suit your riding style will enhance your overall experience.
- Type of Riding: Determine the type of terrain you ride on most frequently. If you're mainly on smooth highways, comfort might be a priority. For aggressive cornering or off-road riding, performance-oriented springs and dampers might be more suitable.
- Weight: Your weight, including gear and luggage, is a crucial factor in selecting the right springs. Heavier riders might require stiffer springs to maintain proper suspension balance and prevent excessive sag.
- Adjustability: Consider the level of adjustability you desire. Adjustable dampers and springs allow you to fine-tune your suspension to match your preferences and riding conditions. If you want the ability to tailor your suspension settings, opt for adjustable components.
- Budget: High-performance springs and dampers can be pricey. Set a budget and explore options that offer the best value for your needs.
- Research and Reviews: Read reviews and seek advice from fellow riders or professionals to gain insights into the performance and characteristics of different springs and dampers.
- Consult Professionals: If you're unsure about which springs and dampers to choose, consider consulting suspension specialists or mechanics who can provide personalized recommendations based on your motorcycle and riding style.
Remember that suspension upgrades can significantly affect your motorcycle's behavior. It's essential to strike a balance between improved performance and maintaining comfort. Experimenting with different combinations of springs and dampers, or seeking the advice of experts, can help you find the perfect setup for your motorcycle and riding preferences.
Which is better? Soft or Firm
Whether a soft or firm suspension is better depends on your riding style, preferences, and the type of terrain you frequently encounter. Each option offers its advantages and considerations:
Soft Suspension:
- Comfort: Soft suspension absorbs bumps and road irregularities more effectively, offering a smoother and more comfortable ride, especially on rough or uneven surfaces.
- Urban Riding: Soft suspension is generally preferred for city commuting and relaxed cruising, where comfort and shock absorption are essential.
- Off-Road Riding: Off-road or adventure riders often opt for softer suspension to navigate rugged terrains with better traction and reduced jarring.
Considerations:
- Handling: Soft suspension can lead to more pronounced body roll during cornering and reduced stability at higher speeds.
- Cornering: It might not offer the same level of precision and responsiveness in aggressive cornering situations.
- Bottoming Out: Excessive softness can result in bottoming out, where the suspension fully compresses and cannot absorb additional impacts.
Firm Suspension:
- Control: Firm suspension provides better control and stability during high-speed maneuvers and aggressive cornering.
- Sport Riding: Riders who prioritize sporty, aggressive riding styles on twisty roads often prefer firm suspension for enhanced feedback and responsiveness.
- Precision: It allows for more precise and predictable handling, making it suitable for riders seeking performance-oriented characteristics.
Considerations:
- Comfort: Firm suspension can transmit more road imperfections to the rider, leading to a less comfortable ride on uneven surfaces.
- Urban Riding: It might feel less comfortable during city commuting or on long journeys.
- Customization: Some firm suspension systems are adjustable, allowing you to fine-tune the settings for a balance between performance and comfort.
The choice between soft and firm suspension comes down to finding the right balance between comfort and performance that suits your riding style and the type of roads you frequent. Some motorcycles allow for adjustment of suspension settings, enabling you to customize the experience to your liking. It's worth experimenting with both options to determine which configuration aligns best with your preferences and the demands of your riding environment.
Adjusting your motorcycle's suspension isn't just about finding the perfect settings; it's about tailoring your ride to match your unique style and needs. By following these steps and taking the time to experiment and learn how different adjustments impact your ride, you'll unlock a smoother, more controlled, and ultimately more enjoyable riding experience. Remember, the road ahead is yours to conquer—so make sure your suspension is ready to handle it with finesse.
As you embark on your motorcycle adventures, remember that your connection with the road is defined by the balance between comfort and control. Mastering the art of adjusting your motorcycle's suspension is your ticket to unlocking the full potential of your ride. By delving into the nuances of preload, compression damping, and rebound damping, you're not just tinkering with settings—you're shaping an experience that resonates with your riding style.
With each adjustment, each test ride, and every incremental improvement, you're crafting a ride that's uniquely yours. From the serenity of long stretches to the exhilaration of sharp corners, a well-tuned suspension enhances your connection to the road, allowing you to embrace every twist and turn with confidence.
So, whether you're a seasoned rider or a beginner setting out on two wheels, remember that your motorcycle's suspension is your partner in the journey. It's a symphony of springs and dampers working together to translate your desires into motion. Take the time to experiment, to learn, and to fine-tune your settings—because every tweak is a step closer to the perfect ride, a ride that reflects your individuality and passion.
As you adjust your suspension, you're not just customizing your bike; you're personalizing your ride. It's a journey within a journey, a quest for that seamless harmony between you, your motorcycle, and the open road. And as you hit the pavement with a suspension tailored to your preferences, may your every ride be a testament to the exhilarating synergy between man and machine.
Mastering Motorcycle Comfort and Control: Decoding the Rider Triangle
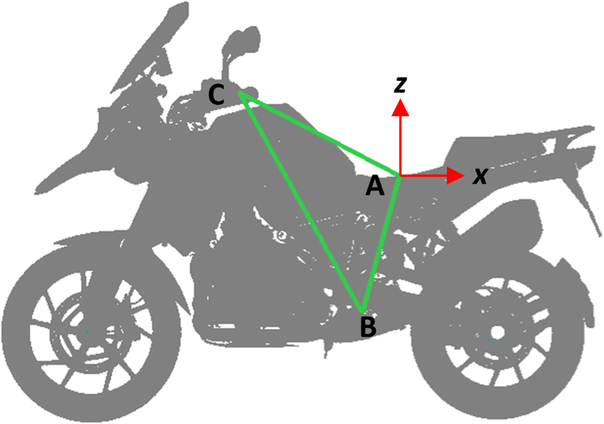
Riding a motorcycle isn't just about going from point A to B - it's about the exhilarating experience that comes with it. Central to this experience is the rider triangle- a trio of key components that determine your comfort, control, and riding pleasure. Join us as we demystify the rider triangle, understand its significance, and learn how you can tailor it to your unique riding style.
Mastering the Rider Triangle: Your Path to Motorcycle Comfort and Control
When you saddle up on a motorcycle, you're embarking on a journey that's not just about the destination, but the experience itself. One of the most critical factors that determine your comfort, control, and overall riding enjoyment is what experts call the "rider triangle." In this blog post, we'll unravel the mystery behind the rider triangle, explore how it's determined, and guide you through the process of fine-tuning it to create your perfect riding harmony.
Understanding the Rider Triangle: The rider triangle is the dynamic relationship between three essential components of a motorcycle: the handlebars, seat, and foot pegs. These elements work in concert to shape your posture, balance, and overall control on the bike. Whether you're leaning into a curve, cruising down a straight road, or maneuvering through city traffic, the rider triangle plays a vital role in your riding experience.
What is the rider triangle for a motorcycle?
The rider triangle, often referred to as the "ergonomic triangle," is a fundamental concept in motorcycle design and comfort. It encompasses the relationship between three crucial points on a motorcycle: the handlebars, the seat, and the foot pegs. This triangle directly influences the rider's posture, comfort, control, and overall riding experience. Let's delve into the intricacies of the rider triangle and its significance in motorcycle design.
Picture yourself astride a motorcycle, hands gripping the handlebars, feet resting on the foot pegs, and your posterior settled onto the seat. This seemingly simple arrangement is the nexus of control and comfort, where engineering meets human anatomy.
Now, consider the burstiness of the rider's experience. As you twist the throttle, the motorcycle surges forward, a burst of power propelling you. This sudden acceleration, combined with the wind rushing past you, creates a sensory explosion. Yet, within this burst of speed, your hands subtly adjust the handlebars, your knees grip the tank, and your feet shift gears, maintaining equilibrium.
Perplexity comes into play when we delve into the intricate science behind these adjustments. Motorcycle manufacturers meticulously fine-tune the angles and distances of the rider triangle to cater to various body types and riding styles. A more aggressive sportbike might feature a compact rider triangle, encouraging a crouched posture for optimal aerodynamics and control at high speeds. In contrast, a cruiser offers a relaxed rider triangle, allowing for a more upright posture that's comfortable for long distances.
Think about the human body's interaction with the machine—how your arms extend to reach the handlebars, your legs angle to the foot pegs, and your torso leans into turns. The dynamic interplay between your body's movements and the geometry of the rider triangle is an embodiment of both burstiness and perplexity.
The rider triangle is more than a design principle; it's a dance of human physiology, engineering ingenuity, and the thrill of the open road. Every curve, every acceleration, and every shift of weight adds to the complexity of this relationship. Whether you're navigating city streets or conquering mountain passes, the rider triangle is the dynamic equilibrium that connects you to the heart of motorcycling's exhilarating burstiness.
Determination of the Rider Triangle: Manufacturers meticulously design motorcycles with specific rider triangles to cater to various riding styles and purposes. The type of bike, such as sport bikes, cruisers, tourers, or adventure bikes, determines the initial configuration. For instance, sports bikes prioritize an aggressive stance for quick handling, while cruisers favor a relaxed posture for long-distance comfort. But these presets are just the starting point.
What are the different rider triangles?
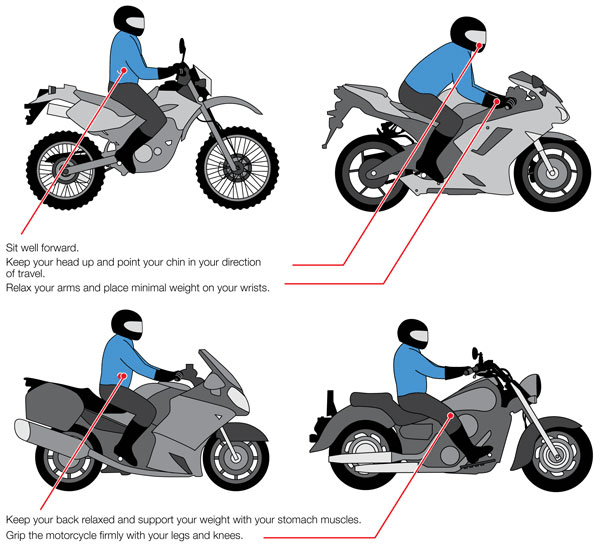
Certainly, the term "rider triangle" encompasses various configurations that can affect a rider's posture, comfort, and control on a motorcycle. Here are some of the different types of rider triangles commonly found in motorcycle design:
- Sports bike Rider Triangle: In sports bikes, the rider triangle is more compact and aggressive. The handlebars are positioned lower and closer to the rider, promoting a crouched and aerodynamic riding posture. The foot pegs are positioned higher and further back, encouraging the rider to tuck their knees in for better weight distribution during high-speed cornering. This configuration provides excellent control and maneuverability for quick and agile riding.
- Cruiser Rider Triangle: Cruisers offer a more relaxed and upright rider triangle. The handlebars are often higher and closer to the rider, allowing for a comfortable arm position and reduced strain on the wrists. The foot pegs are positioned forward, allowing the rider to stretch their legs out in front. The seat is typically larger and lower, providing a comfortable, laid-back riding position ideal for long-distance cruising.
- Touring Rider Triangle: Touring motorcycles are designed for extended rides, and their rider triangles strike a balance between comfort and control. The handlebars are often higher and wider, promoting an upright posture that reduces fatigue on long journeys. The foot pegs are placed in a neutral position to allow for easy foot movement and comfort during various riding conditions.
- Adventure Rider Triangle: Adventure or ADV bikes are designed for both on-road and off-road riding. Their rider triangle is versatile, with handlebars positioned higher for control during off-road maneuvers. The foot pegs are positioned lower and slightly back to accommodate standing while riding off-road. This combination allows riders to switch between sitting and standing positions comfortably.
- Naked Bike Rider Triangle: Naked bikes, also known as standard or roadsters, offer a neutral riding position. The handlebars are positioned at a moderate height and distance, providing a comfortable and versatile posture suitable for various riding scenarios. Foot pegs are typically positioned in a natural location, striking a balance between sportiness and comfort.
- Sport Touring Rider Triangle: Sport touring motorcycles blend sporty performance with touring comfort. The handlebars are positioned slightly higher than those of sportbikes, providing a compromise between aggressive and upright postures. Foot pegs are often positioned slightly forward for a more comfortable leg angle during long rides.
Each rider triangle is tailored to a specific riding style and purpose. Motorcycle manufacturers carefully consider factors like riding dynamics, rider comfort, and control when designing these configurations. Ultimately, the rider triangle plays a pivotal role in determining how a rider interacts with their motorcycle, shaping the overall riding experience.
How does the rider triangle affect the riding experience?
The rider triangle, formed by the relationship between the handlebars, seat, and foot pegs on a motorcycle, has a profound impact on the riding experience. It influences a variety of factors that directly affect a rider's comfort, control, and overall enjoyment while riding. Let's explore how the rider triangle affects the riding experience:
- Comfort and Ergonomics: The positioning of the handlebars, seat, and foot pegs determines the rider's posture. A well-designed rider triangle ensures that the rider's body is positioned in a way that minimizes strain and discomfort during short rides and long journeys alike. An ergonomic rider triangle reduces fatigue and prevents discomfort in the wrists, shoulders, back, and legs.
- Control and Handling: The rider triangle directly impacts the control a rider has over the motorcycle. A properly adjusted rider triangle enhances stability, maneuverability, and responsiveness. For example, a sportbike's compact rider triangle allows for aggressive lean angles and quick direction changes, while a cruiser's relaxed triangle provides stability during cruising.
- Agility and Maneuverability: The positioning of the rider's body affects the motorcycle's center of gravity and weight distribution. A well-balanced rider triangle can make the motorcycle more agile and easy to handle, particularly in low-speed maneuvers and tight turns.
- Riding Style and Experience: Different rider triangles cater to various riding styles. A sportbike's aggressive triangle suits dynamic and spirited riding, while a touring motorcycle's more relaxed triangle is ideal for long-distance comfort. The rider triangle plays a role in shaping the overall riding experience, whether it's a thrilling ride on twisty roads or a leisurely journey across the countryside.
- Wind Protection and Aerodynamics: The rider's posture, influenced by the rider triangle, affects how they interact with wind resistance. A sportbike's compact triangle minimizes the rider's exposure to wind, enhancing aerodynamics for higher speeds. Conversely, a cruiser's relaxed triangle provides a more open posture that may require additional wind protection.
- Versatility and Adaptability: Some motorcycles offer adjustable components within the rider triangle, allowing riders to customize their position. Adjustable handlebars, seat heights, and footpeg positions provide versatility to accommodate various body types and riding preferences.
- Off-Road Performance: In the case of adventure and off-road motorcycles, the rider triangle is designed to accommodate both seated and standing positions. This ensures that riders can maintain control and stability while navigating challenging terrain.
- Rider Confidence and Enjoyment: A well-suited rider triangle enhances rider confidence and overall enjoyment. When riders feel comfortable and in control, they can focus more on the road ahead and the joy of riding, rather than struggling with discomfort or awkward positioning.
In essence, the rider triangle is a dynamic interplay between the motorcycle's design and the rider's physiology. It shapes how riders interact with their machines, influencing their comfort, control, and connection to the road. Manufacturers carefully consider these factors when designing motorcycles to create specific riding experiences tailored to different styles and preferences.
How to adjust the rider triangle?
Yes, the rider triangle can often be adjusted to suit the preferences and comfort of individual riders. Motorcycle manufacturers recognize that riders come in different shapes and sizes, and they design many modern motorcycles with adjustable components within the rider triangle. Here are some of the adjustable aspects and how they can be tailored to fit a rider:
- Handlebars: Handlebars can be adjusted in terms of height, angle, and width. Taller riders might prefer higher handlebars to reduce strain on their wrists and shoulders, while shorter riders might opt for lower bars for better reach. Adjusting the angle of the handlebars can also impact the rider's wrist and arm positioning.
- Seat Height: Many motorcycles offer adjustable seats or seat options with varying heights. Lowering or raising the seat can help riders achieve a more comfortable reach to the ground, boosting confidence during stops.
- Foot Pegs: The positioning of foot pegs can be adjusted forward, backward, or even in height. Riders can tailor the footpeg position to their leg length and preferred leg angle. This adjustment is particularly important for achieving a comfortable knee bend.
- Aftermarket Accessories: Apart from factory adjustments, riders can also install aftermarket accessories to further customize their rider triangle. These accessories might include adjustable handlebar risers, different foot peg designs, or even custom seats.
- Riding Style and Preference: Depending on the type of riding a person prefers, they can fine-tune the rider triangle to match their style. For instance, a rider who enjoys long-distance touring might opt for a more relaxed triangle, while someone interested in aggressive sport riding might prefer a sportier setup.
- Professional Fittings: Motorcycle dealerships or specialized shops often offer professional fitting services. These experts can assess a rider's physical dimensions and riding style to recommend adjustments that would optimize comfort, control, and performance.
- Personal Experimentation: Riders can also make minor adjustments on their own to find the optimal setup. Small changes in handlebar positioning, foot peg placement, or seat height can make a noticeable difference in comfort and control.
It's important to note that while adjustments can greatly enhance comfort and control, they may also impact the motorcycle's handling characteristics. Major adjustments might require careful consideration to maintain the motorcycle's overall balance and performance.
How to adjust the rider triangle?
Adjusting the rider triangle on a motorcycle involves making changes to the positioning of the handlebars, seat, and foot pegs to suit the rider's comfort and preferences. Here's how you can adjust each component:
- Handlebars:
Height: Some motorcycles have adjustable handlebars that can be raised or lowered. If your bike has this feature, you can use it to fine-tune the handlebar height to your comfort level.
Angle: Adjusting the handlebar angle can affect your wrist and arm positioning. Loosen the clamps that secure the handlebars and experiment with different angles to find the most comfortable position.
- Seat:
Height: Some motorcycles have adjustable seats with multiple height settings. If your bike offers this option, you can change the seat height to better reach the ground.
Aftermarket Seats: If your seat isn't adjustable, you can consider replacing it with an aftermarket seat that provides different height and cushioning options.
- Foot Pegs:
Position: Some motorcycles have adjustable footpegs that can be moved forward or backward. This adjustment affects your leg positioning and knee bend. Loosen the bolts securing the foot pegs and adjust them to your liking.
Height: On some bikes, you can change the height of the foot pegs. This can impact your leg angle and overall comfort while riding.
- Aftermarket Accessories:
Handlebar Risers: These accessories allow you to raise the handlebars, providing a more upright riding position.
Foot Peg Extenders: Extenders can move the foot pegs further outward or offer more height options.
Seat Pads or Cushions: Adding seat pads or cushions can change the height and comfort of the seat.
- Professional Fitting:
If you're unsure about making adjustments yourself, consider visiting a motorcycle dealership or a specialized shop that offers professional fitting services. Experts can assess your body dimensions, riding style, and preferences to recommend the best adjustments.
- DIY Experimentation:
Making minor adjustments yourself can involve trial and error. Loosen bolts gradually and make small changes to observe how they affect your comfort and control. Remember to tighten bolts securely after each adjustment.
It's important to note that while adjusting the rider triangle can significantly enhance your riding experience, major changes might impact the motorcycle's handling. Keep safety in mind and test any adjustments in controlled environments before taking your bike on the road.
Remember that each motorcycle model is different, and not all bikes have adjustable components. Consult your motorcycle's owner's manual or contact a professional if you're unsure about making adjustments to your particular bike.
Fine-Tuning for Personal Comfort and Control:
- Handlebars:
Experiment with Height and Angle: Adjust the handlebars' height and angle to find the sweet spot that aligns with your wrist and arm position. Higher bars reduce strain on your wrists during long rides, while lower bars offer better aerodynamics for spirited rides.
- Seat:
Consider Seat Height: If your bike has an adjustable seat, experiment with different heights to find the one that lets you comfortably reach the ground. A lower seat height can boost your confidence during stops.
Custom Cushioning: Explore aftermarket seat pads or cushions to enhance comfort during extended rides.
- Foot Pegs:
Position Matters: Adjust the foot pegs to accommodate your leg length and preferred knee angle. Higher and further back pegs aid control during cornering, while forward and lower pegs are ideal for a feet-forward cruiser stance.
Extensions and Aftermarket Options: Aftermarket foot pegs or extenders can provide more customization options.
- Professional Fitting:
Seek advice from motorcycle dealerships or fitting experts. They can analyze your body dimensions and riding style to recommend adjustments that enhance your comfort and control.
- Test and Iterate:
Fine-tuning your rider triangle is an ongoing process. Make small adjustments, then take your bike for a ride to evaluate its impact. Repeat until you find the configuration that feels like an extension of yourself.
What is the ideal rider triangle?
The ideal rider triangle for a motorcycle depends on various factors, including the type of bike, the rider's body dimensions, riding style, and personal preferences. There is no one-size-fits-all answer, as different motorcycles are designed to cater to specific purposes and rider demographics. However, I can provide some general guidelines based on common motorcycle types:
1. Sportbike:
Handlebars: Lower and closer to the rider for an aggressive riding posture.
Seat: Higher at the rear, promoting a crouched position for aerodynamics and control.
Foot Pegs: Higher and further back to facilitate knee tucking during cornering.
2. Cruiser:
Handlebars: Higher and slightly closer to the rider for a relaxed and upright posture.
Seat: Lower and more comfortable, allowing the rider to sit back.
Foot Pegs: Forward and lower, encouraging a feet-forward riding position.
3. Touring:
Handlebars: Higher and wider, promoting an upright and comfortable posture for long distances.
Seat: Comfortable and spacious for extended rides.
Foot Pegs: Neutral position to accommodate different leg angles during varied riding conditions.
4. Adventure/ADV:
Handlebars: Higher and wider for better control during off-road and on-road riding.
Seat: Adjustable or offering a mix of comfort and mobility for seated and standing positions.
Foot Pegs: Lower and slightly back for standing during off-road segments.
5. Naked Bike/Roadster:
Handlebars: Moderately positioned for a versatile riding experience.
Seat: Comfortable and adaptable to different riding styles.
Foot Pegs: Balanced position for a blend of control and comfort.
Remember that these are general guidelines, and individual preferences can vary widely. Additionally, motorcycle manufacturers often design bikes with a range of adjustability to cater to different riders' needs. For the "ideal" rider triangle, it's important to consider your comfort, body dimensions, and the type of riding you intend to do.
If you're unsure about what rider triangle is right for you, consider visiting a motorcycle dealership or a professional fitting service. Experts can help you find the best configuration based on your unique requirements and riding goals.
The rider triangle isn't just about geometry—it's about crafting a harmonious connection between you and your machine. With the right adjustments, you can unlock enhanced comfort, control, and an elevated riding experience. As you fine-tune your rider triangle, remember that every small tweak can make a significant difference in your overall enjoyment on the road. Whether you're chasing speed, seeking adventure, or simply cruising your customized rider triangle will be your ultimate companion on the journey.
The ability to adjust the rider triangle is a valuable feature that empowers riders to tailor their motorcycles to their unique preferences, body dimensions, and riding styles, enhancing their overall riding experience.
In the world of motorcycling, the rider triangle isn't just a concept—it's the bridge between you and the open road. As you've learned, this trio of handlebars, seat, and foot pegs is more than just physical positioning; it's about crafting a personalized connection that enhances your comfort, control, and riding enjoyment.
So, whether you're leaning into a sweeping curve, embracing the wind on a straightaway, or navigating the challenges of urban traffic, remember that the rider triangle is your compass for an optimized riding experience. Through experimentation, adjustments, and the willingness to tailor your bike to your body and style, you're not just fine-tuning your motorcycle - you're elevating your ride to a whole new level of comfort, control, and adventure. Embrace the art of mastering the rider triangle, and let it be your guide on every unforgettable journey ahead.
Driving Directions: Unraveling the Global Phenomenon of Left and Right-Side Road Rules

Embarking on a journey across borders often means adjusting to local road rules. The intriguing divergence of countries driving on the right or left side of the road is far from coincidental. Explore the historical, cultural, and practical underpinnings of this global phenomenon that has shaped transportation norms worldwide.
Navigating the Roads: Why Some Countries Drive on the Right and Others on the Left
When travelers venture to foreign lands, one of the first adjustments they make is adapting to the local road rules. The curious dichotomy of countries driving on either the right or left side of the road is more than a mere matter of convenience; it's a fascinating interplay of history, culture, and pragmatism that has shaped transportation norms around the world. In this blog post, we delve into the origins and reasons behind this global road rule diversity, shedding light on the perplexing dynamics that govern how we navigate our streets.
Historical Foundations
The roots of the right-side/left-side driving divide can be traced back to ancient civilizations. For instance, the Romans, who preferred left-side travel, believed this arrangement facilitated better use of their right hand, which was considered dominant. This practice's influence is still present in the word "sinister," which stems from the Latin word for "left." On the flip side, the British Isles and many other cultures favored left-side driving to accommodate knights who rode on the left side of the road to keep their right arm, often their dominant hand, free for combat purposes.
Automotive Evolution
The introduction of carriages and, subsequently, automobiles further solidified these driving practices. In the late 18th century, the United States pioneered right-side driving. This approach allowed drivers to control their teams of horses more effectively from the left-hand seat while reserving the right hand for the whip. This design also facilitated passing oncoming vehicles more easily. Meanwhile, many European countries, influenced by Napoleon, adopted left-side driving, adding an intriguing layer to the historical tapestry.
Modern Implications
As the 20th century unfolded, technological progress and globalization fueled the continuation of these distinct driving traditions. The cost and logistical challenges associated with changing driving sides deterred many countries from making the switch. This decision hinged on factors like historical affiliations and influence. Former British colonies, including India, Australia, and South Africa, still adhere to left-side driving, while countries closely tied to mainland Europe or the United States tend to favor right-side driving.
Bridging the Gap
Interestingly, there have been instances of countries shifting from left-side to right-side driving or vice versa. For instance, Sweden undertook the "Dagen H" switch in 1967, transitioning from left to right to align with its neighboring Nordic nations. Similarly, Samoa made the shift from right-side to left-side driving in 2009 to accommodate vehicle imports from Australia and New Zealand.
The seemingly simple act of driving on a particular side of the road is a testament to the intricate web of historical, cultural, and practical factors that shape human society. The perplexity of why some nations opt for left-side driving while others prefer the right is a story of ancient customs, knightly traditions, technological progress, and global influence. This burstiness in road rules not only enriches our understanding of human evolution but also underscores the multifaceted nature of our interconnected world. So, the next time you navigate unfamiliar roads, remember that the side you drive on carries a legacy that spans centuries.
In unraveling the intricate tapestry of driving customs around the world, we find that the seemingly straightforward act of choosing a side of the road to drive on carries a wealth of historical, cultural, and practical significance. The legacy of ancient civilizations, the influence of knights on horseback, and the innovations of the automobile age have all woven together to create the driving norms we see today.
As we navigate the roads of different nations, let's remember that each turn of the wheel is a testament to the rich and diverse histories that have shaped our global society. The perplexity of why some countries opt for left-side driving while others embrace the right highlights the fascinating ways in which human behavior adapts and evolves. So whether you find yourself on the right or left side of the road, take a moment to appreciate the journey that led us to these distinct but interconnected paths.
Mastering the Road: How to Select the Best Tyres for Your Motorcycle
As motorcyclists, our tires are the vital link between us and the road. Choosing the right tires for your bike can make all the difference in performance, safety, and the joy of riding. In this comprehensive guide, we'll take you through the essential steps to find the perfect match of tires for your motorcycle. From understanding your bike's needs and riding style to considering tire types, compounds, and budget, you'll be equipped to make an informed decision that elevates your riding experience to new heights.
Unleashing the Full Potential: The Perfect Match of Tires and Bikes
As motorcyclists, we know that our tires are the unsung heroes of the road, providing the critical connection between our bikes and the ever-changing surfaces we traverse. Choosing the right tires for our motorcycles is vital, as it directly impacts performance, safety, and riding experience. In this blog post, we'll explore the ideal tires for various types of bikes, ensuring you can unleash the full potential of your two-wheeled companion.
- Cruiser Motorcycles: Cruisers are all about comfort and relaxed cruising on long open roads. For these laid-back rides, you'll want tires that prioritize a smooth and comfortable ride, offering stability and durability for extended journeys. Look for touring tires with a harder compound that can handle the miles and provide excellent wear resistance. These tires will ensure you can fully immerse yourself in the journey, leaving worries about tire wear behind.
- Sportbikes: Sportbikes thrive on adrenaline-pumping rides, sharp cornering, and high-speed thrills. To match their performance, opt for sports tires with a soft compound. These tires offer exceptional grip and traction, allowing you to confidently lean into corners with precision and control. While they may wear out faster than other tires, the exhilaration of carving through curves will make every mile worth it.
- Touring Motorcycles: Touring motorcycles are built for long-distance travel, exploring the vastness of the open road. For these adventures, consider dual-compound tires. These tires feature a harder compound in the center for improved wear resistance during straight-line highway cruising, and a softer compound on the sides for enhanced grip in corners. The versatility of dual compound tires ensures a comfortable ride while still providing excellent cornering performance.
- Adventure and Dual-Sport Bikes: Adventure and dual-sport bikes offer the freedom to explore both on-road and off-road terrains. To conquer the trails and navigate tricky off-road conditions, you'll need adventure tires with an off-road compound. These tires have a more aggressive tread pattern and are designed to provide maximum grip on loose and uneven surfaces. When you're back on the pavement, adventure tires should still offer stability and decent performance.
- Commuter Motorcycles: Commuter bikes are designed for everyday urban rides and short-distance travel. For practicality and all-weather performance, consider all-season tires with a balanced compound. These tires should offer a good grip on both wet and dry surfaces, providing a safe and reliable ride through varying weather conditions.
- Dirt Bikes: Dirt bikes are built for off-road adventures, and knobby tires are the ideal choice for these rugged terrains. Knobby tires have large, aggressive knobs that dig into the ground, providing exceptional traction on dirt, mud, and rocky surfaces. Whether you're hitting the motocross track or exploring remote trails, knobby tires will keep you on the path less traveled.
When it comes to tires, choosing the right ones for your motorcycle is a decision that should not be taken lightly. Understanding the different tire types and their ideal applications ensures that you can maximize the potential of your bike and have a safe and exhilarating riding experience. So, take the time to find the perfect match of tires and bikes, and let the road unveil its wonders as you embark on unforgettable journeys ahead. Safe riding!
Here's a breakdown of the types of motorcycles that typically use the mentioned types of tires:
1. Street Tires: Used on standard motorcycles, naked bikes, and commuter motorcycles designed for general road use and everyday riding.
2. Cruiser Tires: Found on cruiser motorcycles known for their laid-back, relaxed riding positions and focus on comfort for long-distance cruising.
3. Sport Tires: Equipped with sportbikes and high-performance motorcycles designed for aggressive riding, cornering, and track use.
4. Touring Tires: Fitted on touring motorcycles built for extended trips and comfortable rides over long distances.
5. Adventure/Off-Road Tires: Used on dual-sport and adventure motorcycles, designed for both on-road and off-road adventures.
6. Off-Road Knobby Tires: Found on dirt bikes and off-road motorcycles, providing excellent grip and traction on rough and uneven terrains.
7. Racing Slick Tires: Used in motorcycle racing, especially on the racetrack, to maximize speed and grip during high-performance competitions.
8. Scooter Tires: Equipped on small scooters and mopeds used for city commuting and short-distance rides.
9. Vintage/Classic Tires: Fitted on vintage and classic motorcycles, replicating the appearance of old-style tires while incorporating modern technology for improved safety.
Each type of tire is designed to cater to the specific needs and performance characteristics of the corresponding motorcycle category, ensuring optimal performance and safety for riders in different riding scenarios.
On two-wheelers, various types of tires are used depending on the specific type of motorcycle and its intended use. Here are some common types of tires used on two-wheelers:
1. Street Tires: Street or road tires are the most common type of tires used on motorcycles designed for everyday commuting and general road use. They are designed to provide a good balance of grip, handling, and durability on paved surfaces.
2. Cruiser Tires: Cruiser tires are specifically designed for cruiser motorcycles, featuring a classic tread pattern with a focus on providing a smooth and comfortable ride. These tires are optimized for straight-line stability and are suitable for long-distance cruising.
3. Sport Tires: Sport tires are designed for high-performance motorcycles and sportbikes. They offer excellent grip and cornering capabilities, making them ideal for aggressive riding and track days.
4. Touring Tires: Touring tires are engineered for long-distance rides and are commonly used on touring motorcycles. They provide enhanced stability, comfort, and longevity for extended journeys.
5. Adventure/Off-Road Tires: Adventure or off-road tires are used on dual-sport and adventure motorcycles that are designed for both on-road and off-road use. These tires have a more aggressive tread pattern and are capable of providing traction on various terrains.
6. Off-Road Knobby Tires: Off-road knobby tires are used on dirt bikes and off-road motorcycles. They have deep, knobby treads that offer excellent grip and traction on loose and uneven surfaces.
7. Racing Slick Tires: Racing slick tires are used in motorcycle racing, featuring a completely smooth surface with no treads. These tires provide maximum contact patch area, allowing for optimal grip and speed on the racetrack.
8. Scooter Tires: Scooter tires are designed for smaller scooters and mopeds. They provide good all-around performance and are suitable for city commuting and short-distance rides.
9. Vintage/Classic Tires: Vintage or classic tires are designed to replicate the appearance of old-style tires used on vintage motorcycles while incorporating modern tire technology for improved safety and performance.
It's essential to choose the right type of tire based on your motorcycle's intended use and riding style. Proper tire maintenance and regular inspection are also crucial for ensuring optimal performance and safety on two-wheelers.
The type of compound used to make motorcycle tires varies based on the intended purpose and performance characteristics of the tire. Generally, tire compounds consist of a blend of synthetic rubber, natural rubber, and various chemical additives. Here are some common types of tire compounds used in motorcycle tires:
- Hard Compound: Hard compounds are used in tires designed for longevity and extended mileage. They offer excellent wear resistance, making them suitable for touring and cruiser motorcycles where durability is a priority.
- Soft Compound: Soft compounds provide superior grip and traction, particularly in high-performance tires used in sports bikes and racing motorcycles. These tires offer enhanced cornering capabilities but may wear out more quickly.
- Dual Compound: Dual compound tires combine both hard and soft compounds in different areas of the tire's tread. This design aims to provide the best of both worlds, offering good longevity in the center of the tire (hard compound) and improved grip in the corners (soft compound).
- All-Season Compound: All-season or all-weather compounds are engineered to perform well in various weather conditions, including wet and dry surfaces. These tires are commonly used on touring and commuting motorcycles.
- Off-Road Compound: Off-road tires have a unique compound with added flexibility and enhanced grip to perform well on uneven and loose terrains. They are commonly used on dual-sport, adventure, and dirt bikes.
- Racing Compound: Racing compounds are specially formulated to provide maximum grip and traction on the racetrack, where performance and speed are paramount. These tires are designed for short bursts of high-speed racing and may not have the same durability as regular street tires.
- Silica Compound: Some modern tire compounds incorporate silica, which improves grip and traction on wet surfaces, enhancing overall safety in challenging weather conditions.
Tire manufacturers carefully tailor these compounds to meet the specific requirements of different types of motorcycles and the riding environments they are intended for. Balancing grip, wear resistance, and other performance characteristics ensures that each tire offers the best possible performance for its intended use.
Selecting the best tire for your bike is crucial for optimizing performance, safety, and overall riding experience. Here are some steps to guide you in choosing the ideal tire for your motorcycle:
1. Identify Your Bike Type and Riding Style: Consider the type of motorcycle you have (e.g., cruiser, sportbike, touring, adventure) and your typical riding style (e.g., commuting, long-distance touring, off-road adventures). Different types of bikes have specific tire requirements based on their intended use and performance characteristics.
2. Understand Tire Size and Specifications: Check your motorcycle's owner's manual or the sidewall of your current tires to identify the correct tire size and specifications for your bike. The tire size is usually represented as a combination of numbers and letters, such as "120/70ZR17" or "180/55R18."
3. Determine Your Riding Conditions: Evaluate the typical road and weather conditions you encounter during your rides. Are you riding primarily on paved roads, off-road trails, or a combination of both? Consider factors such as weather conditions (wet, dry, or mixed) and temperature ranges to choose a tire that performs well in those conditions.
4. Choose the Right Tire Type: Based on your bike type and riding conditions, select the appropriate tire type that best suits your needs. For example, sports tires provide excellent grip for aggressive riding, while touring tires offer comfort and longevity for long-distance journeys.
5. Consider Tire Compound: Tire compounds can vary in hardness, affecting grip, handling, and longevity. Soft compounds offer better grip but may wear out faster, while harder compounds provide better durability. Dual compound tires combine the best of both worlds, offering grip in corners and longevity on straight roads.
6. Check Reviews and Ratings: Read reviews and ratings from other motorcyclists to learn about their experiences with specific tire models. Online forums and motorcycle communities are great sources of valuable insights and recommendations.
7. Consult with Experts: If you're uncertain or have specific requirements, consult with a knowledgeable tire specialist or your motorcycle dealer. They can offer expert advice based on your bike model, riding habits, and preferences.
8. Budget Consideration: Set a budget for your new tires and explore options that fit within your price range. Remember that investing in quality tires is essential for your safety and overall riding experience.
9. Brand Reputation: Consider well-established tire brands known for their quality, reliability, and performance. Established brands often have a wide range of tire options to suit various riding needs.
10. Prioritize Safety: Ultimately, prioritize safety when selecting your motorcycle tires. Choose tires that match your bike's specifications, riding style, and the conditions you'll encounter. Quality tires ensure optimal traction, handling, and stability, reducing the risk of accidents and enhancing your overall enjoyment on the road.
By following these steps, you can make an informed decision and find the best tire that complements your bike and maximizes your riding pleasure. Remember to perform regular tire maintenance, including checking tire pressure and tread wear, to ensure your tires stay in top-notch condition for safe and exhilarating rides.
Selecting the best tires for your bike is essential for a safe and thrilling ride. Ride with confidence, knowing you've found the perfect match!
Evolution and Maintenance of 2-Wheeler Suspensions: A Smooth Ride Through the Years and Beyond
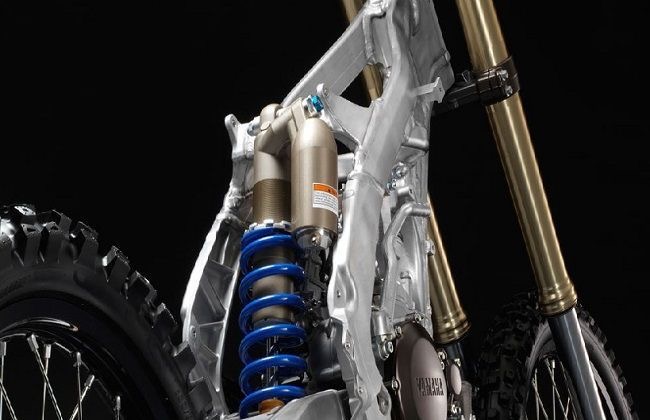
Discover the fascinating journey of two-wheeler suspensions, from humble beginnings to cutting-edge innovations. In this blog post, we delve into the evolution of 2-wheeler suspensions, explore future possibilities, and provide essential maintenance tips to keep your bike's suspension performing at its best.
Suspension is a crucial element in the world of two-wheelers, providing riders with a comfortable and controlled experience. Over the years, advancements in technology and engineering have led to significant improvements in suspension systems, making them more efficient, adjustable, and versatile. In this blog post, we will explore the evolution of 2-wheeler suspensions, look into the future of this technology, and provide essential tips on how to maintain your bike's suspension for peak performance.
Suspension on two-wheelers (motorcycles and scooters) is a crucial component that helps provide a comfortable and controlled riding experience. It consists of various mechanisms that absorb shocks, dampen vibrations, and maintain the stability of the vehicle, especially when riding over rough or uneven surfaces. The primary goal of suspension is to improve the rider's safety, comfort, and control over the vehicle.
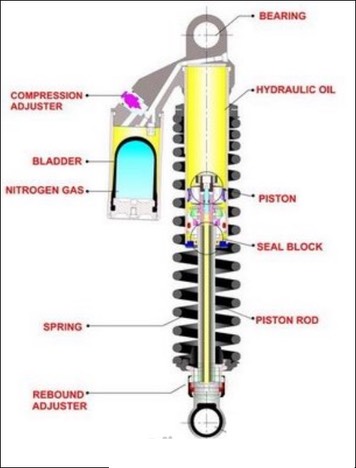
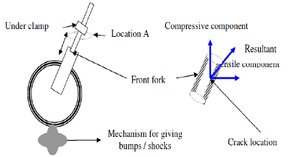
Key components of a typical two-wheeler suspension system include:
1. Front Forks: The front suspension typically employs telescopic forks. These consist of two tubes, one sliding inside the other. The bottom end of the outer tube is attached to the front wheel axle, while the upper end connects to the handlebars. The inner tube moves up and down, reacting to road imperfections and transferring the force to the suspension system.
2. Rear Suspension: The rear suspension varies across different two-wheelers. Common types include:
a. Dual Shock Absorbers: Some bikes have two separate shock absorbers mounted on either side of the rear wheel. These provide a balanced response to bumps and road irregularities.
b. Monoshock: Other bikes have a single shock absorber located near the center of the rear wheel. Monoshock setups are more common in modern motorcycles and offer better adjustability and performance.
3. Shock Absorbers: The primary function of shock absorbers is to dampen the oscillations and vibrations generated by the road. They help keep the tires in contact with the ground, enhancing traction and control. Shock absorbers use hydraulic or gas-filled mechanisms to absorb and dissipate energy from road impacts.
4. Springs: Both front and rear suspensions feature springs, which carry the load of the vehicle and compress when encountering bumps. The springs help in absorbing the impact and then release the stored energy to keep the wheels in contact with the road surface.
5. Swingarm: The swingarm is a critical component of the rear suspension system. It connects the rear wheel to the motorcycle's frame and allows the wheel to move up and down as needed. The shock absorber is typically attached to the swingarm to control its movement.
The suspension's design and components can vary significantly depending on the type of motorcycle or scooter. Some high-performance motorcycles may have more sophisticated and adjustable suspension systems to cater to varying riding conditions and preferences.
Proper suspension setup and maintenance are essential to ensure a safe and comfortable riding experience. Riders should check and adjust the suspension according to their weight, riding style, and the road conditions they frequently encounter. Regular maintenance, including checking for leaks, lubrication, and replacing worn-out components, is essential to keep the suspension functioning optimally.
There are several types of suspensions available for two-wheelers, each with its advantages and characteristics. The choice of suspension type depends on the motorcycle's design, intended use, and performance requirements. Here are some common types of suspensions used in two-wheelers:
1. Telescopic Forks: Telescopic forks are the most common front suspension design for motorcycles. They consist of two telescoping tubes, with the larger outer tube enclosing the smaller inner tube. This design provides simple and effective damping and is suitable for a wide range of motorcycles, from commuter bikes to sports bikes.
2. Upside-Down (USD) Forks: Upside-down forks are a variation of telescopic forks where the larger diameter tube is attached to the triple tree (the part connecting the forks to the handlebars), and the smaller diameter tube is attached to the front wheel axle. USD forks are commonly used in high-performance motorcycles as they offer reduced unsprung weight, providing improved handling and responsiveness.
3. Monoshock Suspension: Monoshock suspensions use a single shock absorber located near the center of the rear wheel. This design simplifies the rear frame and allows for better adjustability and tuning of the suspension characteristics. Mono shocks are commonly found in modern motorcycles and provide better ride quality and handling compared to dual shock absorbers.
4. Dual Shock Absorbers: Some motorcycles, especially older models and cruisers, use dual shock absorbers mounted on either side of the rear wheel. While this setup is not as common in modern designs, it can still be found on certain motorcycles, offering a more classic look and ride feel.
5. Linkage Suspension: Linkage suspension is a type of rear suspension that uses additional linkages between the swingarm and the shock absorber. This setup allows for better control over the suspension's progressive movement, providing improved traction and handling under different riding conditions.
6. Gas-Charged Shock Absorbers: Some motorcycles come equipped with gas-charged shock absorbers. These shock absorbers use pressurized gas (usually nitrogen) to enhance damping performance and reduce foaming and aeration of the hydraulic fluid during heavy usage.
7. Electronic Suspension: High-end motorcycles often come with electronically controlled suspensions. These suspensions allow the rider to adjust the damping characteristics on the fly, adapting to different road conditions or riding styles. Electronic suspensions offer greater versatility and convenience for the rider.
8. Air Suspension: Air suspension systems use compressed air to adjust the suspension's stiffness and ride height. These suspensions are commonly found in touring and adventure motorcycles, allowing the rider to fine tune the ride comfort based on the load and riding conditions.
The choice of suspension depends on factors like cost, performance, riding style, and the intended use of the motorcycle. Manufacturers often use different suspension setups to cater to specific niches and meet the diverse preferences of riders.
Evolution of 2-Wheeler Suspensions:
1. Traditional Telescopic Forks: The early days of two-wheelers saw the adoption of simple telescopic fork suspensions. They were effective in providing a smoother ride over rough terrains compared to rigid frames but had limited adjustability and damping capabilities.
2. Monoshock Systems: As motorcycles evolved, manufacturers introduced mono-shock systems, replacing the traditional dual shock absorbers. Mono shocks offered better control, adjustability, and improved stability, enhancing the overall ride quality and handling.
3. Upside-Down Forks (USD): High-performance motorcycles started incorporating upside-down forks. This inverted design reduces unsprung weight, improves suspension response, and offers better rigidity for aggressive cornering and braking.
4. Electronic Suspensions: The dawn of electronic suspensions brought a new era of adaptability and customizability. Electronic suspensions use sensors and actuators to automatically adjust damping settings based on riding conditions, making for a smoother and more responsive ride.
Damping in the context of suspension refers to the control of how the suspension system responds to the movement caused by road irregularities and the up-and-down motion of the wheels. It is a crucial aspect of the suspension system as it influences the comfort, stability, and handling of the motorcycle.
When a two-wheeler encounters bumps, potholes, or any other uneven surfaces, the wheels move up and down due to the impact. Damping is the process of controlling the speed at which this movement occurs. The damping system uses hydraulic or fluid-filled mechanisms to absorb the energy generated during the suspension's compression and extension.
The primary role of damping in the suspension system is to achieve two main objectives:
- Control Suspension Movement: Damping helps in controlling the rate at which the suspension compresses (during compression damping) and extends (during rebound damping). Without proper damping, the suspension could oscillate uncontrollably, leading to poor stability and compromised tire contact with the road.
- Provide Comfort and Control: Damping is responsible for absorbing and dissipating the energy from road impacts, which would otherwise be transferred to the rider. By dampening these forces, the suspension ensures a smoother and more comfortable ride, minimizing jolts and vibrations. Moreover, effective damping provides improved handling and control over the motorcycle, especially during cornering and braking.
There are typically two types of damping adjustments on suspension systems:
- Compression Damping: Compression damping controls the rate at which the suspension compresses when encountering an obstacle or during heavy braking. Proper compression damping prevents the suspension from bottoming out or diving excessively under heavy loads, ensuring stability and consistent handling.
- Rebound Damping: Rebound damping controls the rate at which the suspension extends after compression. Proper rebound damping prevents the suspension from rebounding too quickly, maintaining consistent tire contact with the road and preventing the suspension from "bouncing back" after hitting a bump.
Many modern motorcycles come with adjustable damping settings, allowing riders to fine-tune the suspension's behavior based on their weight, riding style, and the road conditions they encounter. Riders can customize the compression and rebound damping to achieve the desired balance between comfort and performance.
In summary, damping in the suspension system plays a critical role in providing a smooth and controlled ride. It helps maintain stability, optimizes tire contact with the road, and enhances overall handling and rider comfort. A well-tuned damping system ensures that the motorcycle responds predictably and safely to different road conditions, contributing to a more enjoyable and safer riding experience.
Preload and adjustable suspension are terms related to the setup and tuning of the motorcycle's suspension system. They are essential features that allow riders to customize their bike's suspension to match their weight, riding style, and road conditions, ultimately improving comfort and handling.
- Preload: Preload refers to the amount of compression applied to the suspension springs when the motorcycle is at rest, with the rider on board. By adjusting preload, riders can optimize the suspension's sag, which is the amount the suspension compresses under the bike's weight. Proper sag settings ensure that the suspension maintains the ideal balance between ride height and travel when carrying the rider's weight.
To adjust preload, the motorcycle typically has a threaded collar or a similar mechanism around the shock absorber or the front fork. By turning this collar clockwise or counterclockwise, riders can increase or decrease the preload, respectively. Increasing preload stiffens the suspension and reduces sag while decreasing preload softens the suspension and increases sag.
Proper sag settings are important for maintaining consistent tire contact with the road, ensuring good traction, stability, and predictable handling. Riders should refer to their motorcycle's manual or seek advice from a professional mechanic to determine the correct preload settings for their weight and riding style.
- Adjustable Suspension: Adjustable suspension refers to a system that allows riders to modify the damping characteristics of their motorcycle's suspension. Damping controls how the suspension responds to compression and rebound forces caused by bumps and road irregularities.
There are typically two types of adjustable suspension:
a. Compression Damping: Compression damping controls how the suspension compresses when it encounters an impact or obstacle. Riders can adjust compression damping to make the suspension stiffer or softer, depending on their preferences and the riding conditions.
b. Rebound Damping: Rebound damping controls how the suspension extends after compression. Adjusting rebound damping helps riders control the rate at which the suspension returns to its normal position, influencing how the bike handles after hitting a bump.
Many modern high-performance motorcycles and some mid-range models come with adjustable suspension as a standard feature. Some bikes have manual adjustment knobs or screws on the forks and shocks, while others offer electronic adjustments that can be controlled through the motorcycle's dashboard or a dedicated control unit.
Adjustable suspension gives riders the flexibility to fine-tune the bike's handling characteristics based on their skill level, riding style, and the road conditions they encounter. It allows for a more personalized riding experience and ensures that the motorcycle performs optimally in different situations.
Preload and adjustable suspension are critical features that enable riders to optimize their motorcycle's suspension setup to suit their individual needs and preferences, leading to a safer, more comfortable, and enjoyable ride.
Setting up preloads on the shock absorbers is an important step to ensure proper suspension sag, which is essential for optimal handling and comfort. The process involves adjusting the compression of the suspension springs to accommodate the weight of the rider and any additional loads on the motorcycle. Here's a general guide on how to set up preloads on the shock absorbers:
- Determine the Proper Sag: Before adjusting the preload, you need to know the recommended sag measurements for your motorcycle. Sag refers to the amount the suspension compresses under the weight of the rider and the bike. The recommended sag values vary depending on the type of motorcycle and its intended use. Check the owner's manual or the manufacturer's website for the specific sag values for your motorcycle.
- Measure the Sag: With the help of a friend or a proper stand, lift the motorcycle and suspend it freely, so the wheels are off the ground. Measure and record the distance between the rear axle and a fixed point on the motorcycle, usually a point on the subframe above the axle. This is the fully extended measurement.
- Apply Rider Weight: Put on your riding gear, including any additional gear you usually carry while riding. Sit on the motorcycle in your typical riding position. Ask your friend to support the motorcycle to keep it upright while you're seated.
- Measure Sag with Rider Weight: With you seated on the motorcycle, measure and record the distance between the rear axle and the same fixed point as before. This is the sag measurement. The difference between the fully extended measurement and the sag measurement is the amount of sag, which should match the recommended sag value for your bike.
- Adjust Preload: If the sag measurement is less than the recommended value, you need to increase the preload to stiffen the suspension. If the sag measurement is greater than the recommended value, you need to decrease the preload to soften the suspension.
Most motorcycles have a preload adjustment mechanism on the rear shock absorber, which can be adjusted using a spanner wrench or a specialized tool. Turning the preload collar clockwise increases the preload (stiffer suspension) while turning it counterclockwise decreases the preload (softer suspension).
- Re-measure Sag: Adjust the preload and repeat the sag measurement until you achieve the recommended sag value. It might take a few iterations to get it just right.
- Front Fork Preload (Optional): Some motorcycles also have preload adjustments for the front forks. The process for adjusting the front fork preload is similar to the rear shock absorber. Refer to your owner's manual for specific instructions on adjusting the front fork preload.
Remember that proper suspension setup is essential for safe and comfortable riding. If you're unsure about the process or don't have the necessary tools, it's best to seek assistance from a professional motorcycle mechanic or a suspension specialist to set up your bike's preloads correctly.
The Future of 2-Wheeler Suspensions:
The future of 2-wheeler suspensions is promising, with ongoing research and development aimed at further enhancing the riding experience. Some potential advancements include:
1. Semi-Active Suspensions: Semi-active suspensions will become more widespread, providing riders with real-time adaptive damping based on road conditions and riding styles. This technology will enhance comfort, safety, and performance.
2. Smart Sensor Integration: Advancements in sensor technology will enable suspensions to gather more precise data about the rider's behavior, road conditions, and environmental factors. This will lead to more intelligent suspension adjustments for an optimized riding experience.
3. Active Aerodynamics Integration: Integrated suspensions with active aerodynamics may become a reality, allowing the bike to adjust its aerodynamic profile based on speed, road conditions, and rider inputs, optimizing stability and fuel efficiency.
Maintaining Your Bike's Suspension:
Regular maintenance is essential to keep your bike's suspension performing at its best. Here are some tips to maintain your suspension:
1. Inspect Regularly: Check your suspension components for any signs of leaks, damage, or wear. Pay attention to fork seals, shock absorbers, and linkage systems.
2. Lubrication: Keep all moving parts well-lubricated to ensure smooth operation. Follow the manufacturer's guidelines for recommended lubricants.
3. Cleanliness: Regularly clean your suspension components to prevent the build-up of dirt, debris, and corrosive agents that can compromise performance.
4. Adjustments: Learn how to adjust preload, compression, and rebound damping to optimize your bike's suspension for your weight and riding style.
5. Professional Servicing: For more complex adjustments or when unsure, seek assistance from a professional mechanic or suspension specialist.
The ideal suspension setting for a two-wheeler, such as a motorcycle or a scooter, varies depending on several factors, including the rider's weight, riding style, type of motorcycle, and the road conditions typically encountered. Each rider may have different preferences, so there isn't a one-size-fits-all solution. However, I can provide some general guidelines on how to set up the suspension for most riders:
- Sag: Sag is one of the essential settings in the suspension setup. It refers to the amount the suspension compresses under the weight of the rider. Aim to set the sag within the manufacturer's recommended range, which is usually around 25-30% of the suspension's total travel for the front and rear.
To set the sag, follow the steps mentioned in the previous response under "How to set up preloads on the shock absorbers."
- Preload: Once you've set the sag, adjust the preload (if your motorcycle has this feature) to achieve the correct sag measurement. Increasing preload stiffens the suspension while decreasing it softens the suspension.
- Compression Damping: Set the compression damping to a middle or baseline position recommended by the manufacturer. From there, you can make adjustments based on your riding style and road conditions. Increase compression damping for a stiffer and more controlled ride, or decrease it for a plusher, more comfortable ride.
- Rebound Damping: Similar to compression damping, start with the manufacturer's recommended baseline setting and make adjustments based on your preferences. Increase rebound damping for slower extension after compression, or decrease it for quicker extension.
- Ride Height: Some motorcycles also have ride height adjustments, which can affect the bike's geometry and handling. Unless you have specific requirements or experience with this setting, it's generally best to leave the ride height at the stock position.
- Rider's Weight and Gear: Keep in mind that the suspension should be set up according to the rider's weight, including any riding gear and luggage typically carried during rides.
It's essential to experiment with different settings to find what works best for you. If you're not confident in setting up the suspension yourself, it's always a good idea to seek assistance from a professional mechanic or a suspension specialist. They can help you fine-tune the suspension to suit your individual needs and riding style. Additionally, some higher-end motorcycles come with electronic suspension adjustment, which allows for easier customization of the suspension settings based on riding modes or preferences.
When looking for a bike, especially if the suspension is an important factor for you, there are several aspects related to the suspension system that you should consider. Here are some key points to look at when identifying a bike based on its suspension:
- Suspension Type: Identify the type of suspension used in the bike. Check if it has telescopic forks at the front and dual shock absorbers or a mono-shock at the rear. Upside-down forks (USD) are a feature found in some high-performance bikes.
- Adjustable Suspension: Determine if the bike has an adjustable suspension. Adjustable suspension allows you to fine-tune the damping characteristics to suit your riding style and preferences. It is common in higher-end and performance-oriented motorcycles.
- Suspension Travel: Check the suspension travel, which refers to the distance the suspension can compress and extend. Longer suspension travel is suitable for off-road or adventure bikes, while shorter travel is typical for street-oriented bikes.
- Damping Adjustments: If the bike has adjustable suspension, look for compression and rebound damping adjustments. These allow you to control the suspension's response to compression and extension, respectively.
- Preload Adjustment: Find out if the bike offers preload adjustment. Preload adjustment helps in optimizing the suspension sag to match your weight and riding style.
- Electronic Suspension (Optional): Some modern and high-end motorcycles come equipped with electronic suspension systems. These systems allow you to adjust the suspension settings electronically on the fly, usually through the motorcycle's dashboard or a control unit.
- Manufacturer Recommendations: Check the manufacturer's specifications and recommendations for the suspension settings and adjustments. This information is usually available in the owner's manual or on the manufacturer's website.
- Reviews and Feedback: Look for reviews and feedback from other riders about the bike's suspension performance. Real-world experiences can give you valuable insights into how the suspension behaves in different riding conditions.
- Intended Use: Consider how you plan to use the bike. If you're looking for a comfortable cruiser, a plush and compliant suspension may be more important. On the other hand, if you're interested in sporty riding or off-road adventures, a more adjustable and responsive suspension might be preferable.
- Test Ride: Whenever possible, take the bike for a test ride to experience the suspension firsthand. This will give you a feel for how the suspension responds to different road surfaces and riding conditions.
Remember that the suspension system is a critical component of any motorcycle, influencing ride comfort, handling, and safety. Choosing a bike with a well-designed and appropriate suspension system for your needs will enhance your overall riding experience.Top of Form
The evolution of 2-wheeler suspensions has come a long way, providing riders with unprecedented comfort, control, and safety. As technology advances, suspensions will continue to become smarter, more adaptable, and tailored to individual needs. By following proper maintenance procedures, riders can ensure their bike's suspension remains in peak condition, offering a smooth and enjoyable riding experience for many miles to come.Bottom of Form
The evolution of 2-wheeler suspensions promises an exciting future. Proper maintenance ensures a smooth and safe ride for every journey.
Unraveling the Power Behind Two-Wheeled Machines: A Guide to Motorcycle Engines
Motorcycles have an undeniable allure, and their heart lies in the engine that powers these two-wheeled wonders. In this blog post, we'll explore the different types of motors used in motorcycles and guide you through the best approach to choosing the perfect bike and engine combination for your riding needs.
2-wheeler vehicles commonly use various types of engines. Here are some of the most common types:
1. Internal Combustion Engines (ICE): a. Gasoline/Petrol Engines: These are the most prevalent type of engines in 2-wheelers worldwide. They run on gasoline (petrol) fuel and use spark ignition to power the vehicle. b. Diesel Engines: While less common in 2-wheelers, some markets have diesel-powered motorcycles and scooters. Diesel engines use compression ignition to burn diesel fuel.
2. Electric Motors: Electric two-wheelers have gained popularity due to their environmental friendliness and low operating costs. There are two types of electric motors commonly used: a. Brushed DC Motors: These motors have been used in older electric two-wheelers. They are relatively simple but less efficient compared to modern brushless motors. b. Brushless DC Motors (BLDC): Most modern electric two-wheelers use BLDC motors. They are more efficient, have a better power-to-weight ratio, and require less maintenance.
3. Hybrid Engines: Some two-wheelers feature hybrid powertrains that combine an internal combustion engine with an electric motor and battery. These systems offer improved fuel efficiency and reduced emissions.
4. Rotary Engines: Although rare, some experimental or specialty motorcycles have used rotary engines, known for their high-revving capabilities and compact size.
Motorcycles, with their freedom-inducing allure and nimble charm, have captivated riders for generations. One of the key elements that contribute to their performance and appeal is the engine that powers these two-wheeled machines.
1. The Heart of a Motorcycle - Engine Types: Motorcycles come equipped with a variety of engine types, each offering its unique characteristics and riding experiences. The most common engine types found in two-wheelers are:
a. Single-Cylinder Engines:
- Ideal for: Commuter bikes, entry-level motorcycles, and lightweight off-road bikes.
- Pros: Simple design, lightweight, and fuel-efficient. Suitable for city commuting and easy maintenance.
- Cons: May lack top-end power and smoothness compared to multi-cylinder engines.
b. Twin-Cylinder Engines:
- Ideal for: A wide range of motorcycles, including standard bikes, cruisers, and sport-touring motorcycles.
- Pros: Offers a good balance between performance and smoothness. Suitable for various riding styles and preferences.
- Cons: Slightly heavier and more complex than single-cylinder engines.
c. Inline Three-Cylinder Engines:
- Ideal for: Sportier motorcycles and some sport-touring bikes.
- Pros: Unique engine note, good mid-range torque, and smoother operation than single-cylinder engines.
- Cons: May not offer the same top-end power as inline four-cylinder engines.
d. Inline Four-Cylinder Engines:
- Ideal for: High-performance sport bikes and some sport-touring motorcycles.
- Pros: Exceptional power, acceleration, and smoothness throughout the rev range.
- Cons: Generally heavier and more complex compared to other engine configurations.
2. Choosing Your Motorcycle and Engine: Selecting the perfect motorcycle and engine combination requires careful consideration of various factors, ensuring your ride aligns with your needs and preferences. Here's the best approach to finding your ideal two-wheeled companion:
a. Determine Your Riding Style:
- Are you a daily commuter, a touring enthusiast, or an adrenaline-hungry speedster? Define your primary riding style to narrow down the types of motorcycles and engines that suit you best.
b. Consider Your Experience Level:
- Beginners may find single-cylinder engines more manageable, while experienced riders may prefer the power and performance of multi-cylinder engines.
c. Analyze Your Riding Environment:
- If you'll be navigating city traffic frequently, a lightweight and agile single-cylinder or twin-cylinder motorcycle might be ideal. For long-distance touring, a more comfortable and powerful engine may be preferable.
d. Test Ride and Research:
- Don't hesitate to test-ride different motorcycles to understand how each engine performs in real-world conditions. Additionally, research online reviews and seek expert advice to gain insights from fellow riders.
e. Budget and Maintenance:
- Consider the upfront cost of the motorcycle and the ongoing maintenance expenses. Single-cylinder engines tend to be more affordable and have lower maintenance costs.
The engine is the heartbeat of a motorcycle, defining its personality and performance on the road. Understanding the different types of engines available and aligning your preferences with your riding style and environment will help you make an informed decision when selecting the perfect motorcycle for your adventures. So, embark on this exciting journey, find your ideal engine, and let the open road become your playground of freedom and adventure.
Choose the perfect motorcycle engine for your riding style, and let the open road become your playground of freedom and adventure.
The evolution of Internal Combustion Engines (ICE) in motorcycles has seen significant advancements over the years. Here's a brief overview of the historical progression and potential future trends:
1. Early Single-Cylinder Engines: In the late 19th and early 20th centuries, motorcycles were powered by rudimentary single-cylinder engines. These engines were air-cooled and had low displacement, resulting in modest performance.
2. Multi-Cylinder Configurations: In the mid-20th century, motorcycle manufacturers began experimenting with multi-cylinder configurations, such as twin-cylinder and inline-four engines. Multi-cylinder engines provided improved power and smoother operation, leading to higher-performance motorcycles.
3. Performance and Technology Improvements: Throughout the 20th century, advancements in technology and engineering led to improved engine efficiency, reliability, and power output. Innovations such as overhead camshafts, electronic fuel injection (EFI), and digital engine management systems enhanced motorcycle performance and fuel efficiency.
4. Shift Towards Liquid-Cooled Engines: As motorcycles demanded higher performance and stricter emission regulations came into effect, liquid-cooled engines became more prevalent. Liquid cooling allowed for better heat dissipation and enabled manufacturers to extract more power from the engines while meeting emission standards.
5. Four-Valve and Variable Valve Timing (VVT): Many modern motorcycle engines utilize four valves per cylinder instead of the traditional two valves. This design allows for better intake and exhaust flow, resulting in improved performance. Additionally, some high-end motorcycles have adopted Variable Valve Timing (VVT) technology, which optimizes valve timing for different RPM ranges, further enhancing performance and fuel efficiency.
6. Advancements in Materials and Manufacturing: The use of advanced materials like lightweight alloys and composites, coupled with refined manufacturing techniques, has allowed for lighter and more efficient engines. This has contributed to improved handling and overall motorcycle performance.
Future Trends:
1. Electric Motorcycles: The future of motorcycles is likely to see greater adoption of electric powertrains. Electric motorcycles offer instant torque, low maintenance requirements, and zero tailpipe emissions. As battery technology improves, range anxiety will decrease, making electric motorcycles more practical for everyday use.
2. Hybrid Motorcycles: Hybrid motorcycles, combining both internal combustion engines and electric motors, could become more prevalent. These hybrids offer the benefits of both worlds, with improved fuel efficiency and reduced emissions.
3. Advanced Engine Management: Future motorcycle engines may feature even more sophisticated engine management systems, utilizing artificial intelligence and machine learning algorithms to optimize performance and efficiency based on real-time riding conditions.
4. Alternative Fuels: With a growing emphasis on environmental sustainability, motorcycles may shift towards using alternative fuels such as biofuels, compressed natural gas (CNG), or hydrogen, reducing greenhouse gas emissions.
5. Lightweight and Compact Designs: Advancements in materials and design techniques will likely result in even lighter and more compact engines, improving overall motorcycle agility and handling.
It's important to note that while electric motorcycles and alternative powertrains are on the rise, internal combustion engines will continue to play a significant role in the motorcycle industry for the foreseeable future. The shift to alternative power sources will depend on advancements in battery technology, infrastructure development, and consumer acceptance.
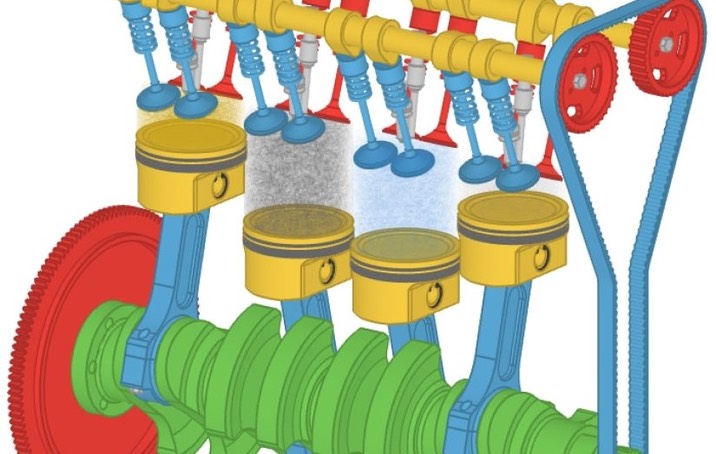
An Internal Combustion Engine (ICE) is a type of heat engine that converts chemical energy stored in fuel into mechanical energy, which is used to power vehicles such as cars, motorcycles, and trucks. The most common ICE used in vehicles is the gasoline (petrol) engine. Here's a basic explanation of how an ICE works:
- Intake Stroke:
- The process begins when the engine's piston moves down the cylinder. As the piston descends, the intake valve opens, and a mixture of air and fuel (gasoline) is drawn into the combustion chamber.
- Compression Stroke:
- Once the intake stroke is complete, the intake valve closes, and the piston starts moving up the cylinder. This compresses the air-fuel mixture in the combustion chamber, raising its pressure and temperature.
- Power Stroke:
- At the top of the compression stroke, a spark plug ignites the compressed air-fuel mixture. The ignited mixture rapidly burns, producing a high-pressure, expanding gas. This explosion forces the piston down with considerable force. The energy from the expanding gas is transferred to the crankshaft, which converts the linear motion of the piston into rotational motion.
- Exhaust Stroke:
- After the power stroke, the exhaust valve opens, and the piston moves back up the cylinder, pushing the burnt gases out of the combustion chamber and into the exhaust system.
- Repeat the Cycle:
- The engine's crankshaft, connected to the piston, converts the reciprocating motion of the piston into a continuous circular motion, which drives the vehicle's wheels through a transmission system.
The four steps of intake, compression, power, and exhaust together form what's called the "four-stroke cycle." Each full cycle occurs over two complete revolutions of the crankshaft (two up-and-down movements of the piston).
It's important to note that there are other types of ICE engines, such as diesel engines, which operate on a similar principle but use compression ignition instead of spark ignition. Additionally, there are two-stroke engines that complete the power cycle in just two strokes of the piston, eliminating the need for separate intake and exhaust strokes.
Overall, the internal combustion process in ICE engines results in the conversion of chemical energy from fuel into mechanical energy, propelling vehicles and providing the power necessary for transportation.
Motorcycles commonly use the following types of Internal Combustion Engines (ICE):
1. Single-Cylinder Engines: Single-cylinder engines have just one cylinder and are often used in small, lightweight motorcycles and scooters. They are simple, lightweight, and cost-effective.
2. Twin-Cylinder Engines: Twin-cylinder engines have two cylinders arranged in various configurations, such as parallel-twin, V-twin, and opposed-twin. They offer better performance and smoother operation compared to single-cylinder engines.
3. Inline Three-Cylinder Engines: Inline three-cylinder engines feature three cylinders arranged in a straight line. They provide a good balance between performance and smoothness, and they are commonly found in sportier motorcycles.
4. Inline Four-Cylinder Engines: Inline four-cylinder engines have four cylinders in a straight line. They are known for their high-revving capabilities, excellent performance, and smooth operation. These engines are often used in high-performance motorcycles.
5. V4 Engines: V4 engines have four cylinders arranged in a V configuration. They are relatively rare in motorcycles but are used in some high-end sports and touring motorcycles.
6. Boxer Engines: Boxer engines have two horizontally opposed cylinders, providing a low center of gravity and smooth operation. They are commonly associated with BMW motorcycles.
7. Single Overhead Cam (SOHC) and Double Overhead Cam (DOHC) Engines: These terms refer to the number of camshafts used to actuate the engine's valves. SOHC engines have one camshaft, while DOHC engines have two, offering better valve control and potentially higher performance.
8. Air-Cooled and Liquid-Cooled Engines: Motorcycles can be equipped with air-cooled or liquid-cooled engines. Air-cooled engines use fins and natural airflow to dissipate heat, while liquid-cooled engines use a liquid coolant system to regulate temperature more effectively.
Let's compare the different types of Internal Combustion Engines (ICE) used in motorcycles:
- Single-Cylinder vs. Twin-Cylinder:
- Single-Cylinder: Simple, lightweight, and cost-effective. Suitable for small and lightweight motorcycles and scooters. Generally, they offer lower performance compared to multi-cylinder engines, but they are fuel-efficient and easy to maintain.
- Twin-Cylinder: Provides better performance and smoother operation compared to single-cylinder engines. Twin-cylinder engines offer a good balance between fuel efficiency and performance and are commonly found in mid-range motorcycles.
- Inline Three-Cylinder vs. Inline Four-Cylinder:
- Inline Three-Cylinder: Offers a unique engine note and good mid-range torque. It provides smoother operation compared to single-cylinder engines. It is often used in sportier motorcycles, providing a good compromise between performance and fuel efficiency.
- Inline Four-Cylinder: Known for high-revving capabilities, excellent performance, and smoothness. Typically used in high-performance motorcycles, offering top-tier power and acceleration. However, they may be heavier and more complex than other engine configurations.
- V4 vs. Boxer:
- V4: Relatively rare in motorcycles, but when used, it provides a compact design and good power delivery. V4 engines are usually found in high-end sports and touring motorcycles.
- Boxer: Known for their low center of gravity and smooth operation. Boxer engines are commonly associated with BMW motorcycles. They offer good torque characteristics but may result in a wider motorcycle.
- SOHC vs. DOHC:
- SOHC (Single Overhead Cam): Simpler and lighter than DOHC engines. Suitable for smaller displacement motorcycles. It uses one camshaft to actuate the valves, offering fewer moving parts and potentially lower maintenance costs.
- DOHC (Double Overhead Cam): Provides better valve control and potentially higher performance. DOHC engines often feature multiple valves per cylinder, allowing more efficient intake and exhaust flow. They are commonly used in higher-performance motorcycles.
- Air-Cooled vs. Liquid-Cooled:
- Air-Cooled: Simpler and lighter design, but may struggle to dissipate heat efficiently under heavy loads or in hot climates. Typically found in classic and retro-style motorcycles.
- Liquid-Cooled: More effective at regulating engine temperature, offering better performance under demanding conditions. Liquid-cooled engines are commonly used in modern motorcycles, especially those with higher performance levels.
Ultimately, the choice of engine type depends on the motorcycle's intended use, performance requirements, and the rider's preferences. Each engine configuration comes with its own set of advantages and trade-offs, catering to different riding styles and needs.
2-Stroke Engine: A 2-stroke engine is a type of internal combustion engine that completes a power cycle with two strokes of the piston, namely the compression stroke and the power stroke. In a 2-stroke engine, the intake and exhaust processes are integrated into the compression and power strokes, making it simpler in design compared to a 4-stroke engine. The fuel-air mixture is introduced into the crankcase, and when the piston moves upwards, it compresses the mixture, which is then ignited as the piston reaches the top dead center, generating power. As the piston moves back down, it expels the exhaust gases.
4-Stroke Engine: A 4-stroke engine is another type of internal combustion engine that completes a power cycle with four strokes of the piston: intake, compression, power, and exhaust. Each stroke occurs in a separate stroke, and there are separate valves for intake and exhaust processes. During the intake stroke, the fuel-air mixture is drawn into the combustion chamber through the intake valve. The piston then moves up during the compression stroke to compress the mixture. In the power stroke, the compressed mixture is ignited, generating power to drive the piston downward. Finally, the exhaust stroke expels the exhaust gases through the open exhaust valve.
Advantages of 2-Stroke Engines:
- Simplicity: 2-stroke engines have fewer moving parts, making them lighter, more compact, and easier to manufacture.
- Higher Power-to-Weight Ratio: Due to the fewer strokes required to complete a power cycle, 2-stroke engines can produce more power per unit of weight compared to 4-stroke engines.
- Fewer Parts: The simplicity of 2-stroke engines translates to lower manufacturing costs and potentially reduced maintenance requirements.
Disadvantages of 2-Stroke Engines:
- Pollution and Efficiency: 2-stroke engines tend to produce more pollution and have lower fuel efficiency compared to 4-stroke engines due to their design and oil-fuel mixture requirement.
- Lubrication: 2-stroke engines require oil to be mixed with fuel for lubrication, which can be messy and add to operating costs.
- Durability: The higher operating RPM and increased wear on parts can lead to reduced engine lifespan and increased maintenance needs.
Reasons for Discontinuation of 2-Stroke Engines: Several factors contributed to the discontinuation of 2-stroke engines in many applications:
- Environmental Regulations: 2-stroke engines are known for higher emissions and lower fuel efficiency compared to 4-stroke engines. With increasing concerns about air pollution and stricter emission regulations, 2-stroke engines became less popular in many regions.
- Fuel Efficiency: As fuel efficiency became a more critical factor in the automotive and motorcycle industries, 4-stroke engines provided better mileage and lower operational costs.
- Technology Advancements: With advancements in materials, manufacturing techniques, and engine management systems, 4-stroke engines were improved to offer competitive power and efficiency while meeting stringent emission standards.
- Electric and Hybrid Alternatives: The rise of electric motorcycles and hybrid vehicles provided environmentally friendly alternatives that further diminished the appeal of 2-stroke engines.
While 2-stroke engines are still used in certain niche applications, such as some off-road motorcycles, small garden equipment, and marine engines, they have largely been phased out in mainstream automotive and motorcycle markets due to their environmental drawbacks and inferior efficiency compared to 4-stroke engines and alternative powertrains.
The most preferred engine type for motorcycles varies depending on the market, the type of motorcycle, and the preferences of the riders. However, globally, the most commonly preferred engine type for motorcycles has been the Internal Combustion Engine (ICE) using gasoline (petrol) as fuel.
Within the category of ICE engines, the following configurations are popular:
1. Single-Cylinder Engines: These engines are commonly used in smaller, lightweight motorcycles, especially in developing countries. They are popular for their simplicity, fuel efficiency, and cost-effectiveness.
2. Twin-Cylinder Engines: Twin-cylinder engines are widely used in various types of motorcycles, ranging from standard and commuter bikes to sport and adventure motorcycles. They offer a good balance between performance and smoothness.
3. Inline Four-Cylinder Engines: Inline four-cylinder engines are often found in high-performance sport bikes and some touring motorcycles. They provide excellent power, acceleration, and top-end performance.
4. V-Twin Engines: V-twin engines are commonly associated with cruiser motorcycles and some custom bikes. They offer a unique engine note, good low-end torque, and a relaxed riding experience.
It's important to note that the popularity of electric motorcycles is on the rise, and preferences may shift in the future as more riders become interested in environmentally friendly and technologically advanced alternatives. Electric motorcycles offer instant torque, low maintenance requirements, and zero tailpipe emissions, making them attractive to environmentally conscious riders.
Please keep in mind that the motorcycle industry is continually evolving, and trends can change based on technological advancements, environmental concerns, and consumer preferences. For the most up-to-date information, it's advisable to refer to the latest market trends and manufacturer offerings in your region.
In a V-twin engine, the cylinders are arranged in a V-shaped configuration, with the crankshaft positioned at the bottom of the V. V-twin engines are commonly used in motorcycles and some small-engine applications. There are two primary configurations for V-twin engines:
- 45-Degree V-Twin:
- In this configuration, the angle between the two cylinder banks is typically 45 degrees. It is one of the most common V-twin configurations used in motorcycles, especially in Harley-Davidson motorcycles. The 45-degree V-twin engine offers good torque at low RPMs and a distinctive exhaust note.
- 90-Degree V-Twin:
- In this configuration, the angle between the two cylinder banks is 90 degrees. This design is often used in sportier and high-performance motorcycles. The 90-degree V-twin engine can provide a smoother power delivery and better balance due to the even firing order of the cylinders.
In both configurations, the V-twin engine has a shared crankpin, which means that both pistons share the same crankpin on the crankshaft. This design simplifies the engine's construction and makes it more compact and lighter compared to some other multi-cylinder engine configurations.
V-twin engines are favored for their unique sound, good low-end torque, and the classic appearance they give to motorcycles. They are commonly used in cruiser motorcycles, custom bikes, and some touring motorcycles. However, different manufacturers may use variations in the angle and design of their V-twin engines to achieve specific performance characteristics and meet various market demands.
Maintaining an Internal Combustion Engine (ICE) is crucial to ensure its optimal performance, longevity, and reliability. Here are some essential tips for maintaining an ICE engine:
1. Regular Oil Changes: Change the engine oil and oil filter at manufacturer-recommended intervals. Fresh oil provides proper lubrication and keeps the engine components running smoothly.
2. Air Filter Cleaning/Replacement: Clean or replace the air filter regularly to ensure the engine receives clean air for combustion. A clogged air filter can hinder performance and fuel efficiency.
3. Keep Coolant Levels in Check: Check the engine coolant regularly and maintain the appropriate mixture of coolant and water. This helps prevent overheating and ensures proper engine temperature regulation.
4. Inspect Spark Plugs: Check and clean or replace spark plugs as needed. Worn-out spark plugs can lead to poor combustion and reduced engine performance.
5. Fuel System Maintenance: Use high-quality fuel and additives if recommended by the manufacturer. Periodically inspect and clean the fuel injectors or carburetors to maintain efficient fuel delivery.
6. Timing Belt/Chain Inspection: If your engine has a timing belt or chain, adhere to the recommended replacement intervals. A failed timing belt/chain can cause severe engine damage.
7. Check Belts and Hoses: Inspect and replace any worn or damaged belts and hoses, such as the serpentine belt and radiator hoses, to prevent breakdowns.
8. Battery Maintenance: Keep the battery terminals clean and check the battery's charge regularly. Ensure the battery is securely mounted and replace it if it's old or showing signs of weakness.
9. Exhaust System Inspection: Periodically inspect the exhaust system for leaks and damage. A properly functioning exhaust system is essential for emission control and performance.
10. Listen to Your Engine: Pay attention to any unusual noises, vibrations, or changes in engine performance. Address any issues promptly to prevent further damage.
11. Regular Service and Inspections: Follow the manufacturer's recommended service schedule and get your vehicle inspected regularly by a qualified mechanic.
12. Storage Care: If storing the motorcycle for an extended period, use fuel stabilizers, and keep the engine in a cool, dry place to prevent corrosion and other issues.
By following these maintenance tips and being attentive to your engine's needs, you can enjoy a well-performing ICE engine and prolong its life, ensuring a smooth and reliable ride for years to come.
Torque and brake horsepower (bhp) are two essential performance metrics used to describe the power and capability of an engine. They are often used to evaluate the performance of vehicles, including motorcycles and cars.
1. Torque: Torque is a measure of the twisting force that an engine can generate. It represents the engine's ability to apply rotational force to the crankshaft, which ultimately powers the wheels of the vehicle. Torque is usually expressed in units of Newton meters (Nm) or pound-feet (lb-ft).
In simple terms, higher torque means that the engine can deliver more pulling power, allowing the vehicle to accelerate faster and handle steep inclines with ease. Torque is particularly important in applications like off-road riding or towing, where the engine needs to overcome resistance and maintain steady power at low speeds.
The torque is also responsible for the initial acceleration of the vehicle. Vehicles with high torque values at low RPMs tend to feel more responsive and lively during low-speed maneuvers.
2. Brake Horsepower (bhp): Brake horsepower (bhp) is a measure of the engine's power output. It represents the rate at which the engine can do work over time. One brake horsepower is equivalent to the power required to lift 550 pounds one foot in one second.
Brake horsepower is typically measured at the engine's crankshaft and represents the engine's raw power before considering losses through the drivetrain or other components.
Bhp is used to quantify the engine's performance capabilities, including its ability to achieve higher speeds and maintain high levels of power during sustained high-speed travel.
It's essential to note that brake horsepower is different from the power measured at the wheels (wheel horsepower), as power losses occur due to factors like friction, transmission losses, and other inefficiencies in the drivetrain.
In summary, torque and brake horsepower are both critical aspects of an engine's performance. Torque determines the engine's ability to generate rotational force, providing pulling power and low-speed performance, while brake horsepower quantifies the engine's overall power output, indicating its capability to achieve higher speeds and sustained performance. Both torque and brake horsepower play crucial roles in determining a vehicle's overall performance and driving characteristics.
Torque and brake horsepower are computed using specific formulas based on the engine's measurements and performance characteristics. Here's how each of them is computed:
1. Torque (T):
Torque is calculated using the formula:
T = (F × r)
where: T = Torque (in Newton-meters, Nm, or pound-feet, lb-ft) F = Force applied (in Newtons, N) or pound-force (lbf) r = Radius (distance from the center of the crankshaft to the point where the force is applied, in meters, m, or feet, ft)
For example, in an engine, the force is generated by the expanding gases during the combustion process inside the cylinder, and the radius is the crankshaft's distance from the center.
2. Brake Horsepower (bhp):
Brake horsepower is calculated using the formula:
bhp = (2π × n × T) / 60
where: bhp = Brake horsepower (in horsepower, hp) π (pi) = 3.14159 (a mathematical constant) n = Engine speed or RPM (revolutions per minute) T = Torque (in Newton-meters, Nm, or pound-feet, lb-ft)
The factor 2π/60 converts the torque measured in Nm or lb-ft to work done in joules per second, which is the unit of power (watts). Then, dividing by 745.7 (conversion factor from watts to horsepower) gives the brake horsepower in hp.
It's important to note that the actual measurement of torque and brake horsepower involves sophisticated testing equipment, such as engine dynamometers. Dynamometers allow precise measurements of engine performance under controlled conditions, and the data obtained is used to calculate the torque and brake horsepower.
Manufacturers often publish the torque and brake horsepower values for their engines, providing consumers with crucial information about the engine's performance capabilities. These specifications can be found in vehicle brochures, owner's manuals, or online resources.
The rev range, also known as the RPM range or power band, refers to the range of engine speeds at which an internal combustion engine can operate effectively and deliver its maximum performance. RPM stands for "revolutions per minute," and it represents the number of complete engine revolutions the crankshaft makes in one minute.
In practical terms, the rev range is the span of engine speeds over which the engine generates its peak power and torque output. The lower limit of the rev range is typically the engine's idle speed, while the upper limit is the engine's redline, which is the maximum safe RPM set by the manufacturer to prevent over-revving and potential engine damage.
Different types of engines and vehicles have different rev ranges based on their design and purpose. The rev range is influenced by factors such as the engine's displacement, design, valve timing, and the intended use of the vehicle.
Here's how the rev range affects engine performance:
1. Low RPM Range: At low RPMs, the engine operates in its lower rev range. This range is generally associated with low-speed driving or idling. The engine produces relatively low power and torque at this stage.
2. Mid RPM Range: As the engine speed increases, it enters the mid-range or power band. In this range, the engine generates its peak power and torque, delivering the most efficient and responsive performance. It is where the engine feels most lively and responsive during acceleration.
3. High RPM Range: As the engine continues to rev higher, it enters the high RPM range. In this range, the power output starts to decline, and the engine might not be as efficient. Reaching the redline or exceeding the maximum RPM specified by the manufacturer can lead to potential engine damage due to excessive stress on the components.
The transmission of a vehicle, whether manual or automatic, allows the engine to operate within its optimal rev range under different driving conditions. Drivers and riders typically shift gears to keep the engine running within the power band for optimal performance and fuel efficiency.
The rev range is an essential consideration for vehicle performance and drivability, especially in performance-oriented vehicles, where reaching and maintaining peak power and torque is crucial for achieving maximum acceleration and top speed.
The best rev range for a motorcycle engine depends on the specific type of motorcycle and its intended use. Different types of motorcycles have different power characteristics and ideal rev ranges based on their design and purpose. Here's a general guideline for each type of motorcycle:
1. City Use: For city commuting and urban riding, motorcycles with a broad and accessible power band are preferred. Engines that offer good low-end torque and mid-range power are ideal for stop-and-go traffic and quick acceleration from traffic lights. A rev range between 3,000 to 6,000 RPM can be suitable for city use, as it provides sufficient torque for low-speed maneuvers and urban riding.
2. Touring: Touring motorcycles are designed for long-distance travel and comfort. They typically have larger displacement engines with ample low-end torque for relaxed highway cruising and overtaking. An ideal rev range for touring motorcycles would be around 2,500 to 5,500 RPM, providing smooth power delivery and fuel efficiency during extended journeys.
3. Sport Touring: Sport touring motorcycles combine the sporty performance of sportbikes with the comfort and features of touring motorcycles. They often have engines tuned for a broader power band, offering a good balance of low-end torque for city use and mid-to-high-range power for spirited riding on winding roads. An ideal rev range for sport touring motorcycles would be around 3,000 to 8,000 RPM, providing both responsiveness and touring capabilities.
4. Track Use: Motorcycles used for track racing or high-performance riding on closed circuits require engines with a high-revving nature. Track-focused sportbikes often have engines designed to deliver peak power at higher RPMs. The rev range for track motorcycles can be quite wide, with power delivery starting around 8,000 RPM and reaching up to the redline, which could be 12,000 RPM or higher, depending on the specific model.
5. Off-Road Use: Off-road motorcycles, such as dirt bikes and adventure bikes, need engines with good low-end torque and controllable power for technical off-road conditions. A lower rev range of around 2,000 to 6,000 RPM is desirable for off-road use, as it provides better traction and control at lower speeds and on challenging terrains.
It's important to note that these are general guidelines, and the actual rev range for a specific motorcycle can vary based on its engine design, tuning, and other factors. Manufacturers often publish the recommended RPM ranges or power characteristics for their motorcycles, which can be found in the owner's manual or technical specifications. Additionally, rider preferences and riding styles may also influence the preferred rev range for each type of motorcycle use.
Riding Safe: Essential Gear for Riders
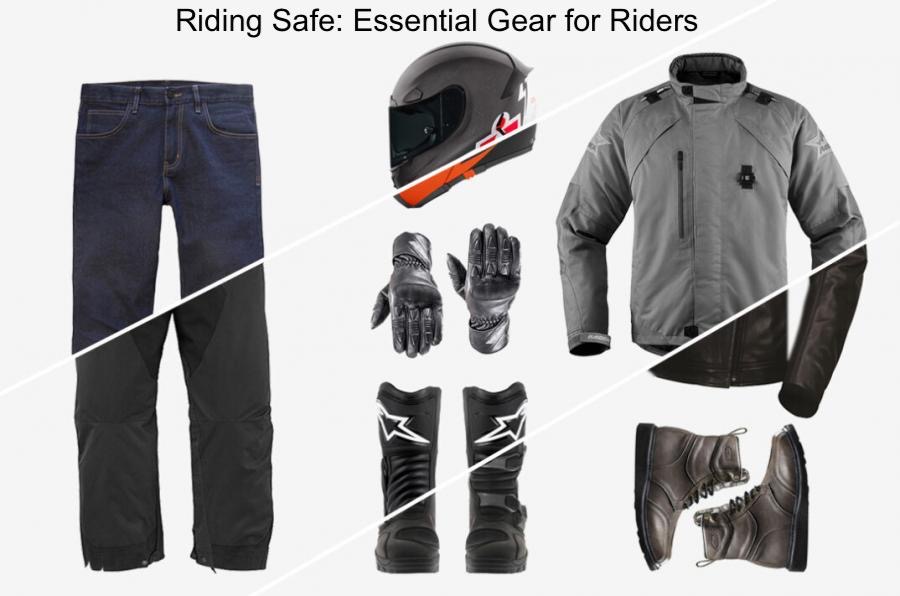
Riding a motorcycle is an exhilarating experience, but safety should always be a top priority. Proper riding gear is essential to protect yourself from potential accidents and injuries. In this blog post, we'll explore the must-have gear for motorcycle riders to stay safe and enjoy their rides with peace of mind. Top of FormBottom of Form
Wearing proper riding gear is crucial for motorcycle safety, as it provides essential protection in the event of an accident or fall. Here are the key pieces of riding gear that should be worn to keep a rider safe on the road:
1. Helmet: A full-face helmet is the most important piece of safety gear for any motorcycle rider. It protects the head and face from impact and reduces the risk of severe head injuries during accidents.
2. Jacket: A motorcycle-specific jacket made of abrasion-resistant materials like leather or textile with armor inserts protects the upper body, including the shoulders, elbows, and spine. It shields against road rash and other injuries.
3. Gloves: High-quality motorcycle gloves with padding and reinforced materials protect the hands and palms during falls. They improve grip and control while riding and shield against abrasions.
4. Pants: Motorcycle pants made of durable materials like leather or textiles with reinforced areas offer protection for the hips, knees, and legs. Some pants come with built-in armor for added safety.
5. Boots: Sturdy, over-the-ankle motorcycle boots protect the feet and ankles. They should be made of durable materials and have non-slip soles for optimal grip on the footpegs and ground.
6. Eye Protection: Motorcycle riders should wear goggles or a full-face helmet with a visor to shield the eyes from debris, wind, insects, and other potential hazards.
7. Reflective Gear: Reflective materials or clothing with high-visibility features can improve the rider's visibility to other motorists, especially during low-light conditions.
8. Rain Gear: In wet weather, riders should wear waterproof or water-resistant gear, including rain jackets and pants, to stay dry and maintain better control of the motorcycle.
9. Layered Clothing: Dressing in layers allows riders to adjust their comfort level depending on weather conditions. Layering also provides extra protection in case of sudden temperature changes or road friction.
10. Back Protector: Some motorcycle jackets come with integrated back protectors, but riders can also use separate back protectors to safeguard the spine from impacts.
It's important to invest in high-quality, well-fitted riding gear from reputable brands that meet safety standards. Properly fitted gear provides the best protection and ensures comfort while riding. Remember, wearing the right gear is not just a matter of personal choice; it significantly reduces the risk of injury and can save lives on the road.
Investing in proper riding gear is a crucial step for every motorcycle rider. From helmets that safeguard the head to sturdy boots protecting the feet, each piece of gear plays a vital role in ensuring safety on the road. Embracing a responsible and safety-conscious approach to riding enhances not only the rider's well-being but also fosters a positive riding culture. So, gear up, ride smart, and make safety a top priority on every journey!
Mastering Two-Wheeler Safety: Essential Tips for Personal and Road Security
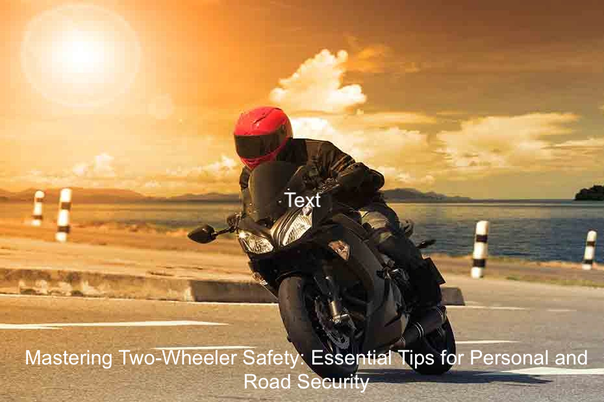
Riding a two-wheeler can be an exhilarating experience, but safety should always be the top priority. Whether you're a seasoned rider or a beginner, understanding how to ride safely is vital for your well-being and the security of others on the road. In this guide, we'll explore essential tips and tricks to ensure a safe and enjoyable journey on your two-wheeler.
How to Ride Two-Wheelers Safely: Tips and Tricks for Personal Safety and Road Security
Riding a two-wheeler, whether it's a motorcycle or a scooter, can be an exhilarating experience. However, safety should always be a top priority for riders. By following some essential tips and tricks, you can not only keep yourself safe but also ensure the safety of others on the road. In this blog post, we will cover valuable insights on how to ride a two-wheeler responsibly, making each journey a secure and enjoyable one.
1. Wear Appropriate Safety Gear:
Before hitting the road, ensure you are equipped with the right safety gear. Always wear a full-face helmet that fits properly, protecting your head and face from potential injuries. Additionally, don gloves, sturdy footwear, and appropriate riding attire to safeguard yourself from road abrasions and impacts.
2. Get Proper Training:
If you are new to riding two-wheelers, consider enrolling in a certified motorcycle or scooter training course. Professional instructors will teach you fundamental riding techniques, road safety rules, and defensive driving skills. Gaining proper training will boost your confidence and make you a more responsible rider.
3. Inspect Your Vehicle:
Regularly inspect your two-wheeler before each ride. Check the tires for adequate pressure and tread, ensure all lights are working correctly, and examine the brakes for responsiveness. A well-maintained vehicle is crucial for safe riding.
4. Ride Defensively:
Adopting a defensive riding mindset can significantly reduce the risk of accidents. Always assume that other drivers may not see you and be prepared for sudden maneuvers from cars, trucks, or pedestrians. Maintain a safe following distance from other vehicles and anticipate potential hazards on the road.
5. Obey Traffic Rules:
Respect and follow all traffic rules and regulations. Adhering to speed limits, stopping at traffic signals, and using indicators appropriately are vital for the safety of all road users. Remember that responsible riding not only protects you but also sets an example for others.
6. Be Visible:
Ensure that you are visible to other motorists, especially during adverse weather conditions or at night. Wear brightly colored or reflective clothing, and keep your headlights on at all times. Visibility is a critical factor in avoiding collisions.
7. Avoid Distractions:
Distractions, such as using your phone while riding, can be extremely dangerous. Keep your focus on the road and avoid engaging in any activities that take your attention away from riding safely.
8. Watch Out for Road Conditions:
Be cautious of road conditions, including potholes, loose gravel, and wet surfaces. Adjust your speed accordingly and avoid sudden movements or aggressive braking on slippery roads.
9. Mind Your Riding Technique:
Practice smooth throttle control, gentle braking, and controlled steering. Overreacting to sudden situations can destabilize your two-wheeler, leading to accidents. Maintain a relaxed posture and grip on the handlebars to enhance stability.
Riding a two-wheeler is a thrilling experience, but it comes with great responsibility. By prioritizing safety and following these essential tips and tricks, you can ensure your well-being and the safety of others on the road. Remember, every ride is an opportunity to enjoy the journey responsibly and create a positive impact on the overall road culture. So, gear up, ride smart, and savor the joy of safe two-wheeler adventures!
Road etiquette is essential for all road users, including motorcycle riders, to ensure safe and harmonious travel. Here are some key road etiquette guidelines that motorcycle riders should follow:
1. Respect Traffic Rules: Adhere to all traffic rules and regulations, including speed limits, traffic signals, and lane markings. Obeying these rules helps maintain order and reduces the risk of accidents.
2. Signal Clearly: Use hand signals and indicators to communicate your intentions to other road users. Signaling helps drivers and pedestrians anticipate your actions, promoting smoother traffic flow.
3. Maintain Safe Following Distance: Keep a safe distance from the vehicle in front of you. This gives you enough time to react to sudden stops or emergencies and helps prevent rear-end collisions.
4. Be Courteous: Show respect and courtesy to other road users. Be patient and avoid aggressive behavior, such as weaving in and out of traffic or tailgating.
5. Avoid Lane Splitting in Unsafe Conditions: Lane splitting (riding between lanes of slow or stopped traffic) can be legal in some regions, but it should be done cautiously and only when safe. Avoid lane splitting at high speeds or in heavy traffic.
6. Use Headlights Wisely: Use your headlights during low-light conditions and inclement weather to enhance your visibility to other motorists. However, avoid using high beams inappropriately, as they can blind oncoming drivers.
7. Be Mindful of Pedestrians: Watch out for pedestrians at crosswalks and intersections. Yield to them when necessary and never ride on sidewalks or pedestrian paths.
8. Be Aware of Blind Spots: Recognize that larger vehicles have significant blind spots. Stay out of these blind spots to avoid being unseen by the drivers.
9. Do Not Ride Under the Influence: Never ride a motorcycle under the influence of alcohol, drugs, or any impairing substances. Impaired riding puts you and others at significant risk.
10. Park Responsibly: Park your motorcycle in designated parking areas and follow local parking regulations. Avoid blocking pathways or emergency zones.
11. Be Mindful of Noise: Motorcycle exhaust noise can be bothersome to others. Keep your motorcycle's exhaust system well-maintained to minimize excessive noise.
12. Share the Road: Motorcyclists are vulnerable road users, so drivers should be considerate and give them sufficient space and time to maneuver safely.
13. Environmental Responsibility: Respect the environment by not littering and minimizing the environmental impact of your rides.
Remember, road etiquette is not just about following rules; it's about being considerate, responsible, and ensuring the safety of yourself and others. Practicing good road etiquette enhances the overall road experience for everyone and promotes a culture of safety and cooperation.
Let's elaborate on the road etiquette for motorcycle riders:
1. Respect Traffic Rules: Motorcycle riders must follow all traffic rules and regulations, just like any other motorist. This includes obeying speed limits, stopping at stop signs and red lights, yielding the right of way when required, and adhering to lane markings and traffic signs.
2. Signal Clearly: Communication on the road is essential for safety. Motorcycle riders should use their turn signals or hand signals to indicate when they are changing lanes or making turns. Signaling early helps other drivers anticipate their movements and avoid potential collisions.
3. Maintain Safe Following Distance: Motorcycles have shorter stopping distances than cars, but riders should still maintain a safe following distance from the vehicle in front of them. This provides enough time to react to sudden stops or obstacles on the road.
4. Be Courteous: Being courteous on the road goes a long way in promoting a positive driving environment. Motorcycle riders should avoid aggressive behaviors, such as tailgating, cutting off other vehicles, or engaging in road rage. Treat other road users with respect and patience.
5. Avoid Lane Splitting in Unsafe Conditions: Lane splitting can be legal in some places, but riders should only do it when it is safe and legal. Avoid lane splitting at high speeds or in heavy traffic, as it can startle other drivers and lead to accidents.
6. Use Headlights Wisely: Motorcycle riders should use their headlights during low-light conditions, such as dusk or dawn, and inclement weather to enhance visibility. However, avoid using high beams when there are oncoming vehicles to prevent blinding other drivers.
7. Be Mindful of Pedestrians: Pedestrians have the right of way at crosswalks and intersections. Motorcycle riders should yield to pedestrians and ensure their safety while crossing the road. Never ride on sidewalks or pedestrian paths.
8. Be Aware of Blind Spots: Larger vehicles, such as trucks and buses, have significant blind spots. Motorcycle riders should avoid lingering in these blind spots to avoid being unseen by the drivers. Be cautious when passing larger vehicles and pass quickly but safely.
9. Do Not Ride Under the Influence: Riding a motorcycle while under the influence of alcohol, drugs, or any impairing substances is not only illegal but extremely dangerous. Impaired riding affects judgment, reaction times, and overall riding abilities, leading to a higher risk of accidents.
10. Park Responsibly: Park your motorcycle in designated parking areas and follow local parking regulations. Avoid blocking pathways, fire hydrants, or emergency zones.
11. Be Mindful of Noise: Loud motorcycle exhaust noise can disturb the peace and cause annoyance to others. Keep your motorcycle's exhaust system well-maintained and avoid unnecessary revving.
12. Share the Road: As vulnerable road users, motorcycle riders rely on the cooperation of other drivers. Drivers should give motorcyclists sufficient space and time to maneuver safely. Motorcycle riders, on the other hand, should be predictable in their movements to help drivers anticipate their actions.
13. Environmental Responsibility: Motorcycle riders can contribute to environmental conservation by minimizing their environmental impact. This includes not littering, avoiding excessive idling, and adopting fuel-efficient riding practices.
Practicing these road etiquette not only ensures the safety of the motorcycle rider but also promotes a culture of responsible and considerate road use, benefiting all road users.
When riding a two-wheeler, such as a motorcycle or a scooter, there are specific traffic rules and regulations that riders must follow to ensure their safety and the safety of others on the road. While traffic rules can vary slightly depending on the country or region, some common traffic rules for riding a two-wheeler include:
1. Obey Speed Limits: Adhere to posted speed limits on different types of roads, including highways, urban areas, and residential zones. Speed limits are set to ensure safe travel and reduce the risk of accidents.
2. Wear Helmets: In many places, wearing a helmet is mandatory for both the rider and the pillion passenger. Helmets provide crucial protection for the head in the event of a collision or fall.
3. Use Turn Signals: Always use the appropriate turn signals or hand signals to indicate your intention to turn or change lanes. Signaling early helps other road users anticipate your movements.
4. Observe Traffic Signals: Stop at red lights, proceed at green lights, and yield at yellow lights, just like any other vehicle. Traffic signals keep traffic organized and prevent collisions.
5. Keep to the Left (or Right): In countries with left-hand traffic, ride on the left side of the road. In countries with right-hand traffic, ride on the right side of the road. Stay within your designated lane.
6. No Overtaking in Dangerous Zones: Avoid overtaking other vehicles at intersections, bends, or in areas with limited visibility. Overtake only when it is safe and legal to do so.
7. Use Rearview Mirrors: Regularly check your rearview mirrors to be aware of the traffic behind you. Being mindful of your surroundings helps you respond to potential hazards.
8. Avoid Distracted Riding: Refrain from using mobile phones or engaging in activities that divert your attention from the road. Focus on riding safely at all times.
9. Keep a Safe Following Distance: Maintain a safe distance from the vehicle in front of you to allow for ample braking time. This distance should increase during adverse weather conditions.
10. Obey Lane Markings and Road Signs: Follow lane markings and adhere to road signs, including one-way signs, no-entry signs, and speed limit signs.
11. No Riding Under the Influence: Never ride a two-wheeler under the influence of alcohol, drugs, or any impairing substances. Impaired riding poses a significant risk to yourself and others on the road.
12. Use Headlights During Low Light: Turn on your headlights during low-light conditions, such as at dusk, dawn, or during inclement weather. This enhances your visibility to other road users.
13. Respect Pedestrians: Yield the right of way to pedestrians at crosswalks and intersections. Be cautious of pedestrians walking near or crossing the road.
Motorcycle riders need to familiarize themselves with the specific traffic laws and regulations in their area and comply with them to ensure safe and responsible riding. Following these rules not only reduces the risk of accidents but also contributes to a safer road environment for everyone.
By implementing the tips and tricks discussed, you can ride your two-wheeler with confidence and ensure personal safety and road security. Remember, responsible riding not only protects you but also sets a positive example for others on the road.
Stay
vigilant, be courteous, and enjoy the freedom of safe two-wheeler adventures!